Anyone who has been in business for a while has probably heard of affiliate marketing. Getting started with an affiliate program and integrating it into a business doesn’t need to be complicated. That’s where Tapfiliate comes in, a service designed to take the difficulty out of creating your affiliate program.
But what is Tapfiliate, and how does it work? We will look at those questions and more in this Tapfiliate review and discuss some of the benefits of the software.
Tapfiliate Review – What Is Tapfiliate?
Put simply, Tapfiliate is a software tool that aids businesses in creating, tracking and managing their affiliate marketing programs.
So what is affiliate marketing? Affiliate marketing is a concept seeking to turn typical word-of-mouth advertising into a partner program. With affiliate marketing, an ‘affiliate’ (or ‘publisher’) gets paid a commission for any sales they generate through their unique affiliate link.
Companies seek to partner with content creators, websites and influencers, or people within a specific industry to promote their products or services. There are several different types of affiliates that you can choose to drive more sales to your company.
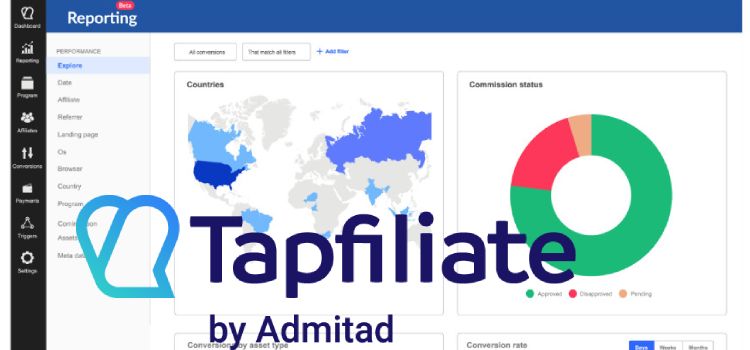
These programs have a wide range of benefits for businesses. You can drive revenue, ROI and increase conversion rates and traffic. You can easily monitor success using their reporting and intuitive dashboard. It also allows affiliates to receive percentage-based commissions.
With Tapfiliate, you create the affiliate program as you see fit, and the software will help with the rest.
Since Tapfiliate designed the software with the web in mind, it is full of useful features for businesses relying on the internet for sales. Tapfiliate has integration with over 30 eCommerce platforms, including WordPress. With Tapfiliate in your arsenal, you can set up a WordPress affiliate program in no time.
Some of the Tapfiliate available integrations.
Tapfiliate also boasts use by over 200 companies today. Some companies using the tool include Degiro, Selz, Kickresume, and Sendinblue.
Is Tapfiliate good for your business? That depends on several factors, including the company’s size and revenue.
Larger businesses with strong brand can benefit from using this affiliate program management software.
Smaller organizations, startups, and companies with little web presence may not make the most of the product and may not see enough return on investment for the service.
Tapfiliate Features
With the broad overview out of the way, we can look at some of the highlighted features of Tapfiliate.
Create Your Affiliate Program
The most critical feature of Tapfiliate is its ability to help businesses create their affiliate programs. There is no Tapfiliate branding on your signup page and in your affiliate’s portal, allowing your business to use its own branding for the affiliate program. This keeps your brand front and center.
Easily Register New Affiliates
An essential aspect of any affiliate campaign is the easy onboarding of new affiliates.
Tapfiliate has many features that make it easy to get affiliates to promote your brand. Aside from being simple to sign up for, the program also distributes essential marketing information to affiliates.
Tapfiliate gives new affiliates a tutorial on its many features, allowing them to hit the ground running. The tutorial information also relieves pressure from the business, as they won’t have to field questions on how to use the system or teach new affiliates the software.
Task Automatization
There are several ways you can automate your workflows and tasks using Tapfiliate. There are integrations with Zapier, Make (formerly Integromat), Mailchimp, and Pabbly. A few examples include adding affiliates to a mailing list, approving or disapproving commissions, or adding an affiliate to a group without manual work.
Create Bonus Commission Structures & Incentives
Commissions and rewards are the backbones of any affiliate marketing campaign. Tapfiliate easily allows businesses to create custom commission structures and add affiliate incentive bonuses.
Businesses can base the rewards on total sales or money made from affiliate links. You can even create groups and modify the commission rates for specific affiliates.
Businesses can also decide between commissions per sale or recurring monthly commissions (for subscription-based businesses). Tapfiliate allows complete control for companies to use when managing an affiliate program.
Affiliates can also take advantage of several of the program’s features. For example, they can quickly check their current sales and see how close they are to hitting the business’s incentives. Tapfiliate’s exciting features are great for any marketing campaign, no matter who uses it.
Simple Affiliate Management
Managing all your affiliates, their commission rates, and various incentives is vital to building long-term relationships with them. Thankfully, Tapfiliate takes the busy work out of all this management. It includes many valuable features that make managing your affiliates a breeze.
The program has built-in reporting tools for brands to track revenue and sales. These tools make rewarding your affiliates a simple process and avoid the hassle of managing it without a service like Tapfiliate.
You can also quickly get an idea of how the campaign is going and its impact on your sales through Tapfiliate. The software contains accurate sales tracking and other stats to show the sales affiliates have referred. It also allows businesses to see which affiliates are driving the most revenue individually.
The program presents all sales data with multiple filters, giving business owners unprecedented information on how well each campaign is working. You can look at stats from the entire year, or instead focus on the previous month or week to see the current sales status.
How Does Tapfiliate Work?
Tapfiliate allows you to create your affiliate program and add all your affiliates in a single place. It can be directly integrated into most eCommerce platforms, including WordPress.
Once you’ve purchased a subscription to Tapfiliate, you can begin managing the various aspects of your campaign all in one platform.
A first-time user will need to integrate with WordPress using the plugin, set up the commission structure, and any custom domains the campaign will use. You can then look over the automation tools and affiliate tracking systems in Tapfiliate. Affiliate links are automatically generated when an affiliate is approved to your program.
Tapfiliate also provides documentation created by experts, a free webinar, and customer service to help users get the most out of the platform. Online customer support is available to answer questions.
Integration With WordPress
With minimal effort, you can directly integrate Tapfiliate into the WordPress client. Once you’ve signed up for an account, you can download the Tapfiliate plugin on the official WordPress site.
With the plugin installed, you should see a Tapfiliate option in the settings menu on the WordPress site. Click on it and input the account ID Tapfiliate gave you when you signed up. From there, you can choose the features you want to use.
Tapfiliate provides a comprehensive article that breaks down the features you can integrate into WordPress. The report contains numerous codes and shortcuts to add tracking features to your campaign.
Tapfiliate boasts flexibility and easy use for any online business, and its simple integration with many eCommerce platforms is a big selling point.
Pricing Structure
There are three pricing tiers for Tapfiliate: Essential, Pro, and Enterprise.
Tapfiliate sells the Essential Plan for a price of $89 per month. This plan sets you up with the most necessary features of Tapfiliate, such as real-time reporting, category-based commissions, and automation features. This plan also has no transaction fees.
Pro is slightly more expensive, retailing at $149 a month. Aside from everything found in the Essential Plan, it also adds the ability to create custom domains and bonus incentives for affiliates. This plan also allows you to add up to five additional team members who can manage the campaign if you permit them.
The final plan is the Enterprise plan. It does not list a price, and you need to contact them to enquire about the pricing details. It includes single sign-on, unlimited tracking, and premium support for users.
The Essential and Pro plans both come with a 14-day free trial. The company won’t charge you while using the trial, and you can cancel or upgrade the program at any time during those 14 days.
Tapfiliate also has a 30-day money-back guarantee, beginning at the end of the free trial. You can also upgrade, downgrade, or cancel your plan at any time.
Customer Service
If you find yourself trying to wrap your head around a feature or concept in Tapfiliate, the company offers customer support. You can reach customer service by either email or live chat. Tapfiliate says they have a 93% customer support satisfaction rate.
The website also contains a frequently asked questions page. For users who want a more hands-on demonstration of Tapfiliate’s features, they also offer a webinar to see features demonstrated.
Tapfiliate Pros & Cons
As with any product, there are positives and negatives to using Tapfiliate. We will look at a few now.
PROS:
A free 14-day trial
Plenty of customization options
Works with most eCommerce platforms
Automation options to handle the busywork
Useful for both businesses and affiliates
Reward structure can be easily altered, and incentives can be added
Lots of integrations
Functionality for referral, affiliate, and influencer marketing
Easy onboarding
Effectively tracks sales
Powerful analytics dashboard
Portal is available in multiple languages
Possible to make white-labeled affiliate pages
Great customer support
Multiple setup guides
CONS:
Learning curve when you first start
The price might discourage smaller businesses
Tapfiliate Review Verdict
Several affiliate marketing programs have been popping up as the concept becomes more popular. Tapfiliate is one of the best platforms available for affiliate and influencer marketing programs, and this fantastic product has plenty of positive reviews. Across the web, it has received several four- and five-star reviews.
This program sets itself apart from the rest of the pack with customization options and ease of use.
It can integrate directly into any of the powerful platforms for eCommerce. Users can also customize the reward structure for their affiliates, and the program allows businesses to create incentives for high-performing affiliates.
As an alternative to Tapfiliate, you can use the WooCommerce affiliate plugin (if you use WooCommerce).
AUTHOR BIO:
Darya Jandossova Troncoso is a photographer, artist, and writer working on her first novel and managing a digital marketing blog – MarketSplash. In her spare time, she enjoys spending time with her family, cooking, creating art, and learning everything there is to know about digital marketing.
Tapfiliate
Pros
Option to make white-labeled affiliate pages
Available in multiple languages
Great analytics dashboard
Vast amount of features
Free trial option
Lots of integrations
Works with most eCommerce platforms
Cons
Not for every business from pricing standpoint
Learning curve
DISCLOSURE: Posts may contain affiliate links. If you buy something through one of those links, I might get a small commission, without any extra cost to you. Read more about it here.
Forms and banners aren’t the only strategies to get new customers and keep them around. With Claspo’s drag-and-and-drop interface, companies can easily build completely customizable popups.
Anyone can benefit from Claspo’s services, regardless of their website’s size or niche. By using its user-friendly tools, you can increase engagement and the amount of time visitors spend on your site.
Using the widgets provided, Claspo can help you maximize the site’s potential and increase traffic. Many functions are packed into these widgets while still making them simple to use.
You can use them to advertise certain areas or features of your site, convert site visitors into customers, create polls and surveys, and increase the number of people who sign up for your newsletter.
In this Claspo review, you will find out more about the tool’s features and how you can utilize them.
Claspo Review
The Claspo is a one-stop platform that anyone can use. Even beginners can easily create stunning popups.
Setting up trigger actions, website pages or sections, and other factors is up to the user. Use a Claspo widget to display popups, collect data, and track the results of your marketing activities.
You can use available ready-made templates to create popups. Then you just change things like background, font size, color, padding, and other design aspects. You can add various elements such as forms, gamification, call-to-action buttons, animated buttons, etc.
Optimize your popup to make it fit the screen of any device.
Various widget styles.
Easy to use editor.
The ability to control when and how visitors view popups.
Customizable elements.
Display campaigns at designated time intervals.
Exit-intent popups or welcome popups.
Widgets can be triggered based on how far down the page the user has scrolled.
Analytical tools allow you to keep track of conversions for widgets.
A username, email address, and password are all you’ll need to open a Claspo account. Additionally, you can sign up with Twitter, Google, or Facebook.
Integrating with CRM, CDP, or other available tools allows you to personalize popups and boost their effectiveness.
Connecting Claspo Widgets To Your Site
Popup widgets from Claspo can be instantly added to the site using one of the following methods:
Google Tag Manager (GTM)
WordPress
Adding Widgets Using GTM
When you use Claspo to design a popup widget tailored to your activities and objectives, you are provided with a script. You must include that script into your website using the tag management system known as Google Tag Manager.
Adding Widgets In WordPress
There are several ways to integrate the script into your WordPress site:
Use Insert Headers and Footers plugin to add the script to the entire WordPress site. Every page of your website will now have the new code automatically loaded.
Manually add the script to your WordPress files and insert it in locations such as header, footer, specific page, or post.
Use a Code Embed plugin to select the location in the content where to embed the script.
Layout Types
Currently, there are three layout types available:
Inline – The widget is incorporated into any element of the webpage.
Floating box – The widget will stick to the top or bottom of the page without blocking content.
Popup – There are several popup types. Lightbox popup (a huge message on top of the website with a darker background), Informer popup (attention-grabbing popup banner to inform visitors or notify), Slide-in Scroll Box (a small slide-in message), Inline popup (message built into the page), Popup launcher (mini version of popup).
There are also placement options for inline.
Claspo placement options.
Coming soon layouts:
Sidebar forms – Contact form on the side of the page.
Full screen – Popup that covers the entire screen.
Content locking forms – Hide content behind content lock, and users will need to perform a certain action to unlock.
Multi-step forms – Divide forms into multiple pages.
Gamification – Invite visitors to spin the wheel for a certain reward.
Display/Trigger Settings
There are available various trigger options (when will popup appear):
Scroll Trigger – Display popup when the user reaches a particular % of the page.
Exit-Intent Trigger – Use a popup message to make an attractive customized offer to clients who show indicators of leaving your site.
UTM Parameters – Your visitors’ UTM parameters can be used to create a personalized message for them.
Timed Delay – To ensure that visitors have enough opportunity to look around, set time constraints.
Click Trigger – Use the elements’ characteristics (class, ID, link) to trigger popups.
JavaScript Trigger – You’re only limited by your creativity when it comes to JavaScript customization.
Frequency – Adjust the number of times a popup message appears and the number of times it repeats.
Newsletter Subscriber – Show newsletter to those who haven’t yet subscribed and not those who have already done so.
New Visitor – Show a nice popup message with a personalized offer (coming soon).
Page-Level Targeting – Display popups only on selected parts of the site.
HTML Elements – Embed the required HTML elements from the page to customize the triggers.
Flexible Setting of Display Conditions (and/or) – Claspo Advanced Rule Engine can be used to help you develop a set of rules for popups that have two triggers.
Campaign-Scheduled – Using a campaign-scheduled popup is a great way to promote a new product or service on a certain day or time (coming soon).
Some of the available trigger options.
Integrations
Claspo can be integrated with third-party tools.
Currently supports integration with Zapier using hooks, ActiveCampaign, Klaviyo, Mailchimp, MailerLite and SendGrid.
Analytics & Insights
Under the analytics tab, you will find valuable statistics about popup performance, such as:
Impressions and views
Subscription conversions
Conversion rate
Google Analytics (Events)
Desktop/Mobile statistic
The features that are yet not available but will be soon:
Top Converting Widgets
Control – See how various messages perform compared to the popup-free website version.
Lift test – Do you require evidence that your popups influence buyers’ behavior? Do a test to investigate the shift in conversion rate.
Goal Tracking – Set up statistical goals that help you get insights into customers’ behavior and track them.
A/B Testing – Perform A/B tests to see how each popup performs.
How To Create Widget Using Claspo?
When creating widget, you need to add name, select goal and layout type.
In the next section, you will select style options that suit you best.
Then you can choose to from available ready-made templates. Currently, the choice is in not big.
In the last step, you can customize popup further using editor.
Drag and drop editors allow you to personalize a chosen template to your heart’s content. Options for personalization include:
Undo/Redo – Mistakes are bound to occur. Callaspo’s ability to undo or redo activities will be helpful to everyone while customizing popups.
Duplicate elements – Duplicate the objects like input fields, images, or text in one click.
Mobile view editing – Use mobile-friendly forms like compact popups, sliders, or sticky bars.
Adjustable size & layout – Place the photographs in the popup and adjust their dimensions. There are various ways to include them into your design, whether to make them bigger or smaller, turn them into a centerpiece, or put them into the background.
Custom success message – Customize your success message.
CTA boosted – Use CTA-boosted components like dynamic buttons and inputs.
Templates library – Claspo comes with ready-made templates. Currently, only 4 templates are available. More coming soon.
Built-in image editor – Change the size, add elements and text in the builder to allow you to render the images while creating your popup (coming soon).
Countdown timer – The fear of missing out is a strong motivator. Place a countdown timer in your popup to show visitors that the offer will expire soon. Fear of missing out is a great tactic (coming soon).
Video content – Video materials assist buyers in connecting with the core concept of your marketing campaign. They can feel like they’re using or wearing your product, which is an important part of a successful marketing strategy (coming soon).
Setting the theme – Create the same theme for all popup forms to harmonize with your store’s design and color palette (coming soon).
Personal library of custom modules & components – Create a customized library of unique modules and components to quickly and easily create popups of your own design (coming soon).
Customizable input fields – Customizable input fields allow you to receive only the information relevant to the intended use of a particular popup like email, gender, and age (coming soon).
External libraries of icons and stock images – Using Claspo’s built-in external libraries, you’ll have access to a large library of royalty-free pictures and icons for your popups.
Pricing Plans
Claspo currently only offers a free plan. The tool has recently launched, and many features are yet to come. Because of that, only a free plan is available.
There are no time limits to using a free subscription plan. The only difference between plans are limits such as page views, active widgets, sites on which you can use, users, and branded/white label.
When a page is loaded or the URL path, the Claspo tracking module counts a pageview. A second pageview is recorded if a user navigates to a different page and returns to the original page. If a user clicks reload after reaching the page, this is counted as an additional pageview. A pageview is not counted when the query component of a page URL changes.
Claspo Review Verdict
The attention spans of website visitors are quite short. After fewer than seven seconds, they’ve already moved on to the next item on their list. It’s not always easy to turn visitors into long-term customers. People aren’t simply going to sign up for your newsletter. A variety of methods must be used to keep your audience engaged for a longer amount of time.
Popups are not a great experience for users. However, they are beneficial for generating leads, increasing conversion rates, and letting site visitors know about any specific deals or important information. Popups aren’t supposed to be bothersome, but instead, they’re supposed to aid in the growth of your revenue. Popups can only be effective if they are built using the proper tools.
Fortunately, there are plenty of resources for creating popups. Claspo is one such product. It’s a unique set of widgets packaged as an online toolkit, allowing you to create unique popups running on any platform for any site.
Unfortunately, in this state, Claspo lacks many features that other popup tools have. Most of the features in Claspo are yet to be added. This is because it is a newer product and I think it was launched too soon as much work and features are needed. Also, I don’t see anything in upcoming features that would distinguish it from many other established popup builders.
Claspo has potential, but until they release all features, there are better options available such as MailOptin, OptinMonster, Sumo, Thrive Leads, Convert Pro, Brave, Getsitecontrol, and other popular popup builders that have been around for a while now.
Claspo
Pros
Free plan available
Easy to use editor
Various trigger options
Analytics and insights feature
Optimize popup for mobile devices
Various widget styles
Cons
Lack of documentation
Only several available templates
No option to create popup from scratch (blank) instead of selecting template
Many features are yet not available and will be coming soon (it feels like tool was launched too soon)
You need to manually add script to site or use third-party plugins (Claspo doesn’t have its own WordPress plugin which would make things easier)
Not many layout types
DISCLOSURE: Posts may contain affiliate links. If you buy something through one of those links, I might get a small commission, without any extra cost to you. Read more about it here.
Marketing Miner is a cloud-based SEO tool that helps you with your online presence visibility. It will help you find potential search engine queries while performing keyword research, perform SEO analysis of any website, monitor site ranking, keep an eye on competitors, monitor brand mentions, help discover link-building opportunities, etc.
Marketing Miner is packed with various useful features. But is it only good on paper, or it really delivers results? In this Marketing Miner review, I will put it to the test and show you all the features it offers as well as its pros and cons.
Marketing Miner Review
Agencies, freelancers, and website owners will find Marketing Miner to be an invaluable SEO tool. Over 40 features are available to help you improve your website’s search engine rankings, while a friendly interface and bulk data analysis will save you time and effort.
Improve your SEO strategy by collecting useful data insights and analyzing up to 100,000 keywords or URLs in a single click.
Thanks to Marketing Miner plethora of tools, you will develop a successful content marketing strategy, find out which landing pages and keywords bring the most traffic, monitor mentions of your brand and important keywords in your niche, conduct a comprehensive technical SEO audit, discover new link building opportunities to improve backlink profile, etc.
Features:
Create individual analyzes – You can create separate analyses no matter how many domains or keywords you need to get data.
Observe the website changes – You can get a long-term picture of the health of your site by looking at the overall picture. The software monitors the website and sends you an email if something changes.
Easily analyze data – Thanks to profilers, you can get all data with a single click.
Keyword search volume – Reveals the average number of times a particular term is searched for each month. This number makes it easier to identify queries and the frequency with which prospective customers seek them.
Keyword suggestions – Find all the “AutoComplete” recommendations for the term you’re looking. This tool will come in handy when doing keyword research or brainstorming ideas for content.
URL indexing – Discover URLs that aren’t indexed and learn why.
How Does Marketing Miner Work?
Search engine optimization is made easier thanks to Marketing Miner’s ability to assist you in analyzing keywords and selecting those that are most relevant and high quality to your niche.
There are several ways in which the tool can accomplish this, including analyzing search volume and CPC (cost per click) of Google keywords and determining the most relevant landing page or automatic categorization.
With the help of Marketing Miner and a number of its main features, users can monitor their organic search ranking and the performance of websites. They can also find out how competitors perform and what they do to achieve that.
Users can also use this data mining tool to gather and evaluate critical information on the success of their products and services in the marketplace. In addition to allowing them to analyze the rates and pricing, it also allows them to track internet mentions of their brand.
Competitor analysis, rank and keyword monitoring, Google analytics integration, auditing tools, keyword research, mobile search tracking, and link management are just a few of the capabilities integrated into Marketing Miner.
Keyword Research
Marketing Miner keyword research analyzes essential SEO indicators, including search volume, trends, keyword difficulty, CPC, SERP, etc., based on your search query.
Trending keywords allow you to see what other people are searching for in the same area as you. Moreover, the tool also suggests the new keywords that have gained popularity recently.
It’s also possible to look at the content gap to determine your rivals’ keywords.
SEO Audit
If your site has any technical difficulties, this feature can help you fix them. You can analyze the indexing status to understand which parts of the site don’t get traffic.
Another feature allows you to inspect a website’s response codes to detect and fix issues. Use this to identify any broken links on the website.
Marketing Miner can effectively reduce keyword cannibalization in content and thus help you improve online visibility.
Using the search visibility tool, you can get an idea of how much traffic a page or post receives and which are ranking keywords. If there are any technical SEO changes, you will be notified.
Rank Tracking
Marketing Miner rank tracking provides a lot of information about how well your website performs. You can track keyword ranking progress for up to 200 keywords daily or 1,000 keywords weekly per project.
Regarding tracking competitors, you can monitor rankings for up to 5 competitors per project.
Do you want to see how many different keywords you rank for? For every search type, you can evaluate results for up to 100,000 keywords in any area (even local).
Competitor Analysis
Marketing Miner provides a useful competitor analysis feature with information such as the keywords they use to rank and the estimated traffic (analysis based on organic and paid traffic).
You will discover competitor top-ranking pages so you can make data-driven judgments based on that information. Overall, you can get a list of the websites that appear in Google search results as your competitors.
Brand monitoring lets you see what other people say about your competitors. This also closely checks the competition’s website and promptly reports any changes.
Get alerts when your competitors’ websites are updated, like changes in H1, title, structured data, and robots.txt files.
Learn about your competitors so you can always be one step ahead of them. Use your understanding of their strengths and weaknesses to your advantage.
Brand Monitoring
Discover what people say about your brand online and how they react to it. You have the option to rapidly reply to remarks by setting an alert.
The mentions of keywords and phrases relevant to your niche are also tracked, so you’re always on top of the trends.
Link Building
Improve your backlink profile by finding new link opportunities. When a link is removed from a site, you will get an email alert so you can immediately contact the site owner.
Improve your outreach efforts by learning about fresh backlink possibilities and gaining practical insights. Marketing Miner will scan the top 60 search results for terms relevant to your niche to help you discover new prospects.
Enter domains or URLs to discover websites that rank for organic keywords you are targetting. You can establish new business relationships and/or backlinks by connecting with them.
Find contact details like social media and emails for websites you wish to connect with. Up to 100,000 domains can be analyzed in a single go.
Analyze estimated search traffic for specific pages. This will help when deciding whether or not you should concentrate on link-building opportunities. Enter a URL to see how well it ranks in search results.
API
The API helps you to extract data without manually logging into the tool. It provides over ten endpoints, such as keyword suggestions, search volume, etc., to extract data.
When working with large amounts of data, it’s important to access current and correct information. The REST/POST APIs are flexible and support working on your own dashboards or applications.
Bulk Data Analysis
There are more than 40 tools to examine data for up to 100,000 domains, URLs, or keywords in a matter of minutes.
Pricing Plans
Marketing Miner offers five pricing plans tailored for small- to mid-sized businesses and enterprises. Plans are Free (Minee), Miner, Digger, Machine, and Custom plan. The Minee plan is free and comes with a thousand credits per month. It is very limited compared to other plans.
Miner plan costs $29/month and includes 100,000 credits and one project with 200 monitored keywords. Digger monthly subscription fee is $59 and includes one million credits. Each project can have up to 200 monitored keywords.
With the Machine plan, you get two million credits a month for $99. The plan covers up to 20 projects, with a total of 200 keywords tracked per project.
With Custom plan, you create your own needs and select how many credits and projects you need. You can learn more about the price and features of each plan by visiting the Marketing Miner pricing page.
Marketing Miner Pros & Cons
Here are some of the advantages and disadvantages of using Marketing Miner.
PROS:
Because it is all-in-one software, you won’t need any other SEO tools in addition to it.
It provides SEO experts with useful information.
Compared to other tools of a similar purpose, this one is quite affordable.
The data provided is correct and reliable.
The keyword analysis function provides you with valuable information about the requirements and preferences of your target audience.
It provides notifications in real-time.
It can handle a substantial volume of data without any problems.
It provides reports that are easy to understand and straightforward.
Provides bulk data analysis.
Offers a free version.
Option to monitor keywords ranking.
CONS:
Because there are so many different functionalities, the user interface may seem cluttered at times.
The final reports may sometimes appear technical for the novice.
The free version has many restrictions.
Marketing Miner Review Verdict
Everyone can benefit from Marketing Miner’s ability to gather detailed and precise data for use in keyword research, SEO, and digital marketing. The software package includes all the tools you’ll need to boost your SERP ranking, strengthen, and fine-tune your marketing approach.
The main feature of Marketing Miner is that it provides accurate and dependable data. There’s no better software out there than this one since it can work with a vast amount of data simultaneously. Most of the reports are straightforward and simple to understand.
Marketing Miner provides a free plan, so you can start with that and see how the tool suits your needs. You can always upgrade to one of the paid plans when ready.
As alternatives to Marketing Miner, you can check Serpstat review, SpyFu review, Semrush review. Or if keyword research tools are what you are most interested in, I suggest you rather check my KWFinder review, Long Tail Pro review, and Keyword Revealer review.
Marketing Miner
Pros
Free plan available
Useful brand monitoring tool
Comes with keyword research feature
Find the keywords your competitors rank for
Get the full picture of your website’s performance
Run a comprehensive SEO audit and discover technical issues affecting site
Discover new link building opportunities
Cons
Free plan has many restrictions
Novice users can be overwhelmed with all data
DISCLOSURE: Posts may contain affiliate links. If you buy something through one of those links, I might get a small commission, without any extra cost to you. Read more about it here.
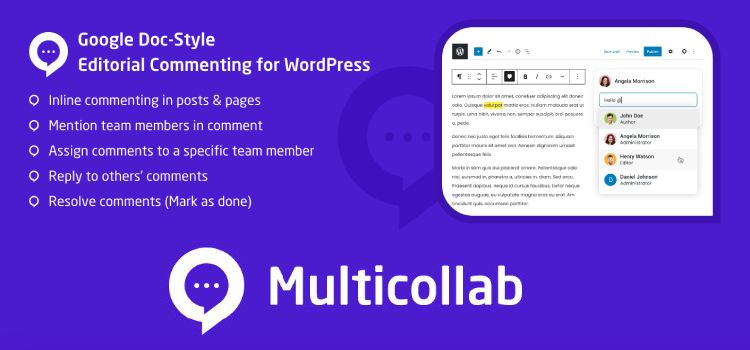
Are you looking to improve your WordPress publishing workflow? Then Multicollab is a plugin that will make your life way easier. The plugin uses Google Docs features, like inline comments, right from your site WordPress editor.
Your writing team can add remarks on particular media or text, respond to and resolve comments, provide suggestions instead of direct edits, etc.
It’s like using Google Docs’ collaborative capabilities inside your WordPress dashboard.
Using the Multicollab plugin, you can avoid the time-consuming process of writing content on one platform, having content reviewed and approved, and then posting content as a blog post in WordPress.
In this Multicollab review, I will walk you through the ins and outs of using Multicollab so that you can see if it’s a good fit for your WordPress editorial workflows.
Multicollab Review
Multicollab is a Google Doc-style editorial commenting plugin that makes it easier and quicker to share editorial feedback. It works with Gutenberg editor, allowing you features like the ones Google Docs provides. This plugin enhances the publishing process making it easier for writers to use Gutenberg.
Thanks to this plugin, reviewing content in the Gutenberg editor has never been easier. Multicollab offers the capability of adding inline comments, suggestions, automatically emailing the suggestions, etc.
The plugin allows adding inline comments in posts and pages the same way you would when using Google Docs.
You can add comments to any part of content inside the Gutenberg editor, including text and media. Apart from mentioned, you can comment on the following type of blocks: table, list, headings, verse, quote, pullquote, button, audio, file, video, gallery, and cover.
You can add comments during the post-draft and editing stages. In the free version, you can add inline comments only on text. Plus and Pro versions of the plugin add an option to add comments to any part of content. The plugin can also be used with custom post types.
Reply & Resolve
You can respond to existing comments inline, just as you can to new ones. You can also mark it as resolved after you’re done. When responding to an existing comment, you can use this handy feature to add or modify your response quickly.
A single comment can be replied to by several team members and resolved by anybody at any time.
Suggestion Mode
The suggestion mode allows you to add suggestions without permanently editing the content.
If you make changes in the suggestive view, they will appear as recommendations instead of being immediately added to the content, as they are in editing mode.
Suggestions can be accepted or rejected. It’s a lifesaver when you’re reviewing someone else’s work for quality assurance.
Direct Comment Linking
If you want to share a specific comment with someone, you can click the three dots icon to generate a link that will take people straight to that comment in the editor.
You can set that a certain user sees and handles the comment. To assign someone, use the ‘@’ symbol followed by their name. As you write the name, a selection of people with the appropriate user roles will appear, from which you can choose the one to whom the comment should be assigned.
An automated email will be sent to the specified team member, informing them about the comment. As a result, even if the user isn’t on the site or aware of the comment, he’ll be notified.
You and your team can mark and comment on any areas that require attention, whether it’s an image or a part of the text.
To improve the editorial process, Multicollab pro gives you the ability to tag, assign, and comment precisely where you need to, whether you want to leave comments on video, audio, gallery, or image.
Email Notifications
When someone is tagged in a comment, they will automatically receive an email notification. This is a great feature that will allow to increase efficiency and decrease turnaround time.
You won’t have to worry about your or team members missing anything.
Gutenberg Integration
The plugin is built specifically for the Gutenberg editor. You won’t be able to use the plugin with the classic editor.
User Roles & Accesses
With Multicollab, you can grant certain users permissions to add and resolve comments and suggestions. It gives you a simple editor to enable/disable those capabilities depending on the user roles.
This means you can enable writers to post comments and reply to them, but only editors can resolve them and approve suggestions.
You have complete control over who can access each feature and participate in the project.
View Reports & Timelines
There are many helpful reporting features included in Multicollab. You can view timelines of all the activities:
With the free plugin version, you get a summary for an individual piece of content inside the editor.
The pro version provides a single dashboard that shows all activities.
You can see activities and summary in the page/post editor.
Having all of your adjustments, comments, and feedback in one place is possible thanks to the Advanced Dashboard. It consists of Activity Timeline and Activity Snapshot that gives you a different perspective on things by showing you a breakdown for each post.
The number of editorial comments is also shown in a column in the Posts and Pages list.
How To Use Multicollab?
After installing and activating Multicollab, you’ll automatically see it when you open the WordPress editor. The Multicollab option will be available in the editor’s toolbar, allowing you to access all of the settings from the sidebar.
When you’re re-writing based on suggestions and comments, you can hide comments so that they don’t present a distraction.
Open any post in the Gutenberg editor, and you will see the MultiCollab icon at the top right corner. Clicking the icon will open the activity center and settings.
A portion of the text must first be selected before you can post a comment. Then click on the drop-down icon and choose the comment option.
Like in Google Docs, you can type your comments and save them by clicking the Save button.
You can edit comments anytime by using the pencil symbol in the comment box’s upper right corner. You will notice a trash can symbol next to the pencil icon, which is used for deleting the comment.
To resolve a comment, click on the checkbox at the top of the comment pop-up. Responding to comments is also easy. Just type in the comment and press the reply button.
If your blog post has a lot of comments and you want to check it without having to go through them all, you can disable the ‘Show all Comments’ option by going to the Multicollab icon > Settings. This will temporarily hide all comments.
Multicollab allows you to see all open and total comments in a listview in the WordPress admin dashboard when you go to the posts or pages display.
Using this summary, you can quickly check how many comments still need to be reviewed for a particular article.
Multicollab Pricing
Using a freemium pricing model, Multicollab offers a forever free plan and then two paid plans.
The free plan supports the following features:
Comments only on text
Assign comments to team members
Tag team members
Reply to comments
Resolve comments
Copy and share links
Activity center
If you want more features, you will need to go with one of the paid plans:
Plus – $199/year (all features from the free plan plus comment on text and media, manage permissions, email notifications)
Pro – $499/year (all features from previous plans plus suggestion mode and advanced reporting dashboard)
The Pro plan also provides faster support response times (within one business day compared to 2-3 business days in the Plus plan). For a detailed feature comparison between the pricing plans, you can check the pricing page.
Multicollab Review Verdict
There are many helpful tools when it comes to writing content. Tools like Grammarly, Trinka and ProWritingAid can help you with proofreading the content while Multicollab offers Google Doc style commenting features to speed up content creation workflow.
Moving a post between different text editors is a waste of time. Most teams require efficient collaboration tools when it comes to comments, assigning tasks, suggestions, and resolving issues when writing content. For bigger editorial teams, Multicollab is a handy plugin.
Working in the native WordPress editor using the Google Docs collaboration capabilities is now possible with Multicollab.
If all you want to do is use the comment feature on the text and are satisfied with the basic features, the free version will be enough for your needs. However, if you need features like permission control, suggestion mode, email alerts, and more extensive reporting, you’ll need to upgrade to a paid plan.
Multicollab is unnecessary for a solo blogger who doesn’t need to work with anybody else. But this plugin is a worthwhile investment in the long run when it comes to bigger teams.
If you want to try Multicollab, you can either install the free version or take advantage of the 14-day free trial for the premium plans.
Multicollab
Pros
Free plan available
Leave comments on text, media, video, etc.
Suggestion mode
Easy to use
Manage permissions
Email notifications
Assign, reply, resolve comments
Cons
Little pricey if you want to get all features
DISCLOSURE: Posts may contain affiliate links. If you buy something through one of those links, I might get a small commission, without any extra cost to you. Read more about it here.
Wondering how to sharpen blurry videos for optimal quality? Looking to give your old videos and movies a boost in quality? AVCLabs Video Enhancer AI is just the tool you need.
This professional AI-based video enhancing and upscaling tool can take your videos to new heights, boosting quality and resolution up to 4K or even 8K.
Using cutting-edge multi-frame super-resolution technology, AVCLabs Video Enhancer AI can make even the oldest videos look better than ever. So don’t let your precious memories fade and give them new life.
What Is AI-Based Video Sharpening?
To put it simply, sharpening a video is the process of increasing the clarity of a video by improving the visual contrast between adjacent pixels in the image.
In most cases, the visual contrast between pixels decreases with time. That’s why old videos often look blurry and less detailed compared to the original – the visual contrast between pixels decreases over time, making the image less detailed.
The main goal of sharpening a video is to increase the visual contrast between pixels. This can be achieved by increasing the brightness of a video – the brighter the video, the higher the visual contrast between pixels.
As video sharpening is a complex process, it can’t be done manually. And even if it could be done manually, it would be tedious, time-consuming, and require a lot of skill. That’s why, when you try to sharpen a video manually, you must use many different editing settings, like contrast, brightness, etc. This can be frustrating, especially if you don’t have any experience with video editing.
What Kind Of Videos Can Be Sharpened?
AVCLabs Video Enhancer AI works great with all kinds of videos, including old videos, 4K videos, 8K videos, and even VR videos. It doesn’t matter if your videos are blurry or have low visual contrast. AVCLabs Video Enhancer AI can make them look crisp and visually appealing.
AVCLabs Video Enhancer AI works with all kinds of videos, regardless of their resolution. However, low-resolution videos, such as VHS tapes, are likely to be beyond the help of any video processing tool. If you digitize your VHS tapes and convert VHS tapes to a digital video format, you can sharpen the old, blurry, and low-quality VHS videos.
If you’re wondering what resolution your old videos have, you can easily find out using AVCLabs Video Enhancer AI. Open your video in AVCLabs Video Enhancer AI, and you’ll see the resolution of your video.
How To Sharpen A Blurry Video With AVCLabs Video Enhancer AI?
AVCLabs Video Enhancer AI is a powerful and professional video quality enhancement and resolution upscaling tool based on the latest AI technology.
It can boost the quality of old videos and movies and upscale resolution up to 4K or even 8K with its multi-frame super-resolution technology, making your videos look more clear, sharp, and lifelike than ever before.
Whether you are a professional videographer or just a casual video lover, AVCLabs Video Enhancer AI is the perfect tool to make your videos look their best.
Steps To Sharpen Blurry Videos
Before sharpening your video, make sure you’ve downloaded and installed AVCLabs Video Enhancer AI on your computer. For this tutorial, we’ll be working with the Windows version of the program, but the process is similar on Mac computers.
AVCLabs Video Enhancer AI works in two stages – video processing and video export.
First, you need to import your video into AVCLabs Video Enhancer AI.
To do that, simply click the “Browse” button on the main interface of AVCLabs Video Enhancer AI, and select your video from your hard drive.
You will see detailed information about the original video on the top of the display. It displays the resolution, FPS, and duration of the clip.
All you need to do now is select the AI Upscaler option from the Feature List. Check the Upscale box under the Model Settings menu, then select a model according to your need.
Four model options are available: Standard, Ultra, Standard (Multi-Frame), and Ultra (Multi-Frame).
Then you’ll need to choose the video size and output format and confirm your Save Directory.
You can choose the video size as a percentage from 100% to 400%, and you can also set the resolution directly as 720p, 1080p, 2K, QXGA, Quad HD, WQXGA, UHD, 4K, or 8K. The program supports exporting the enhanced video to MP4(H.264), AVI(Uncompressed), MP4(H.265), MKV(H.264), MKV(H.265), MOV(ProRes 422HQ) format.
After all the preparation work is done, simply click on the Start Processing button to automatically sharpen your blurry video.
You can zoom in to preview the details while sharpening the video.
Note: You can click on the Pause button to pause the sharpening process if the computer needs to be occupied for other tasks and resume it when the computer is available.
After the video processing is complete, click the Open Output Video tab to find and check your newly processed and sharpened video.
AVCLabs Video Enhancer AI Review
AVCLabs Video Enhancer AI is a powerful AI-based video enhancing tool that can take your videos to new heights.
Using cutting-edge multi-frame super-resolution technology, AVCLabs Video Enhancer AI can make even the oldest videos look better than ever.
AVCLabs Video Enhancer AI is capable of adjusting multiple settings, including brightness, contrast, saturation, and hue. And with its built-in AI models, you don’t even have to know what these settings do – the program will handle everything for you.
User Interface
Unlike other traditional video editing software such as Adobe Photoshop, AVCLabs Photo Enhancer AI has an intuitive operating interface that you can find a ‘Browse’ button on the main interface when launching the program. Users can easily upload a video they want to improve even though they don’t read the product manual.
After you have uploaded the video into the program, you will find 4 main settings on the right panel of the program, including AI Feature List (AI Upscaler, AI Face Blur), Model Settings (Upscale, Denoise, Face Refinement), Video Settings (Brightness, Saturability, Contrast), Output Settings (Video Size, Export video format, video save path).
Powerful Multiple Built-In AI Models
AVCLabs Video Enhancer has four built-in AI models that can be used for video processing. The AI models can be selected from the “Feature List” and “Model Settings” drop-down menu, located in the right panel of the program’s interface.
The four AI models available in AVCLabs Video Enhancer AI are:
Upscale – Intelligently upscale videos from 480p, 720p to 1080p, 1080p to 4K, and 8K, without destroying the details and degrading the quality.
AI Face Blur – Support adding blur to a moving face in a video to protect privacy while maintaining the video’s quality.
Denoise – Enable you to denoise the old TV series, movies, home videos, surveillance videos, and so on, and ensure the preservation of texture quality and details as much as possible, leading to better visual experiences.
Face Refinement – Work pretty well in sharpening blurry faces from low-quality videos and enhancing facial details, retouching faces in videos, and beautifying portrait-style footage for sharing on social media like Instagram story or Snapchat.
Fine-Tuning Settings
Most of the settings used in video processing are fine-tuning settings, which are applied when you select a particular AI model.
To select a particular AI model, simply navigate to the Video Settings drop-down menu. Fine-tuning settings are the settings that can be adjusted individually, and they include brightness, saturability, and contrast. These settings can be adjusted using the slider below the Video Settings drop-down menu.
GPU & CPU Adjusting Settings
In addition to adjusting video processing settings, you can also adjust computer processing settings.
Click on the “menu” button on the top right corner of the program and then select the Settings option. A settings dialogue pops up where you can change the Performance Settings.
You can choose the AI Processor to determine what hardware (GPU or CPU) will be used by the application when processing a video.
These settings are especially useful if you have an old computer or you’re trying to save processing power, as they allow you to reduce the load on your computer’s central processing unit.
System Requirements
AVCLabs Video Enhancer AI is fully compatible with Windows PC and Mac computers. It works with Windows 11, Windows 10 (64bit), Windows 7 (64bit), macOS 10.15, and above.
Using Apple M1 Chip. NVIDIA Video Card (GeForce GTX 1650 and later, and RTX 30 Series are perfect) is highly recommended.
Pricing Plans
AVCLabs Video Enhancer AI can be used for free if you don’t mind the watermark that will appear on the bottom of your processed videos.
To remove the watermark, you can upgrade to the 1-Month Plan for $39.99 per month, the 1-Year Plan for $119.95 per year, or the Lifetime Plan for $299.90/lifetime.
Each subscription plan has no limit to the number of videos enhanced. For monthly and annual subscriptions, users can cancel the plan any time before the renewal date if users do not need the program anymore.
Before purchasing the program, users can test the full features of the program using the free trial version.
Pros & Cons
Here are the advantages and disadvantages of using AVCLabs Video Enhancer AI:
PROS:
Simple user interface.
Intuitive controls and settings.
Easy-to-use AI models, user-friendly for beginners who are not good at editing videos.
A dedicated Face Refinement model helps enhance facial details and sharpen a blurry face in a video.
Fine-tuning settings are available for video enthusiasts to enhance videos better.
Multiple input and output video formats are supported.
Affordable pricing plans.
CONS:
For some videos, it might take a bit longer than usual.
Only available on Windows and Mac.
AVCLabs Video Enhancer AI Review Verdict
AVCLabs Video Enhancer AI is a powerful yet easy-to-use video-processing tool. It uses the latest AI technology to enhance your videos and make them look better than ever.
Whether you just need to make a video look better or you need a powerful video solution that can upscale your videos to 1080p, 4K, or even 8K, AVCLabs Video Enhancer AI is the right solution for you.
A user-friendly interface and easy navigation layout make it easier for beginners to get started. Flexible subscription plans and multiple AI models can satisfy users’ different needs.
When you don’t have any experience with video editing, you might think there’s no way to make your videos look their best. However, you can use AVCLabs Video Enhancer AI to process your old, blurry, low-quality videos to look their best.
With this program, you can make your videos look crisp and clear so that your memories will last forever.
AVCLabs Video Enhancer AI
Pros
Simple user interface
Free trial option
Free version available
Intuitive controls and settings
Easy-to-use AI models
Fine-tuning settings
Multiple input and output videos formats
Cons
Only available on Windows and Mac
Free version has watermark
For some videos, it might take a bit long time to process
DISCLOSURE: Posts may contain affiliate links. If you buy something through one of those links, I might get a small commission, without any extra cost to you. Read more about it here.
The MotoPress WordPress hotel booking plugin is one of the most popular solutions available and an excellent choice if you want to add a hotel booking function to the WordPress website.
The plugin is packed with useful features. You get all in one tool for all booking needs. In this MotoPress Hotel Booking review, I will show everything you get and why it should be your number one choice when it comes to hotel booking plugins.
MotoPress Hotel Booking Review
For websites that rent out properties, the MotoPress Hotel Booking WordPress plugin is like having an entire property management suite at your fingertips.
You can list an infinite number of services and accommodations, accept direct online bookings, synchronize all bookings among online travel agencies, etc.
Plugin is ideal for running hospitality businesses like holiday rentals, hotels, apartments, hostels, etc., regardless of the function, size, or cost.
The MotoPress plugin has a wide range of options, making it a popular choice. I will go over some of the most important aspects of the plugin.
Simple User Interface
The MotoPress plugin provides easy-to-use user interfaces. The user interface enables you to manage everything from one central location.
Synchronization With OTAs
MotoPress Hotel Booking plugin synchronizes your website with popular Online Travel Agents such as Booking, Airbnb, TripAdvisor, etc. Customers can also book reservations for your properties using third-party sites. This exposes your property to more traffic.
You can sync with these sites every 30 minutes to ensure you get booking data info in real-time.
Property Presentation
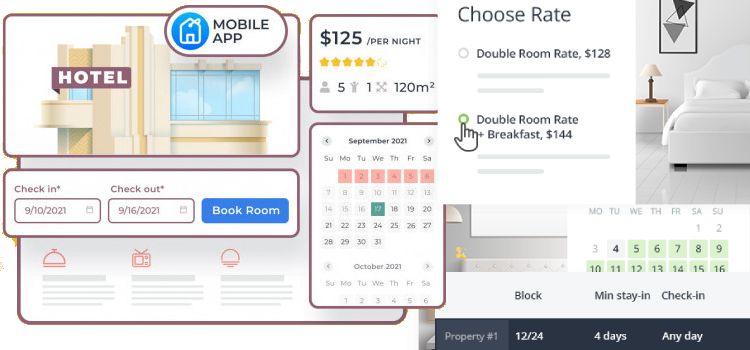
The plugin can be used to rent out an infinite number of properties, or it can be used to rent out a single accommodation (such as a villa, a cabin, etc.). Each kind of accommodation is completely modifiable. You can add a description, facilities, number of guests, bed size, remarks, pricing, and booking system directly to the property page.
You can choose to highlight additional services and packages that are offered for a specific accommodation type.
Easy & Responsive Search/Booking Form
You can create a simple or advanced form based on your criteria. Customers can easily schedule their check-in and checkout dates using the search form.
The form is user-friendly and can be used from any desktop, laptop, tablet, or mobile device.
You can manage many properties and provide your guests with a choice of where they wish to stay. You can add as many variables as you want to the search form by adding features such as room type, price range, etc.
Booking can also be done over the phone and then confirmed by the staff.
Multiple Properties Bookable At Once
Customers can schedule several locations and pay for them all at once using a booking form. Also, you can personalize the booking form to allow the visitor to choose the number of occupants and recommend certain locations or rooms for a specific sort of guest or a specific number of people.
Real-Time Availability Calendars
Thanks to the real-time calendar, customers can choose the days they would like to stay, and they are provided with an immediate response about the availability of the accommodation they want to visit, depending on the day they select.
You have the ability to personalize the color of the status bar to show which days are open for booking and which days have been reserved for each individual property.
Custom Fields
Want to make it easier for customers to locate the best property for their needs? To improve the search experience, the booking widget allows adding as many custom search parameters (filters) as needed to the availability search form (location, kind of accommodation, price range, etc.).
Rate Management
Using the MotoPress plugin, you can set different rates for different seasons, holidays, or days of the week. You can set a higher price during the holidays or lower it on the winter days.
The plugin also provides the capability to set various rates or provide discounts depending on the time length the customer intends to book.
You can add special rates for extras like breakfast, lunch, towels, etc. You can make payment options refundable and non-refundable.
The per-person rate gives you complete control over the pricing depending on the number of visitors (adults and children) sharing a room.
Additionally, using your administration dashboard, you can allow guests to use promo codes they have to save money on reservations. If there are certain taxes or fees (such as service fees), you have the flexibility of adding them, and during checkout, customers get to see a detailed summary of all charges before paying.
If you provide any additional services, such as transportation to and from the airport or room delivery, you can set rates at which this extra services are charged. You have the option of charging per day or visitor.
Payment Options
You can collect payments using a variety of different payment methods. Customers can pay either online or when they arrive at the location.
You have the ability to accept payments made online via PayPal, Stripe (Stripe additionally allows you to receive payments through Bancontact, iDEAL, Giropay, SEPA Direct Debit, and SOFORT), 2CheckOut, BeanStream, Braintree, Bambora, or let guests pay after arrival or via a direct bank transfer.
If there are other payment gateways that are only available in certain regions, you have the option of integrating those payment gateways into your website by using the Woocommerce payment extension. However, you will be required to pay an additional fee for this feature.
Email Notifications
When a guest requests a reservation, you can either send the guest an email confirmation link or have the hotel staff manually confirm the booking from the administrative panel. You can also choose to either accept full payment or a minimum deposit.
When a reservation is made, an email is sent to both the website administrator and the guest with the reservation’s details, status, and any cancellations policies.
Edit the content of confirmation, cancellation, and other email templates. Choose colors, customize text, upload logo, etc.
User Dashboards
Allow customers to create personal accounts so they can easily view current bookings and make future bookings faster.
You have the option of enabling automatic account creation at checkout for each customer, or you can give visitors the option to decide for themselves whether or not they want an account on your website.
Property Management
The administrative panel makes managing properties fast and easy. You can easily set the maximum and minimum length of stay for guests in a particular property.
For specific dates, you can remove property from the booking list by setting no checkout and no check-in days, as well as set limits for when a client can remain on the property.
You’ll see all reservations and pending bookings clearly displayed on the dashboard, and you can export this information as a CSV file.
Revenue Chart
The revenue metrics chart allows you to graphically compare your revenues and booking dates to discover low and high seasons, as well as any form of consistency. In addition, it will allow you to see how much money you’re earning from other services and how much money you’re making after tax.
All information is presented in an easily understandable visual mode.
Booking Reports
Generate booking reports with a single click. Filter the bookings to export by check-in date, checkout date, date of reservation, or total duration of stay to get a CSV file of all reservations made during a particular period of time.
There are a variety of spreadsheet programs that can be used to access and update the reports, including Excel, Google Sheets, etc. Reports can then be printed, stored locally, or sent via email.
Multilingual
The plugin is officially compatible with WPML. The frontend and backend of the plugin are translated into 18 languages: Portuguese, Polish, Russian, Spanish, Turkish, Swedish, Italian, Hungarian, Czech, Chinese, Dutch, French, Arabic, German, Finnish, Bulgarian, Ukrainian, Croatian with more languages on the way.
Compatibility With Page Builders
MotoPress Hotel Booking is compatible with Gutenberg (10 custom blocks), Elementor, and Divi. WordPress Classic Editor is also supported.
You can use the Gutenberg WordPress editor or standard shortcodes to make visual changes to content. Each shortcode comes with a detailed explanation, parameters, and notes.
Theme Compatibility
The styles (the visual component) of the Hotel Booking plugin will be inherited from the current WordPress theme you are using, making it seem to be an organic component of your design.
Hotel Booking Mobile App
Utilize the specialized mobile app provided by the Hotel Booking plugin, you can add and manage reservations via your mobile phone or any other device.
MotoPress provides a free app that is compatible with devices running the Android and Apple operating systems. With this app, you can check the real-time availability of your properties, add reservations, and check information about guests and payments.
Hotel Booking Addons
Using the MotoPress Hotel Booking Addons, you can add even more features such as providing visitors the ability to leave reviews, offering more payment gateways, setting up automated email alerts for payment requests, and collecting email addresses.
If you’re using Divi or Elementor to design your hotel booking website, you can take advantage of free extensions to make sure the user experience is seamless and the Hotel Booking plugin works perfectly with your page builder.
Hotel Booking plugin addons are available for adding custom functionality:
WooCommerce Payments – Increase the quantity of different payment options.
Payment Request – Streamline the process of requesting and collecting rental payments from customers.
Reviews and Rating – Allow visitors to evaluate and review their stay at properties.
Elementor Integration – Assists in the process of creating your hotel website using Elementor.
Divi Integration – Combines the Divi theme with the MotoPress Hotel Booking plugin so that aesthetic modifications can be made to both the content and the styles using the Divi builder.
Hotel Booking Notifier – Send automatic emails that are triggered by events both before and after guests arrive and leave.
Hotel Booking Checkout Fields – You can make changes to the form throughout the checkout process by either changing the existing fields or adding new ones.
Mailchimp Integration – Mailchimp’s robust e-commerce and email marketing automation tools can be used with the Hotel Booking plugin.
PDF Invoices – You will be able to automatically send PDF invoices through email to customers. You can modify the pre-made invoice templates and send them out to your customers automatically, depending on the booking and payment information they provided.
Multi-Currency – Allows you to add a multi-currency widget.
Pricing
The MotoPress plugin comes in a free version (Lite) and a paid version (Pro). The Lite version provides a full-fledged booking function. However, it has restrictions compared to the paid version.
The free version also has a real-time availability form with an intelligent search algorithm and responsive property listings. There is no limit to the amount of properties and services that can be included in a free version. Automatic inventory management is also supported to prevent overbookings.
The Lite version gives you access to numerous currencies, discount coupons, shortcodes, and integration with all other Hotel Booking addons available. In addition to being completely compatible with WPML, the free version of the plugin is already translated to 14 languages.
Pro version is packed with additional features to help you increase sales and boost customer satisfaction. Some of the features you get in pro version include:
Bookings can be synchronized automatically with online travel agencies (exchange calendars through iCal), such as HomeAway, TripAdvisor, Booking, and Airbnb. This will make it easier for you to rent out properties on many platforms simultaneously and prevent you from overbooking.
Priority support through email, live chat, and a forum.
More in-built payment gateways such as 2Checkout, Braintree, Stripe, and Beanstream/Bambora.
Add reservations from the backend.
The ability to change the original booking details, such as departure and arrival dates, booked services, rates, etc.
Different property prices based on the number of guests and nights.
Attributes (adding extra sorting options to the search availability form).
Prices vary not just depending on the duration of time (weekly, monthly, and custom rates) but also on the number of people staying at the property.
For small to medium-sized companies that need the reservation or booking function, the cost of using MotoPress is relatively reasonable when compared to the cost of using alternative booking plugins or booking engines. You can also test the plugin via demo site page.
If you’re looking for a plugin that can work with any form of accommodation, this is the one for you. It provides all the necessary tools to manage an online booking system without costing much.
The administrative component of MotoPress is very straightforward to access and use, so you won’t be swamped with capabilities you don’t need.
Your guests will be able to see precisely what’s available at any given time thanks to the live real-time search availability tool.
Considering the plugin’s features, it is safe to say it is a great choice. If unsure, you can always go first with the free version and see if the plugin fits your needs.
MotoPress Hotel Booking
Pros
Free version available
Channel Management to Sync with OTAs
Real-time availability calendars
Flexible rate and inventory management
Bookable extras and services
Various payment gateways
Manage all booking from one dashboard
Cons
Some features are in form of addons which you need to pay separately
DISCLOSURE: Posts may contain affiliate links. If you buy something through one of those links, I might get a small commission, without any extra cost to you. Read more about it here.
Jasper AI uses machine learning and artificial intelligence for its copywriting processes. It can quickly generate appealing and compelling copy for marketing emails, advertisements, social media posts, website landing pages, blog posts, etc. You can create up to five times as much output in less time.
In this Jasper AI review, I’ll talk about all features that Jasper has to offer and how the tool works. I will mention its pros and cons and conclude if this tool is worth your time and money.
Various content types can be created with the Jasper AI GPT-3 software. Books, YouTube video scripts, school papers, blog posts concentrated on search engine optimization, and other content forms.
Jasper AI isn’t the cheapest AI writer on the market. However, its superior output capabilities, simple user interface, and impressive amount of features can more than justify the cost. You won’t need to hire outside assistance, because you’ll be able to create all the copywriting needs.
User input is what Jasper AI bases its content generation on. It doesn’t randomly pick content from the web, so you will not get any plagiarized material. But to be sure, you can always use plagiarism checker tools.
If you want optimal content from Jasper, there will be a bit of a learning curve. The facts created aren’t always accurate, so you’ll still need to edit and fact-check the information generated.
Legal reasons were behind the company’s rebranding decision. The initial name Jarvis AI caught the attention of Marvel (Disney) lawyers. A cease and desist was issued because of the words “Jarvis” in combination with “AI assistant.”
Tony Stark (aka Iron Man) relied on his AI assistant JARVIS assistant in several of the Marvel movies, so Disney didn’t want that tool, potentially, in any way misleads users. The development team found it easier to just rebrand from Jarvis.ai to Jasper.ai instead of getting involved in a potentially damaging, drawn out legal battle.
Jasper Notable Features
Here are some of the useful and notable features that the tool provides.
Dashboard
You can have as many project folders and workplace documents as you want. There won’t be any content restrictions to worry about as you work on creating and organizing content between all your clients or websites.
Words Limit
Depending on your plan, every month you have certain amount of words for use with Jasper. Those words are spent whenever you press the “compose” button.
You can purchase more words if you exceed the monthly word limit.
Character Lookback
This refers to the amount of text Jasper AI can consider when formulating new text. While Jasper AI will reference the GPT -3 data for generating new content, it still takes into consideration the existing content of your document, and it can reference up to 3000 prior characters of text.
This helps to ensure Jasper AI isn’t repeating points and the generated result flows well with the previous context.
Customizable Voice Tone
The fact that Jasper AI can mimic and understand an existing tone of voice is one of its unique functions. The content that’s created will then match the tone that you want to achieve. It can recognize adjectives and people (even fictional characters sometimes).
25+ Supported Languages
While Jasper is trained more thoroughly in English, they integrate with DeepL to offer Jasper in over 25 languages. Language options are currently free while in Beta.
English is the only language that I’ve used to test Jasper AI. You can reach additional markets in other nations thanks to the ability to create content in over 25 international languages but I don’t know the quality of DeepL translation as I never used it.
Content can be translated into, written, and read in more than two dozen languages. Those are Chinese, Swedish, Slovenian, Slovak, Russian, Romanian, Portuguese, Polish, Dutch, Latvian, Lithuanian, Japanese, Italian, Hungarian, French, Finnish, Estonian, Spanish, English, Greek, Danish, Czech, Bulgarian, and German are currently supported.
Surfer SEO Integration
You can optimize content for a maximum of three different keywords, and SEO can be further improved by connecting with Surfer SEO.
Surfer SEO has been used by people who want to create compelling website content or blog articles that are featured more prominently in search engine results. Natural language processing, running correlations, and examining content created by competitors are what Surfer SEO takes into account when making its content suggestions.
While you can create content with Jasper AI and paste the resulting text into any SEO recommendation tool, Jasper AI’s long form assistant integrates directly with Surfer SEO. With the assistance of artificial intelligence, you can create web content and articles that are fully optimized for many popular search engines.
Surfer SEO doesn’t come with your Jasper AI subscription. It’s an optional paid add-on. The core Surfer SEO plan can be acquired for $59 per month. It may be worth the extra expense if you’re interested in creating quality SEO content.
Grammarly Integration
Grammarly is a tool that can help writers generate content that has a logical flow and maintain grammatical consistency.
Jasper comes with included Grammarly premium at no charge, usually priced at $12 monthly. Non-native English speakers and others who seek to improve their writing abilities will find this to be a phenomenal feature.
For more info, check Grammarly review, Grammarly vs WhiteSmoke, and Grammarly vs Ginger.
Copyscape Integration
A handy plagiarism checker is a relatively recent addition to Jasper AI’s long form assistant. Even though the GPT -3 database and machine learning algorithm usually creates unique content, it’s still possible that some of its results could accidentally contain information that’s exact or very close to content that appears in other sites.
While WriterZen, Grammarly, and many other plagiarism checkers can be utilized to review your content, industry leader Copyscape works with Jasper AI to ensure that the information created doesn’t appear anywhere else. The software lets you scan for plagiarism without having to enlist the aid of any other outside services.
Unfortunately, this service isn’t free. Everyone (including Jasper AI subscribers) will need to pay before they can use Copyscape. Credits in $10, $20, or $100 intervals must be loaded. For the first 200 words, credits are used at $0.03. After that, credits are then used at $0.01 for every 100 additional words that will be evaluated.
Jasper AI Bootcamp
Jasper’s development team created the educational lessons and videos included in Jasper AI Bootcamp. This will cover all the basics you need to know to get up and running with Jasper AI.
How Does Jasper AI Work?
The first thing to realize about Jasper AI and other similar copywriting resources is that they aren’t completely automatic. They won’t just begin with a blank document and craft an original blog post, ad copy or website landing page after a mouse click or two.
Such tools do a good job when creating new content in very little time. However, not all of the content that it creates will necessarily be accurate or of the highest quality. Manual intervention is still required. You’ll have to use your own research on the subject to fact check the content created.
Jasper AI often uses content that dates back several years as source material. Some of this information can be outdated or no longer relevant. Current topics such as NFTs, the Coronavirus, and other recent topics can be completely missed.
Jasper AI is powered by machine logic and artificial intelligence to produce human-like text for marketing emails, social media posts, advertisements, blog posts, and other content types.
Jasper AI utilizes an autoregressive language model known as GPT -3 technology in the background.
Jasper Templates (Skills)
Jasper AI has an impressive amount of templates that can be used. They are trained to perform very specific use cases.
Jasper can probably create any type of content that meets your needs. Professional conversion experts and copywriters trained Jasper AI. It copies proven models and adheres to the rules that were assigned.
There are more than 50 different templates (also referred to as skills) to pick from. Boss mode’s long form assistant allows you to create content for blog posts, Quora answers, personalized cold emails, Instagram captions, Facebook ads, etc.
Here are some of the templates available:
AIDA Framework – This framework is based on Attention, Interest, Desire, and Action. It can be used to develop social media posts and other content to increase interest and engagement.
PAS framework – The Problem-Agitate-Solution framework identifies common problems people may encounter and offer recommendations to resolve those issues, which can also help improve website conversion rates.
Content improver – Existing content pieces are examined and rewritten. The results are intended to generate more interest and interaction with the particular subject.
Product description – Create compelling product descriptions for social media pages, emails, and various sites to give users details about a specific product.
Blog post intro paragraph – You can eliminate writer’s block by allowing Jasper AI to create introductory paragraphs for your blog posts.
Creative story – Add storytelling to your content creation workflow.
Sentence expander – Create longer sentences from short sentences. This can be utilized to develop more engaging content relevant to your piece’s topics.
Persuasive bullet points – Generate persuasive bullet points for email messages, landing pages, and other purposes.
Video script hook and introduction – Create a video intro that will capture viewers’ attention and compel them to watch till the end.
Video description (YouTube) – Generate descriptions that can help your YouTube videos to rank higher in search engines.
Feature benefits – Benefits influencing buying decisions can be created from product features.
Unique value propositions – You can clearly explain how buying or using the items that you have to sell can be to a consumer’s advantage.
Text summarizer – Get the key point from a piece of text.
Blog post topic ideas – Brainstorm possible topics for your blog posts. These ideas could improve Google search result rankings and keep your readers engaged.
Blog post outline – Create article outlines and lists. They can be especially effective for “how to” posts and lists.
Blog post conclusion paragraph – You can summarize what you have to say in your blog with an appealing conclusion paragraph.
After choosing the Jasper AI template you want to use, the next step is to fill in the template data about the product or brand.
Jasper’s output quality will depend on the quality of the information you enter. The output will be as vague or as specific as the information that is provided.
You can control these attributes when generating content:
How many copies will be created? Up to ten copies can be generated at once.
The proper tone of voice for a particular copy. The tone of voice can be engaging, witty, conversational, friendly, inspiring, etc.
The first step was choosing a template. The second step was adding product information. Now it’s time to generate AI content!
Choose the “Generate AI Content” option. Jasper AI should only take a few seconds to do its job, and you will receive content for your topic.
Your History tab will have all content that the artificial intelligence created. You won’t have to worry about losing any content that Jasper generated.
Example of using AIDA Framework template. The generated content is actually pretty good.
Bullet points can be added to a template content improver. This content can be placed in email messages for greater emphasis.
Jasper has many very effective templates. They can be helpful for short form social media content, newsletters, autoresponders, and scripts for videos.
AI outputs are where any output that’s created using these templates will be stored. Those creations can be deleted, flagged (which will improve Jasper AI’s learning), or favorited.
You’ll also have access to a very capable search engine to search through the AI output so that the content can be reused between copies.
Jasper Recipes
Jasper Recipes are pre-built workflows and they contain several commands. These recipes help to speed up content creation when those commands are run in their proper order. Boss mode must be activated before you can use Jasper Recipes.
This function provides many different types of templates. They can be used to create video scripts, Google and Facebook ads, cold emails, press releases, product reviews, blog posts, and other content forms.
I have used cold email recipe to generate output.
Whatever you input, it will always impact your outputs. If you want Jarvis to get creative and make a lot of stuff up, try inputting a few words or a short sentence.
If you want Jarvis to really follow directions and include key facts then you’ll want to add a lot more detail into the input boxes.
Jasper recipes are logical series of steps via commands that artificial intelligence will follow in creating content quickly. They can definitely make life easier for users who have Boss mode.
Jasper Commands
You have more power over how Jasper works on the Boss Mode. You can use plain language to tell Jasper what to do using Commands. This allows you to take greater control over how Jasper performs and results in faster content production.
Command examples:
–Write blog post titles about best air purifiers
–Write outline for a blog titled “10 best robotic vacuums for hardfloor”
There are certain commands that Jasper will execute better than others, and he isn’t trained to follow a single set of instructions. He truly comprehends the goal of your command and works to fulfill it.
How to run a command:
In plain language, write the command you want Jasper to follow.
Press CMD + Enter on Mac or CTRL + Enter on PC.
Jasper will highlight the command, and execute it.
An even faster way to interact with Jasper is by using voice commands to literally speak what you want Jasper to do. Yes, you can do that using your microphone.
Jasper Boss Mode
The Jasper.ai team lets you implement Jasper Commands in Jasper Boss Mode. When Boss Mode is activated, it unlocks the long-form assistant document editor allowing you to write various content.
You’ll be able to write information up to five times faster than the Starter plan would allow. Content writers, marketers, and bloggers can benefit from the additional features provided in Boss mode.
Here are the extra features that are included with Boss Mode:
Write content faster – The Jasper document editor will be available once the long form assistant template is unlocked. You can easily write full books, marketing emails, blog posts, and other long-form content.
Compose button – In the Jasper Long-Form Assistant, each time you “compose” some AI-generated text, you have to write some words yourself before the compose button will be enabled again. In Jasper Boss Mode, the “Compose” button is completely unlocked.
Increased visibility – The starter plan can only read the last 600 characters but with Boss mode, Jasper reads the last 2,000 to 3,000 characters.
Write Jasper commands – You can write Jasper commands at any time. These instructions will tell Jasper what you want to be created. Jasper will then go to work after the command is run.
Built-in Grammarly editor – Grammarly’s free version is integrated into Jasper editor. You won’t have to worry about producing content that contains grammatical mistakes.
Plagiarism checker – Run Copyscape in Jasper editor. It’s rather affordable and credits will be required for use. It’s an added safety feature even though the vast majority of content produced by Jasper AI is entirely original.
How Does Jasper Boss Mode Work?
When the long form assistant and Boss mode are activated you can give Jasper AI text-based commands instructing him precisely what you want him to do with modifiers such as asking for paragraphs, lists, tone of voice, etc. You can be as specific as possible.
You can use the rephrase function whenever you’d like. Just select the rephrase option and highlight the paragraph or sentence that you want to be modified. Jasper AI will check that passage and attempt to rewrite it using words and language that are somewhat similar.
Rephrase, and the content improver template are different features. The content improver template allows Jasper AI to enhance particular content sections.
The “explain it to a 5th grader” feature is located next to the rephrase button. This function simplifies complex phrases or pieces to the level most fifth graders can easily comprehend. It makes content less confusing or complicated and often creates shorter sentences.
Steps to use long form content:
Start by opening the long form editor.
Now it’s time to write a Jasper command. For instance, you could write a sentence that says, “Write a paragraph that describes digital marketing and what it’s used for.”
Jasper will then write content for you based on your command.
Where templates are more constrained, documents allow open-ended content creation in a familiar Google Doc-like experience. Documents are available on the Boss Mode Plan.
The long form editor in Documents has more tool integrations than just the standard copywriting templates and is a more open-ended tool. It’s best suited for creating brand new content from scratch for landing pages or blog posts.
Sales pages, video scripts, blog forms, and other forms of long form content can be created using the documents long form assistant.
The team member function will even let you share what you’ve written with other team members if you want advice or feedback. A handy feature that simplifies group collaborations.
The long-form assistant works in several steps:
1. Provide important details regarding the subject. Provide as much information as necessary so that Jasper AI can create content that will keep your readers interested.
2. Now it’s time to choose a headline that matches the topic. Catchy titles are sure to leave your target audiences wanting more!
3. You can let Jasper create an introduction or you can start writing content.
It’s essential to provide Jasper AI with the initial input. Otherwise, it won’t know where to begin or the tone and message you want to express.
Artificial intelligence tools like Jasper work on patterns. AI will create content according to the input that it was given. As you compose blog posts, you can allow Jasper to write content and even complete your own thoughts for you automatically.
Jasper AI generated content based on set parameters.
Jasper will automatically correct any typographical errors that it finds. You can activate the “Fix Grammar” function to ensure complete grammatical accuracy in your work.
There are two more choices: simplify (passages are reworked so the average fifth grader can easily understand them) and rewrite. Your cursor position will determine what content will be read and created.
To receive content that relates to the information that you’re currently viewing, Jasper will read 2000 to 3000 text characters that are above your current cursor position. You can even have content created in more than 25 different international languages.
Editing Modes
There are 2 editor modes.
Focus mode is the default mode which allows you to focus on the document you are working on.
Power mode gives you access to all of the templates in a drawer right inside of your document. To open, click the Power mode icon in the center of the top bar of a document.
If you have Surfer SEO integration, there will be one additional – SEO mode. This integration will also allow you to optimize your writing for specific keywords you want to include.
Putting Jasper To The Test
I decided to put Jasper to the test. After doing tests with various templates, commands and watching whole Bootcamp I have grasp of how Jasper works and how to get good content out of it.
TEST 1
For first test, I decided to use Jasper to write sort of short review about popular Elden Ring game. I used Documents > Blog post workflow option. You can see final output on this link.
I spent less than 5 minutes generating the output. The content is not entirely plagiarism free. Checking with Grammarly plagiarism checker showed about 20% plagiarism.
The generated content looks professional and nicely written. There are some wrong facts like release date, but other than that, it looks good.
TEST 2
For this test I decided to use Documents > Start from scratch option. I decided to use “climate change” as topic. I just let Jasper do all the work. I only added few sentences (those in bold and first paragraph). Click here to see generated output.
You can see that content again is very good. I didn’t fact checked the “climate change statistics” part, but generated content is definitely usable, readable and has correct flow. In this case, Grammarly also showed plagiarism in around 20%.
TEST 3
For this test, I am going to use Content Improver template. This template is used to improve existing content. You can paste up to 800 characters and choose how many outputs you want to get. You can generate as many times as you want until you are satisfied with generated content.
I was overall not very please with Content Improver and the generated output. You can see example of generated content by visiting this link.
Jasper AI Pricing
Starter and Boss Mode are the two Jasper pricing plans currently available. Annual and monthly pricing options exist for both plans.
Access to all of Jasper AI’s short form copywriting templates and 20,000 words monthly is provided with the Starter plan, which starts at $29 per month. You can also upgrade to the Boss plan, priced at $59 monthly and up.
All of the features from the Starter plan are included in the Boss plan, along with these additional features:
Content can be created up to five times faster than usual.
The compose button will be unlocked.
Jasper commands are available. You have complete control over the content that Jasper will create. Jasper will quickly produce unique pieces after receiving the commands.
Jasper’s visibility increases. Jasper can only read up to 600 characters with the Starter plan. It can read 2,000 to 3,000 characters with the Boss plan.
If your account goes over your monthly budget for word credits you will be charged for overages at $10 per 5,000 words or moved to a higher plan (you can select your preferred method in your settings).
You’ll receive an extra two months of Jasper.ai for free if you purchase an annual plan. There are no lifetime plans or free plans currently. You won’t be able to test Jasper’s features and functionality before buying a plan.
Even though you will be charged after providing credit card information, the Jasper team realizes that it may take a while for some users to discover its full potential. That’s why they offer a money-back guarantee.
Don’t Blindly Trust Jasper Accuracy & Generated Text
One drawback of Jasper AI is that it will generate situations, names and numbers that can be inaccurate or irrelevant.
That’s why you’ll need to review Jasper AI’s content to confirm that everything is indeed accurate and true. You need to read through articles so it may take more time to evaluate the content on topics you have less knowledge or experience with.
Technical specs for certain items can be given as one way to avoid numerical errors.
Jasper Pros & Cons
Here are some of the advantages and disadvantages of using Jasper.
PROS
There are over fifty different content templates to choose from.
The community is very active and can provide valuable advice and assistance.
Boss Mode offers a lot of content generation.
Bloggers can take advantages of the long form assistant feature.
Provided training.
The user interface is incredibly easy to use.
The new usage templates, functions and features are added regularly.
It doesn’t take long to create unique content that’s free from plagiarism.
Long and short form content can be created in no time.
Blog posts can be optimized more efficiently thanks to the integration with Surfer SEO. But Surfer and Boss Mode subscriptions are necessary for this integration.
Jasper supports more than 25 languages.
CONS
You’ll need to fact check the content that is generated. Some wording and numbers included in created content will not necessarily be true or correct.
There can be repeated information when using the long form assistant.
Jasper may seem relatively inexpensive for business users. However, it can be costly for most users.
You won’t be able to use it to completely rewrite existing articles (like a content spinner would). Jasper can’t create separate content that doesn’t need at least some editing work.
There is a learning curve which is normal with tools like this (go through Jasper Bootcamp to learn how it works and to get better content).
Jasper AI Review Conclusion
Writers at all skill levels and specialties can benefit from the powerful GPT -3 software known as Jasper AI. Its performance and features are impressive, even though this resource isn’t perfect.
It can be used to create eBooks, YouTube video scripts, school papers, listings, blog posts (which can be further enhanced through integration with Surfer SEO), etc.
Jasper AI is a vast improvement over several other comparable products. It can help you fight writer’s block and integrate automation into your writing. Experienced and novice content writers can benefit from this powerful copywriting resource on their side.
There’s almost no end to the amount of customization choices. That and its simplicity are why I suggest Jasper AI to consistently produce quality long form content.
Many users will say that Jasper doesn’t produce great results and that the software is overpriced. Yes, it can take some time to produce the results that you’re looking for. Using Jasper AI regularly and watching their training materials can help you become more adept and get better content.
I strongly suggest taking the free Jasper AI bootcamp training if you’re considering signing up for an account. This training is included with your account and will provide you with the resources and skills necessary for developing stories, video scripts, blog posts, and other content that will appear as if human beings wrote them.
Jasper AI can create excellent articles, social media posts, and other content for people who understand the software’s capabilities and potential.
The created content will rely heavily on the prompts or commands given in Jasper Boss mode or before the compose button is pushed. It’s essential to properly position Jasper and use the best possible practices so that only optimum content will be delivered.
I’ve found Jasper AI to be one of the best copywriting resources. However, there can be times when some manual oversight is necessary. Writing a few initial words yourself can guide artificial intelligence into developing content in the manner that was intended.
You won’t be able to really comprehend just what Jasper AI can do until you sign up for a paid plan. Then you can try the various features and functions and start thinking about the types of content you want to produce.
Jasper AI can be a decent content creator if you put the time and effort into learning how to use it. Before long, you’ll know just how to instruct the AI so that it can easily create compelling content that will leave your readers wanting more!
But if Jasper is not what you are looking for, then check alternative options such as Anyword, WP Robot, Article Forge, SEO Content Machine and Kontent Machine.
Lorem ipsum dolor sit amet, consectetur adipiscing elit. Integer a mauris suscipit, euismod mi nec, sollicitudin dolor. Curabitur imperdiet augue eget sem viverra, ut aliquet dui gravida. Nam efficitur nisi sit amet justo rutrum efficitur et at lacus.
Investigationes demonstraverunt lectores legere me lius quod ii legunt saepius. Claritas est etiam processus dynamicus, qui sequitur mutationem consuetudium lectorum.
Lorem ipsum dolor sit amet, consectetur adipiscing elit. Integer blandit lacus id sem vehicula ullamcorper. Nulla et sapien eu nunc mollis scelerisque vel quis turpis. Cras orci arcu, rutrum eget lorem vitae, accumsan gravida nisi. Aenean fermentum id nunc eu rutrum.