The important & standard post format
Investigationes demonstraverunt lectores legere me lius quod ii legunt saepius. Claritas est etiam processus dynamicus, qui sequitur mutationem consuetudium lectorum.


Investigationes demonstraverunt lectores legere me lius quod ii legunt saepius. Claritas est etiam processus dynamicus, qui sequitur mutationem consuetudium lectorum.

Staying ahead of the competition is crucial in the ever-evolving world of online content creation and affiliate marketing. You need a powerful tool that helps you uncover the most profitable keywords but also assists in selecting the perfect affiliate products and generates unique, high-quality content to drive your success.
From researching keywords to handpicking affiliate products and even crafting content, the Too Much Niche WordPress plugin handles everything smoothly on your behalf.
In this Too Much Niche review, I will show you all the features the plugin offers and how you can utilize them to have your site ready quickly.
The Too Much Niche plugin uses AI technology, mainly OpenAI’s ChatGPT, to create content for affiliate niche sites. It analyzes real product data, such as product descriptions, specs, customer reviews, and ratings, as the foundation for creating unique and useful content.
The entire process, from gathering, processing to generating content, happens on plugin servers. You will not need to concern yourself with paid ChatGPT API access or anything else.
Plugin will also perform extensive keyword research to pinpoint SEO-optimized keywords for each article.
With the help of AI technologies, the plugin creates engaging articles in four formats: Product Roundups, Product Reviews, Informative Articles, and How-to guides (more coming soon), each spanning a length of 1800-2500 words.
You don’t even have to worry if articles will look bad and if a bunch of information will be smashed across the article. Leveraging Guttenberg and Greenshift Blocks, the plugin takes care of your content’s visual appeal and professional formatting.
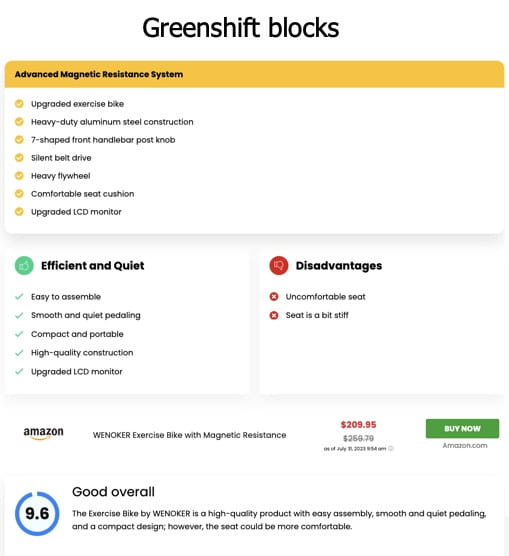
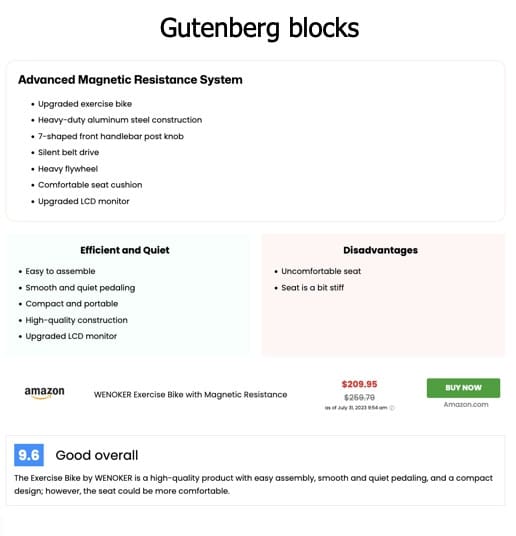
Its content formatting relies on Guttenberg Blocks and the free Greenshift page builder plugin to ensure a polished and professional appearance, regardless of the chosen theme.
The Too Much Niche plugin performs optimally in English but offers support for numerous other languages as well.
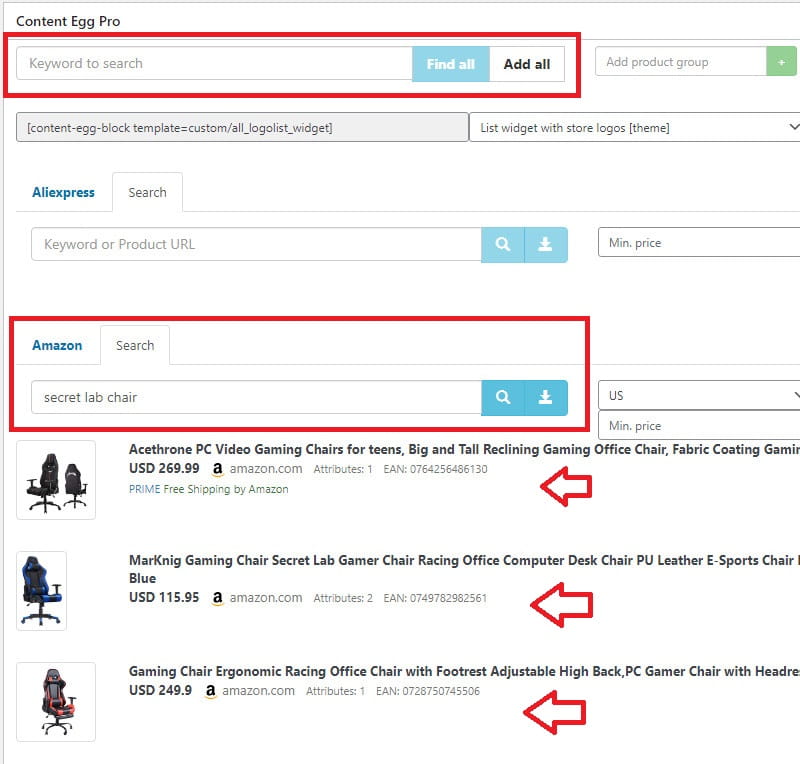
You can even integrate a plugin with Content Egg. By combining features of the Too Much Niche plugin and Content Egg Pro, the plugin will be able to add, into generated articles, affiliate products sourced from platforms such as Amazon.
The plugin is made to provide you with a fully ready website, taking care of everything from keyword research to content creation, formatting, and article publishing. The time it takes to generate the entire site depends on the number of articles created. For instance, producing 300 articles may require more than 15 hours.
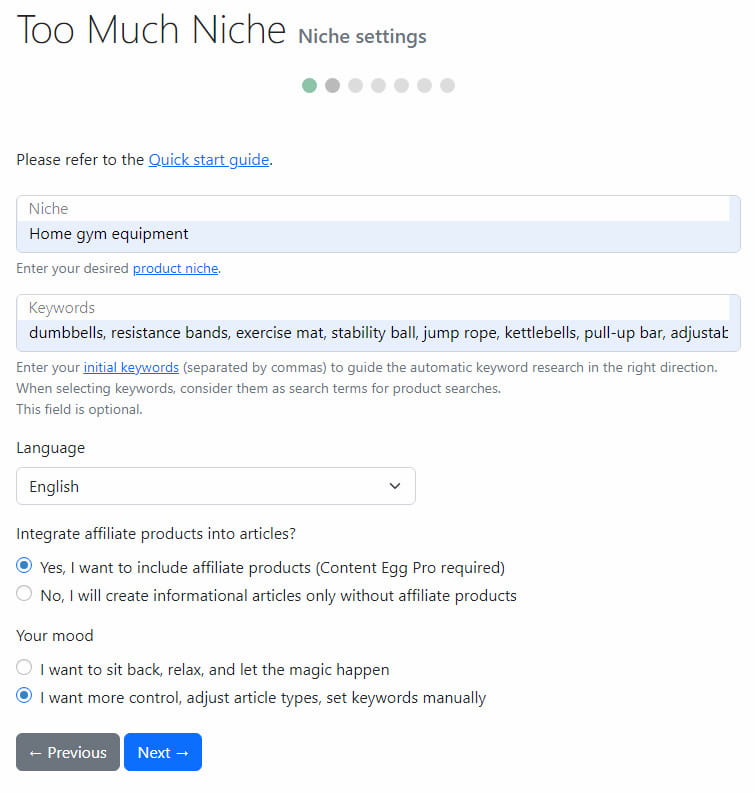
The Too Much Niche plugin’s main focus is to create content based on products, which means it is best suited for product niches.
Steer clear of selecting non-product-focused niches and keywords that lack associated products suitable for promotion. When picking keywords, treat them as search terms for product-related inquiries.
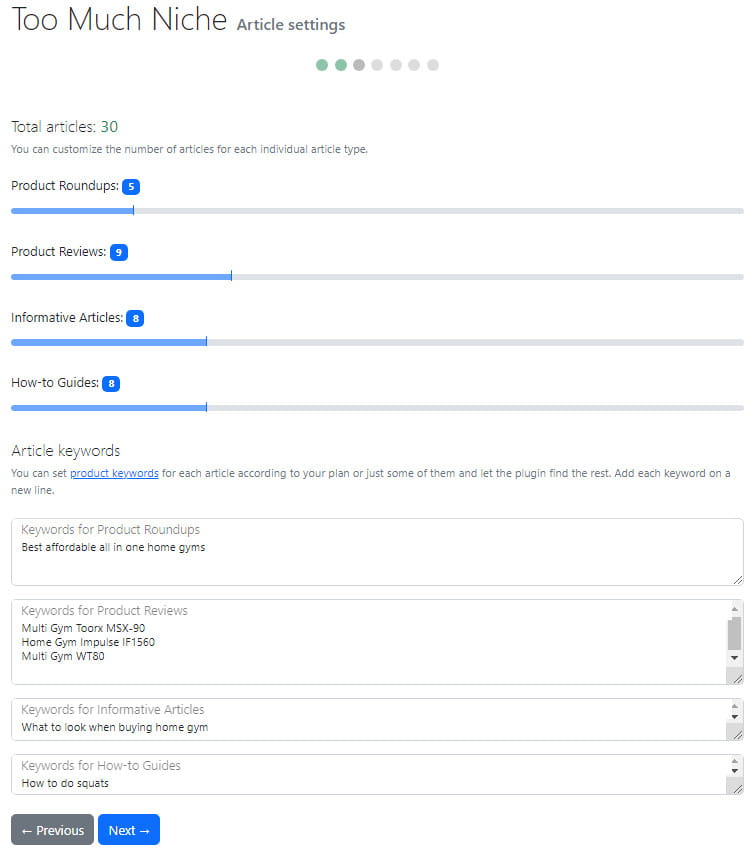
The Too Much Niche plugin gives you control over the articles thanks to two distinct modes:
To switch to manual mode for keyword selection, simply opt for “I want more control and set keywords for articles manually” at the initial step of the wizard.
When you’re in manual mode, you can fine-tune the quantity of articles for each article type (roundup/reviews/info). However, it’s essential to remember that the total article count should still align with your plugin’s pricing plan.
You can specify keywords for each article individually or for some of them, allowing the plugin to handle the rest. Each keyword should be added on a separate line.
In manual mode, you can assign a keyword to each article and provide a list of specific products that should be used in generating the article.
Manual product selection grants you additional control and is an optional feature. This means you can manually handpick products for certain articles while leaving the plugin to automatically select products for others.
Employing a wider array of keywords heightens the predictability of results when it comes to generating products and articles.
Avoid the usage of duplicate or overly similar keywords, as this can result in creating articles with redundant or overlapping content. By diversifying keywords, you ensure better plugin results.
For even more precise control over the results, you can manually input keywords for each article.
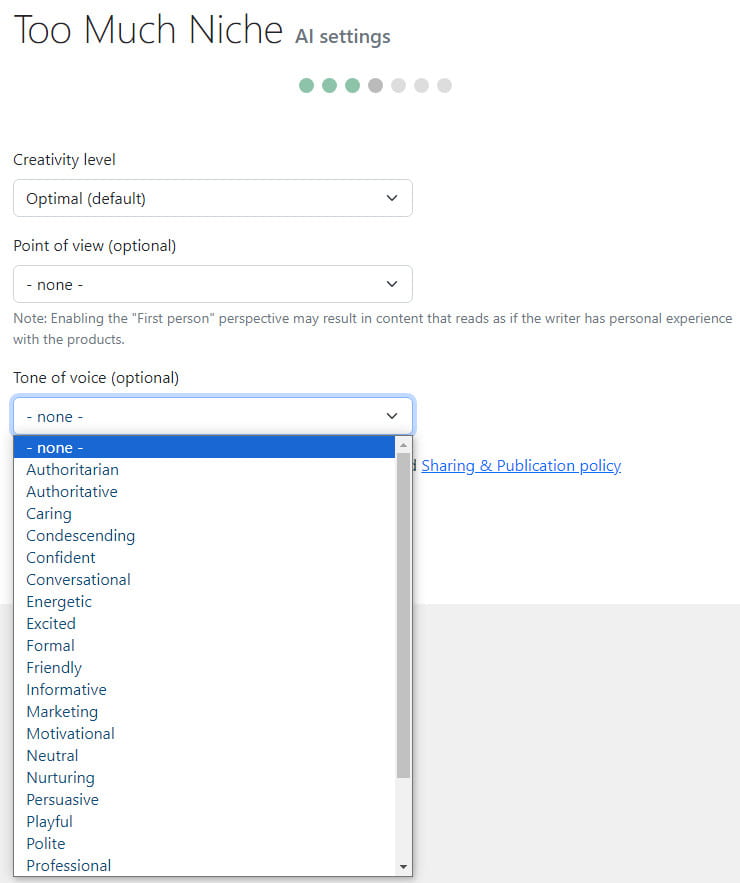
The plugin also has AI settings that you can adjust per your needs. You can set Creativity Level and choose from options such as Min (more factual but repetitive), Low, Optimal, Optimal + (more creative), High, and Max (less factual but creative).
Point of view is another setting option, allowing you to pick from first-person singular, first-person plural, second-person, and third-person. Under Tone of voice, you will find several options like friendly, informative, confident, etc.
Too Much Niche uses WP cron for its operations. Even if your website doesn’t receive the traffic necessary to trigger WP cron, the plugin servers will automatically ping your cron script, ensuring the plugin operates smoothly in the background without interruption.
Once all articles have been generated and posted, you can deactivate and remove the Too Much Niche plugin from your site. However, in that case, some functions will be unavailable.
When it comes to formatting your content, you can either choose Gutenberg blocks, Greenshift blocks, or Basic HTML.
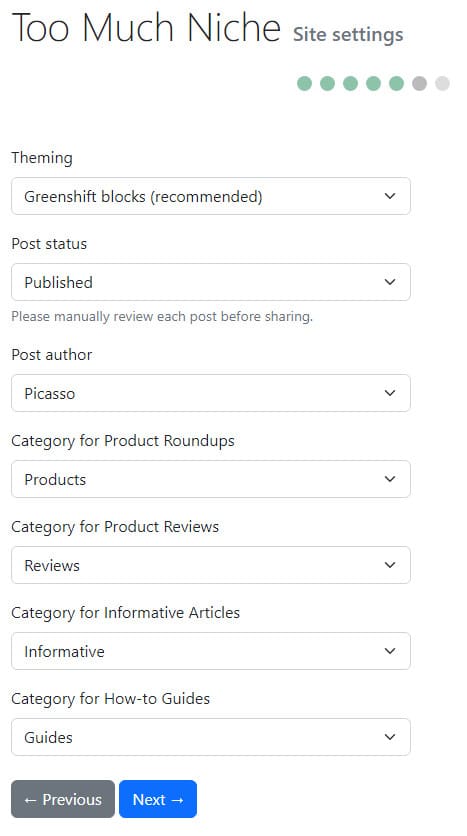
Greenshift is generally compatible with most WP themes, while Gutenberg blocks require a theme with Gutenberg support. On the post edit page, you can convert an article from one theme format to another.
On the Too Much Niche plugin product page, you can also find demos of sites made with the plugin to grasp how it looks when published.
The Too Much Niche plugin comes with another useful feature. It automatically generates schema markup for Product, Review, HowTo, and FAQ elements.
Here are the current types of articles that the plugin supports or will support in the future:
Too Much Niche will need to be combined with the Content Egg plugin if you would like to generate a Product roundup and Product review articles.
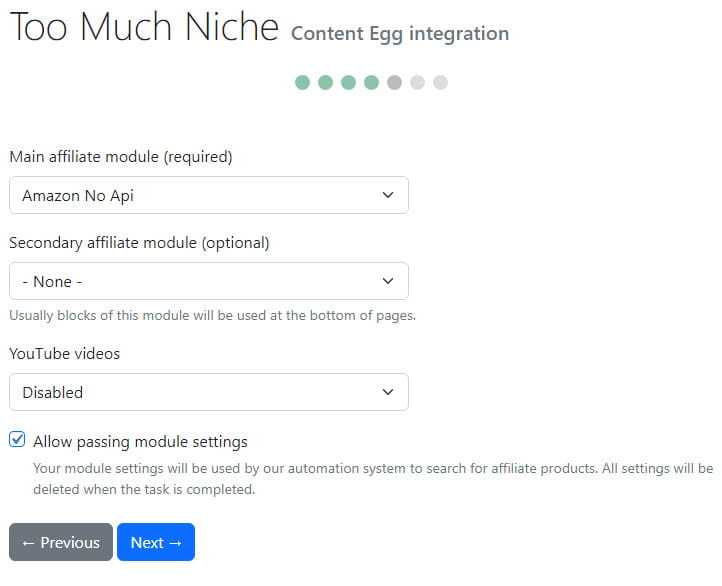
You will also need Content Egg if you intend to use product blocks and generate articles with affiliate products in How-to guides and Informative articles. For this, you will at least need to activate one of Content Egg modules such as Amazon API, Amazon No API, Amazong Affiliate Egg integration, Bol.com, etc.
You can also manually add products in Content Egg.
They provide a one-time fee pricing for the plugin instead of a subscription-based model. With your chosen pricing plan, you can generate a number of articles allowed for that plan.
There are several pricing plans divided into Product articles pricing and Text articles pricing. Product article pricing includes creating articles with affiliate products, and Content Egg Pro is required for this option.
They are all for a single site, and the only difference is how many articles you can create with each plan. You can create product reviews, product roundups, informative articles, and how-to guides (and any future article types added).
Text articles pricing concentrates on generating text-based articles without affiliate products, and for them, usage of Content Egg is not required. Pricing plans are also for single site usage, and the only difference is in the number of articles you can generate. You can create only informative articles and how-to guides.
Each license key is valid for use on a single domain only. Once you start the content generation on a domain, you can’t interrupt and use the license key on another domain.
You must purchase a new license key to add more articles to your site. You can repeat this process as many times as needed. You need to use your license within three months from the time of purchase.
Too Much Niche is a highly useful plugin that will generate content based on authentic product data and real customer reviews. This methodology guarantees the accuracy and reliability of the information presented, while alternative tools often rely solely on AI-generated content, potentially leading to incorrect information.
Each article created will be displayed in a professional and visually appealing manner for driving conversions in affiliate programs.
The plugin is designed to provide you with a fully functional website in a very short time. It streamlines the entire website creation process, encompassing keyword research, content generation, formatting, and article publication tasks.
The Too Much Niche plugin is finely tuned to specialize in creating content centered around products, making it an ideal choice for any niche that revolves around specific products or product categories.


Many WordPress users face persistent content creation, editing, and optimization challenges. Especially when it comes to search engine optimization.
To address these concerns and provide a solution that streamlines content-related tasks, an AI content assistant integrated within the WordPress environment is very useful. By leveraging the power of artificial intelligence, such a tool can automate content generation.
While there are existing AI content assistants and content generation tools available, it’s worth noting that these tools often operate externally from WordPress.
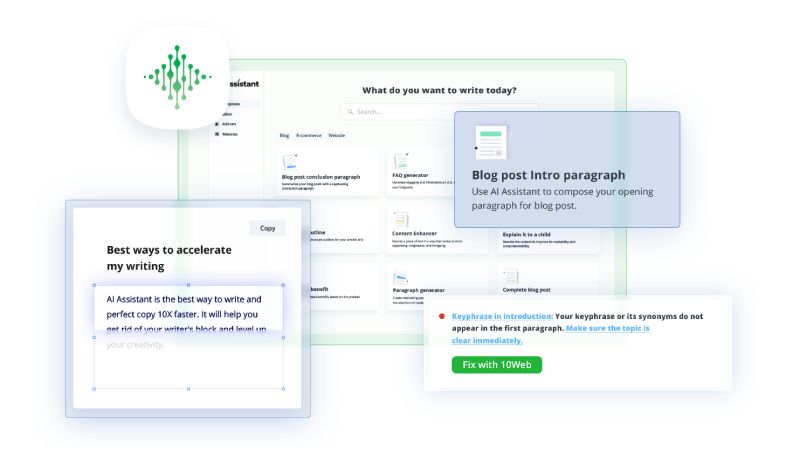
The 10Web AI Assistant distinguishes itself by harnessing cutting-edge generative AI technologies such as GPT-3, ChatGPT, DALLE-2, Stable Diffusion, and 10Web’s own AI algorithms.
With the 10Web AI Assistant, users can write SEO-optimized content directly within the WordPress block editor and Classic Editor.
This 10Web AI Assistant review will show everything the tool offers, as well as its pros and cons.
| 10WEB DISCOUNT:
Use coupon kasatenweb for a 20% discount. |
The 10Web AI Assistant serves as an all-in-one solution designed explicitly for WordPress users, encompassing the functionalities of an AI content writer, editor, and optimizer. Its advanced technology revolutionizes content creation and editing processes by offering a remarkable tenfold increase in speed compared to traditional methods.
What sets the 10Web AI Assistant apart is its seamless integration with popular WordPress plugins and themes. It caters to various content needs with plans that allow unlimited website connections and access to over 20 templates.
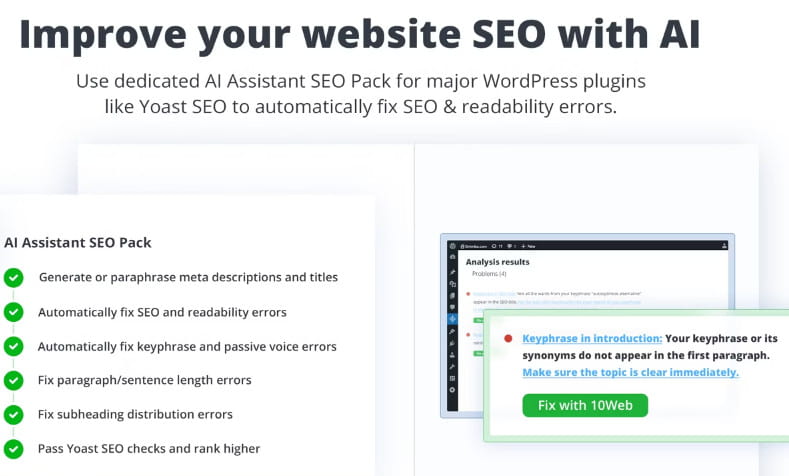
It can generate or paraphrase meta descriptions and titles, resolve SEO and readability errors, address keyphrase and passive voice issues, and ensure proper paragraph and sentence lengths, etc.
Features:
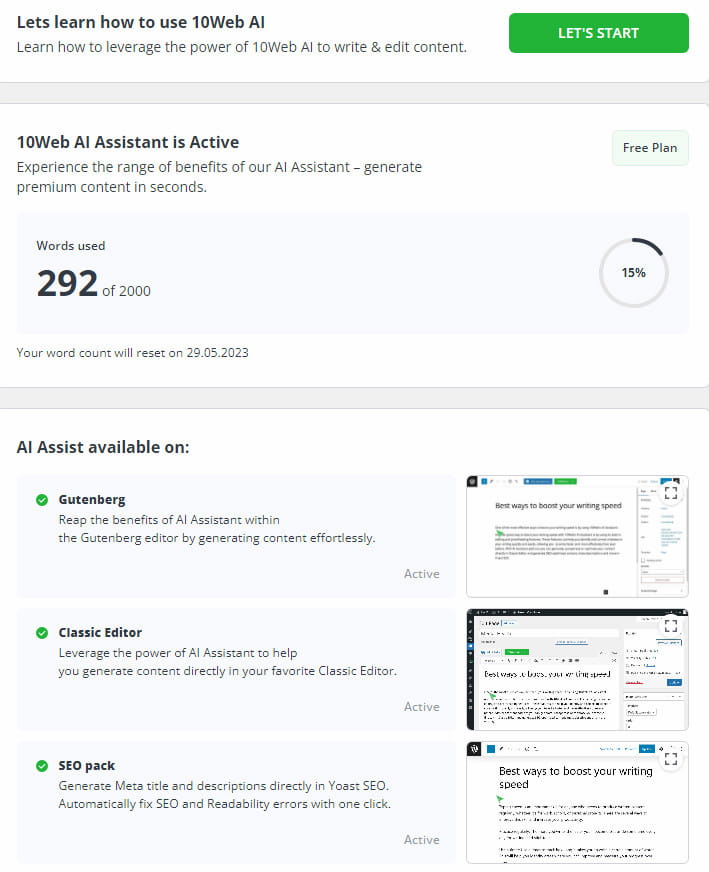
With the 10Web AI Assistant, you can utilize the AI Assistant within your WP admin dashboard using editors such as the WordPress block editor (Gutenberg) or the Classic Editor. Additionally, you can access the AI Assistant features within the user interface of well-known plugins like Yoast SEO.
The AI Assistant dashboard comprises several pages that enhance your content creation experience:
Accessing the AI Assistant for WordPress (AI Content Writing Assistant and SEO Pack) is simple. Download the plugin from the WordPress plugin repository and install it on your WordPress website.
Activate the plugin and connect your website to 10Web through your 10Web account. Once connected, you will gain access to the 10Web AI Assistant dashboard, where you can utilize its features and functionalities.
Once the AI Assistant is successfully installed and integrated into your WordPress website, it unlocks many possibilities for content creation. Within your WordPress environment, you can effortlessly develop various types of content.
To generate unique and high-quality content using the AI Assistant, provide the AI Assistant with input such as text, keywords, and keyphrases, specify the desired tone, select any additional criteria, and initiate the content generation process with a click of a button.
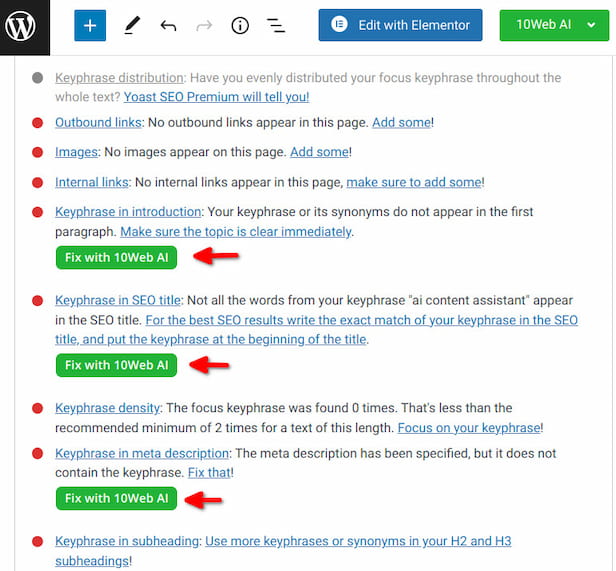
From there, the AI Assistant takes charge and generates fresh and original content that is completely free from plagiarism. Moreover, it seamlessly integrates with Yoast SEO, enabling you to address any SEO and readability errors.
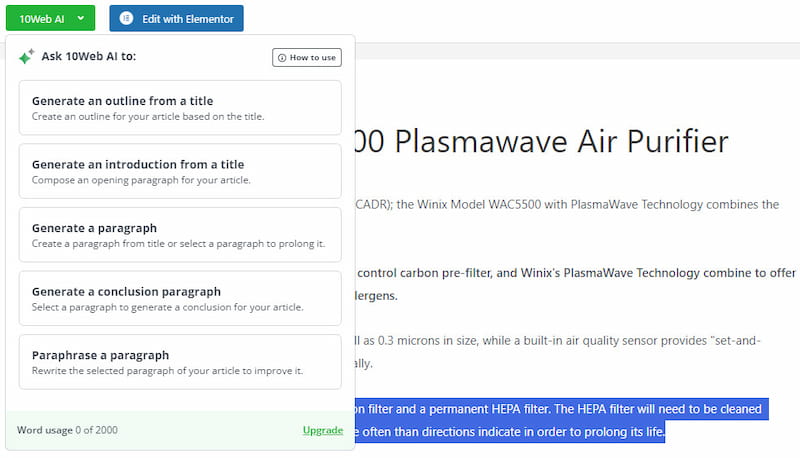
Whether you’re using the Gutenberg or classic editor, the 10Web Assistant allows you to generate an extensive range of content, including paragraphs, outlines, copies, text, product descriptions, introductions, and conclusions.
Both editors function similarly with the AI Assistant, with the only distinction being that the AI adapts to the structure inherent in the editor, such as blocks or HTML while creating the content. Once generated, you have the freedom to edit the content as desired or utilize it as-is.
10Web Assistant offers a collection of content templates that serve as valuable resources, streamlining your content creation process.
You can quickly generate an introduction for your content by highlighting the title and allowing the AI Assistant to generate relevant introductory content in seconds, leveraging the title and keywords provided.
With the 10Web AI content optimizer, you can generate unique text, including entire paragraphs, by providing a phrase or sentence as input. The process is quick and automatic, taking only a few seconds to generate SEO-optimized and plagiarism-free content.
The outline generation feature allows you to create well-structured outlines quickly.
By leveraging the capabilities of the content optimizer, you can utilize the provided keywords and suggestions to generate a conclusion that aligns with the same tone, strategically incorporates keywords, and delivers relevant messaging.
The 10Web AI content writer is a powerful tool for paraphrasing, offering the ability to generate numerous copies of unique, high-quality, and plagiarism-free content optimized for SEO.
This tool lets you conveniently paraphrase sentences or entire paragraphs directly within WordPress.
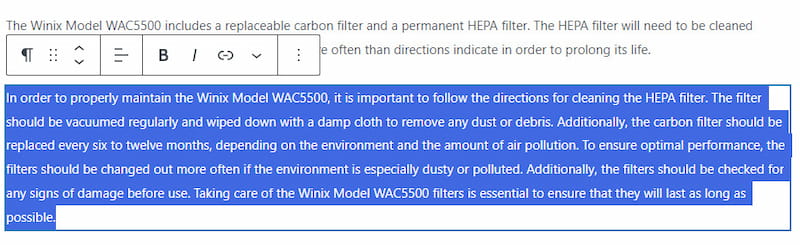
Enhance your paragraphs and sentences using the 10Web Assistant tool by selecting the paragraph in question and pressing “paraphrase a paragraph.”
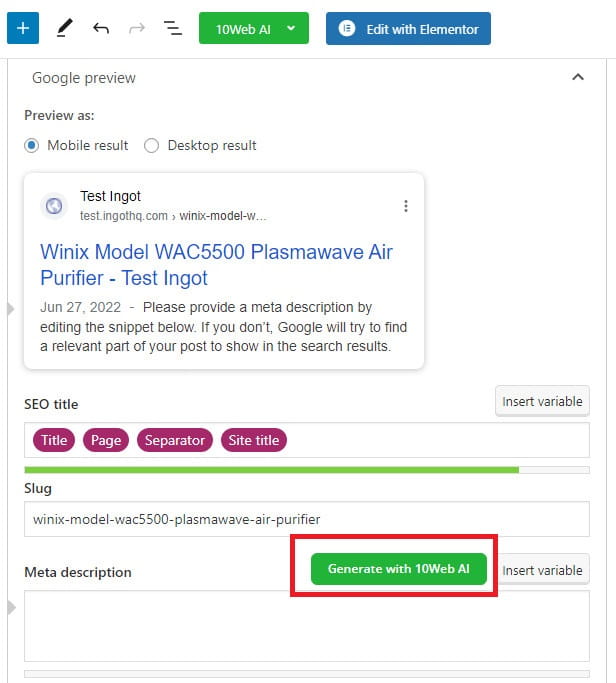
With the 10Web AI Assistant, you can swiftly generate SEO-friendly descriptions and titles that align with Yoast’s SEO guidelines. Additionally, you can optimize existing descriptions and titles.
You can edit key phrases, set appropriate length limits, and enhance the overall SEO score provided by Yoast.
You can fix passive voice errors and transform non-engaging introductions into compelling ones. Furthermore, you can include relevant keywords within titles and paragraphs to boost your content.
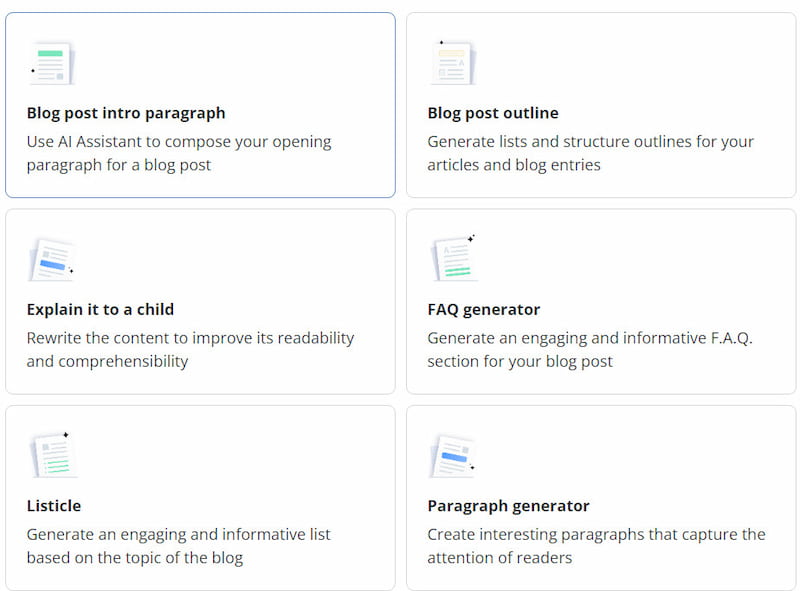
Within the 10Web AI Assistant Dashboard, you will find a collection of content templates. These templates serve as valuable resources to streamline your content creation process.
Simply select a relevant content template from the available options to use them. Then, provide any necessary specifications or requirements for your content.
The AI Assistant will generate high-quality, eloquent, engaging content based on the chosen template in just a few seconds.
10Web AI Assistant content templates include:
|
|
Each template is accompanied by a brief description that outlines its intended purpose. Additionally, you can find a sample field within each template, showcasing an example of the type of content it generates.
Some templates may include specific fields for “Tone of voice” and/or “Audience.” The “Audience” field allows you to specify the target group or individuals for whom the content is written.
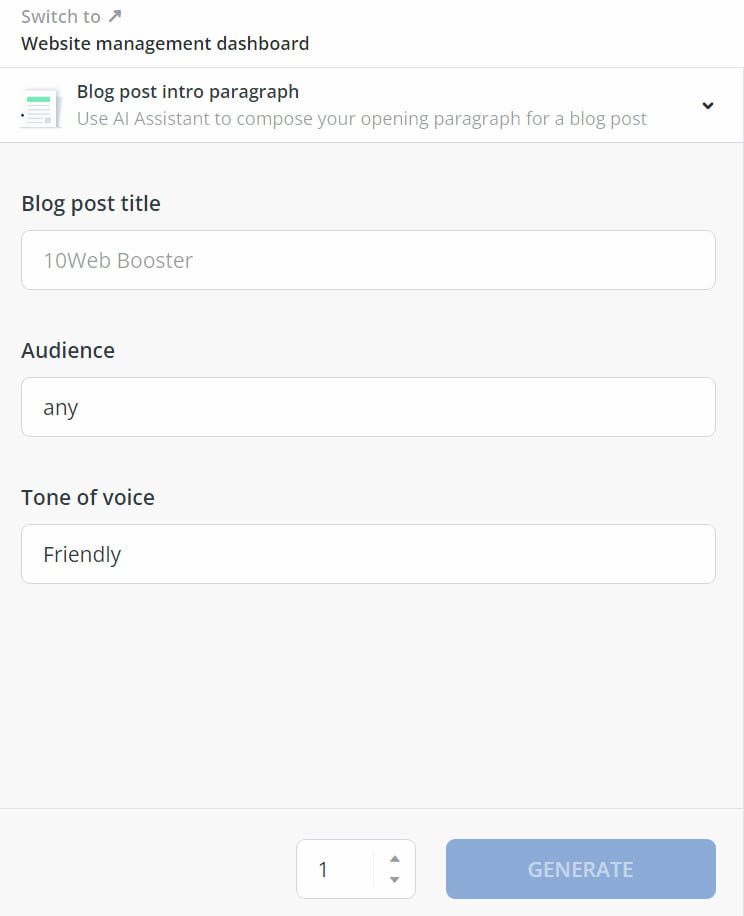
The “Tone of voice” field allows you to define how you want the content to sound or resonate with your audience. While a friendly tone of voice is typically set as the default, you have the flexibility to select a different tone that aligns with your desired communication style.
At the moment, you can generate up to 5 outputs at once. If you don’t need more than one output, do not generate more, as it will affect your word consumption.
You can go beyond text generation and also leverage its image creation capabilities. This powerful tool allows you to input a text or prompt describing the desired image, and the AI Assistant will generate unique and captivating images tailored to your input.
These AI-generated images are original and free from any plagiarism concerns.
The 10Web Document Editor offers a seamless and collaborative experience with the assistance of an AI content writing Assistant. This tool enables your entire team to access and work on content writing and editing simultaneously.
Whether manual writing or AI-assisted content generation and editing, the 10Web Document Editor takes real-time, collective content creation to the next level.
Within the editor, you can leverage the AI Assistant service to write and edit articles effortlessly. This user-friendly tool is designed for those who want to create or update their website’s content without investing significant effort or in a collaborative environment.
You can compose, paraphrase, automate, and format content as needed, with the assurance that the generated text will be unique, error-free, and plagiarism-free.
The AI Assistant integrated within the Document Editor also ensures that spelling and grammatical errors become a thing of the past.
The AI Assistant operates on a freemium model, offering free and premium plans. With the free account, you can generate up to 2,000 words per month.
Premium plans are available through the AI Assistant Pro for users requiring more extensive content generation. The pricing varies depending on your specific requirements.
For $10 per month, you can access automatic SEO-optimized content generation with a limit of up to 10,000 words. The $30 per month plan allows content creation of up to 30,000 words, while the $100 per month plan offers the ability to generate unique, optimized content of up to 100,000 words.
Custom plans are also available for those with higher word count needs. With all the premium plans, you have the flexibility to connect multiple websites.
AI Assistant pricing is separated from other 10Web set of tools, so if you wish to get 10Web hosting, AI Builder or 10Web Booster, you need to know that they are not included in the AI Assistant pro plans.
The 10Web AI Assistant and ChatGPT are AI-powered tools, but they have different purposes and distinct functionalities.
The 10Web AI Assistant is designed explicitly for content generation within the WordPress environment. It focuses on assisting users in creating targeted and optimized content, including posts, pages, and more. It leverages AI algorithms and language models to generate unique and SEO-friendly content while also providing integration with WordPress plugins and features.
On the other hand, ChatGPT is a conversational AI language model. It is designed to have interactive and dynamic conversations with users, providing responses and information on various topics. ChatGPT can engage in back-and-forth exchanges, answer questions, provide explanations, and offer general conversational support.
While both tools utilize AI technology, they have distinct purposes and functionalities. The 10Web AI Assistant is tailored for content generation within the WordPress environment, while ChatGPT is designed to engage in conversational interactions.
The closest alternative option for 10Web Assistant would be GetGenie, an AI content assistant for WordPress that offers a wide range of functionalities. This powerful tool can handle various types of content, including short copies and long-form articles.
With its search engine optimization capabilities, GetGenie enables you to optimize your content for better visibility and ranking on search engines.
One of the standout features of GetGenie is its extensive collection of 30+ templates. For more info, check my GetGenie review.
Other options include Jasper, Anyword, SEO Content Machine, Article Forge, and Kontent Machine.
10Web offers several set of tools and AI Assistant is latest addion. AI writing assistants have transformed the content creation landscape by leveraging the power of artificial intelligence. 10Web Assistant is one such tool that enables users to generate compelling and SEO-optimized content directly within their WordPress dashboard.
This innovative AI assistant has built-in SEO-checking and editing features, allowing users to quickly identify and rectify SEO and readability errors.
Whether you’re utilizing the Gutenberg or classic editor, the 10Web Assistant empowers you to create a wide range of content types. From paragraphs and outlines to copies, paraphrased text, product descriptions, introductions, conclusions, and more, you can leverage the AI assistant to streamline your content creation process and enhance the quality of your writing.
I suggest you try the free plan and see the quality of content generated and if 10Web Assistant would benefit you. You can always purchase a premium plan if needed.
| 1. What is 10Web AI Assistant?
10Web AI Assistant is an AI-powered virtual assistant that helps users manage and optimize their WordPress content. |
| 2. How does 10Web AI Assistant work?
The 10Web AI Assistant operates by utilizing the existing content on your website as a reference. It leverages this content to generate fresh and unique content optimized for SEO and engagement. |
| 3. Is there a free trial available?
The 10Web AI Assistant offers a free usage option. The freemium version has certain limitations, allowing you to generate up to 2000 words of content per month. This will enable you to experience and benefit from the AI Assistant’s capabilities without financial commitment. |
| 4. Is the content plagiarism-free?
10Web AI Assistant guarantees the creation of unique, original, and plagiarism-free content. |
| 5. Are there limitations on how much content can be generated?
In the free version, you can generate up to 2000 words of content per month. If your content needs exceed this limit, you can explore the paid plans and pricing offered by 10Web. By visiting their plans and pricing page, you can select a plan that aligns with your specific requirements and grants you access to a higher word limit for content generation. |
| 6. What technology is used to generate content?
The 10Web AI Assistant leverages multiple language models, including the powerful GPT-3 and its advanced variant, the Davinci model. In addition to these pre-trained models, 10Web has also developed its own custom AI algorithms to enhance the functionality of the AI Assistant. |
| 7. What are the 10Web Assistant benefits?
With its assistance, you can streamline your content creation process, improve productivity, and maintain consistency and quality across your content. |
| 8. How is word usage calculated?
They follow the assumption that every 5 characters constitute a word. When the AI generates text based on your input sentence, your word usage is determined by the total number of characters in the input and output text divided by five. |
| 9. What do you get with Assistant Pro?
Upgrading to the 10Web AI Assistant Pro gives you access to a range of additional features and benefits. These include the ability to connect with unlimited websites, an increased word generation limit of 10,000 words per month or higher (depending on the selected plan), support for both short and long writing and input lengths, access to long-content templates, and various other features designed to enhance your content creation experience. |
| 10. Is it compatible with other WordPress plugins and themes?
AI Assistant is designed to be compatible with the majority of popular WordPress plugins and themes. |
DISCLOSURE: Posts may contain affiliate links. If you buy something through one of those links, I might get a small commission, without any extra cost to you. Read more about it here.

If you run a business that requires appointment scheduling, having the right tools is essential for success. But it can be a daunting task to choose the right appointment booking plugin for your WordPress website.
With so many options available, it’s easy to get lost in the sea of choices. However, with BookingPress, you can rest assured that you are making the right choice.
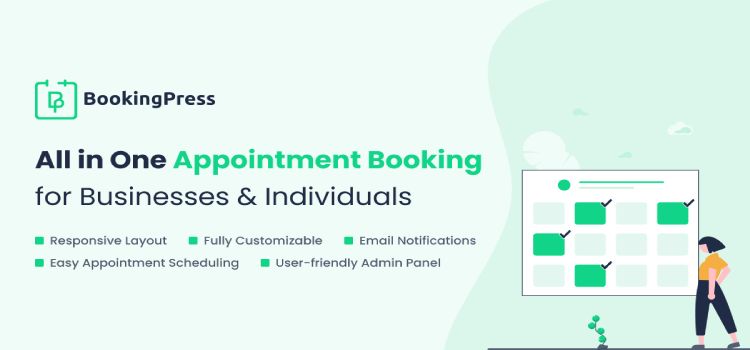
BookingPress is a comprehensive appointment booking plugin that allows you to easily set up a complete booking system according to your unique requirements. With its user-friendly interface and intuitive features, even those new to online appointment scheduling can quickly get started.
One of the most impressive features of BookingPress is that it provides 33+ premium add-ons and 15+ payment gateways completely free with its PRO version. This means you can access a wide range of advanced features and payment options without having to pay extra.
In this BookingPress review, I will show the features the plugin offers as well as its pros and cons.
BookingPress is one of the unique appointment booking plugins available today. This freemium plugin offers a wide range of features that will meet the needs of businesses of all sizes.
One of the standout features of this plugin is its ability to handle unlimited appointment bookings and services. This makes it an ideal solution for businesses that must manage multiple appointments and services simultaneously.
In addition to its appointment booking capabilities, BookingPress offers online payment options through integrations with popular payment gateways like PayPal, Stripe, and Mollie.
It also integrates with third-party programs and services like Google Calendar, Outlook Calendar, Zoom, and Mailchimp to streamline business operations.
BookingPress can be easily customized to fit your business needs and can be translated into multiple languages. It’s also fully compatible with popular page builders like Gutenberg, Elementor, and WPBakery, making customization easy without changing CSS codes.
BookingPress offers a unique 34+ premium add-ons for free with a premium membership. These add-ons enhance the website’s functionality and can be easily integrated using API keys.
The plugin provides excellent support and documentation to help users configure the add-ons, making it a comprehensive solution.
The most popular BookingPress premium version features include:
BookingPress offers a unique combination of a traditional appointment booking wizard system and a modern, intuitive user interface suitable for businesses of all types and sizes. You can effortlessly create and manage appointments directly from the admin dashboard without relying on any third-party plugins.
You can easily customize your appointment booking system according to your preferences with just a few clicks. The plugin’s user-friendly dashboard can be accessed through your WordPress admin panel and provides all the necessary configuration options in one place.
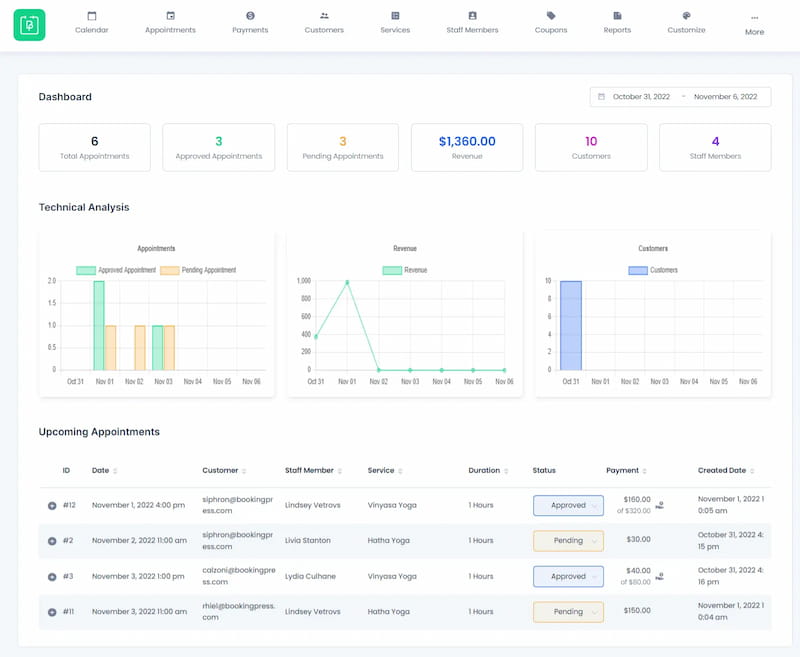
The dashboard provides a comprehensive overview of your appointments and revenue generated within a specified period.
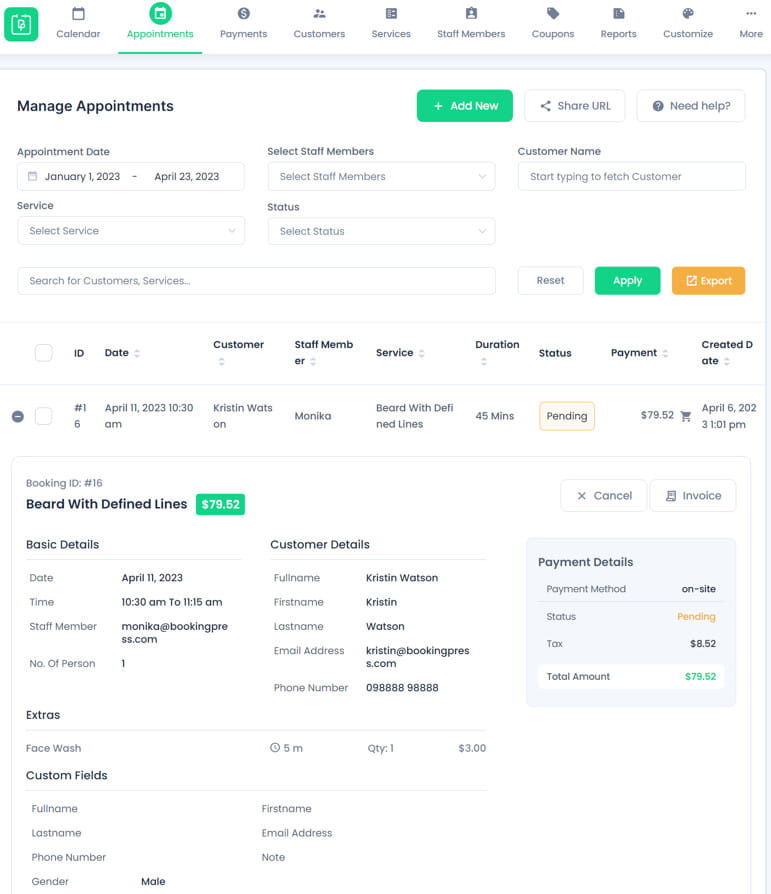
From the dashboard, you can view a list of all your appointments, payments, and the number of hours worked for each client and service type. The pending and upcoming appointments are also displayed for easy tracking.
The dashboard displays detailed information for each booking, including the date and time, customer name and email, assigned employee, booked service and duration, payment details, and booking status. This information gives you full visibility and control over your appointment schedule.
To help you track your progress, conversion information is also available. The calendar page lets you view and filter all of your appointments by service and location and manually add new appointments.
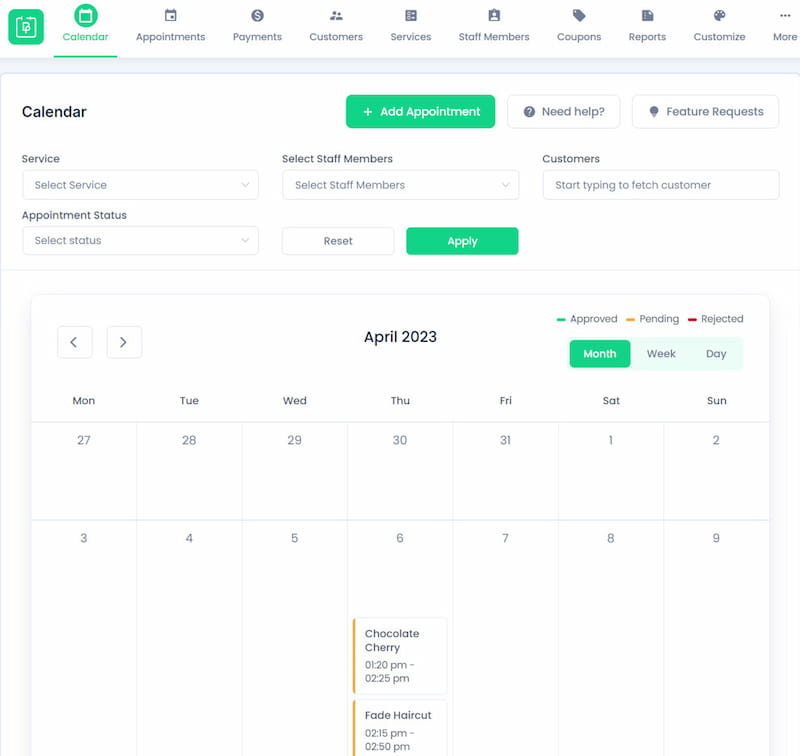
When you click the Edit button for an appointment, you can easily adjust its parameters and view payment information.
You will be able to see all the necessary information about scheduled appointments. To schedule a new appointment, click on the “Add New” button.
You can streamline your staff’s booking process by syncing your popular calendars like Google Calendar and Outlook Calendar with BookingPress.
This integration enables your team to schedule appointments more efficiently and quickly, with instant notifications on their synced calendars and can help ensure your team stays organized and on top of their appointments.
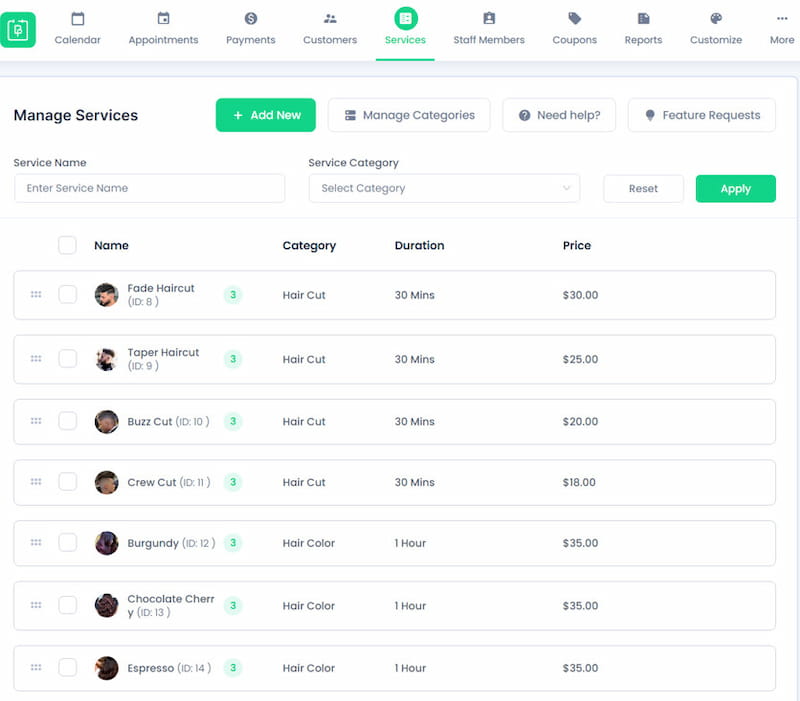
With BookingPress, you can add as many services as you need without limitations. However, it’s important to ensure your availability is managed properly to avoid scheduling conflicts.
The Services section allows you to create unlimited services, set their time duration and cost, and assign them to specific categories for better organization.
BookingPress also offers a unique feature allowing customers to make multiple bookings simultaneously. This feature is made possible by the Cart add-on, which enables customers to book multiple services simultaneously, unlike traditional booking plugins that only allow booking one service at a time.
BookingPress makes it easy to customize the appointment booking form, even if you don’t have CSS coding experience. But if you want to add your custom code, the plugin allows inserting custom CSS code.
Plugin comes with built-in customization feature that allows you to customize the booking form with just a few clicks. You can find all the customizable areas in the Customize section of the plugin settings.
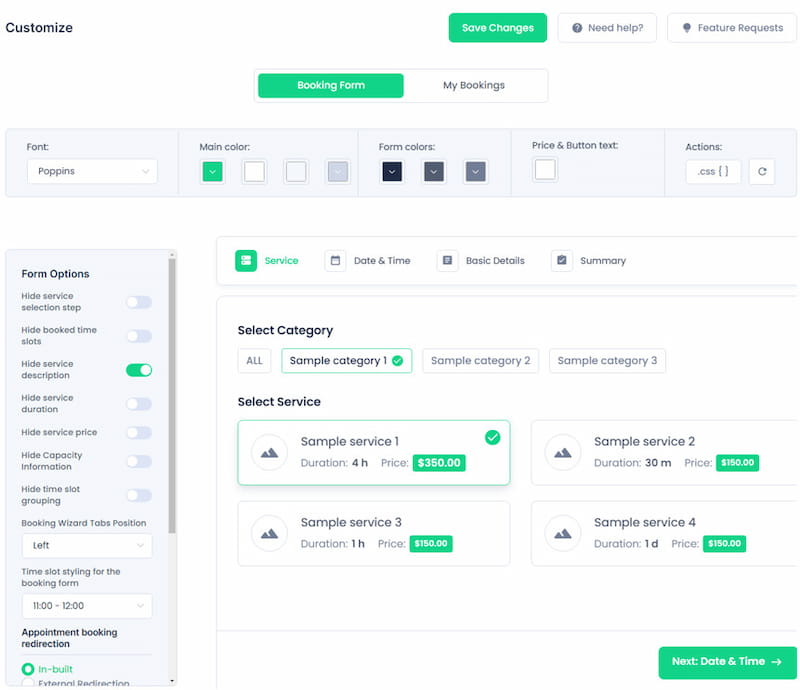
You don’t need to use the WordPress customizer. Instead, you can paste your code into the CSS section and save it. Using the built-in customization options and custom CSS codes, you have complete control over the appearance of your booking form.
If you need to change the frontend, head to the “My Booking” section and modify the settings to match your preferences.
BookingPress also provides additional form options to integrate with the plugin to enhance its functionality. You can enable or disable any of these options depending on your needs.
As a business owner, accepting payments is crucial. BookingPress makes it easy with its comprehensive payment settings, which can be configured on the payment settings page.

When you select a currency, it will be used throughout the website. Payment options include on-site payments and integration with popular payment gateways. Customers can choose on-site payment if they want to pay when they arrive at your office.
If they opt for a payment processor like PayPal, they will be redirected to the official PayPal website to complete the payment. You can choose from 15+ payment gateway add-ons.
The plugin offers payment integrations with PayPal, Stripe, Mollie, Authorize.net, Razorpay, 2Checkout, PayPal Pro, PagSeguro, Braintree, Paystack, PayUMoney, PayFast, Square, Worldpay, Skrill, etc.
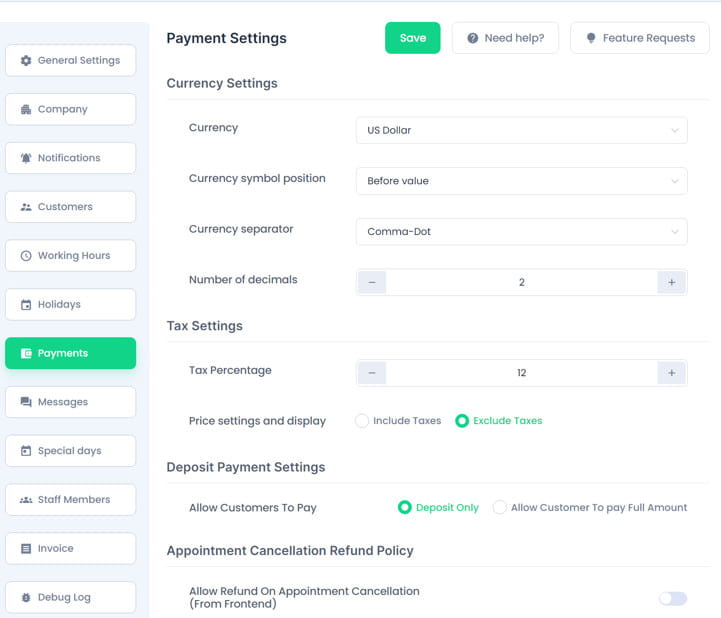
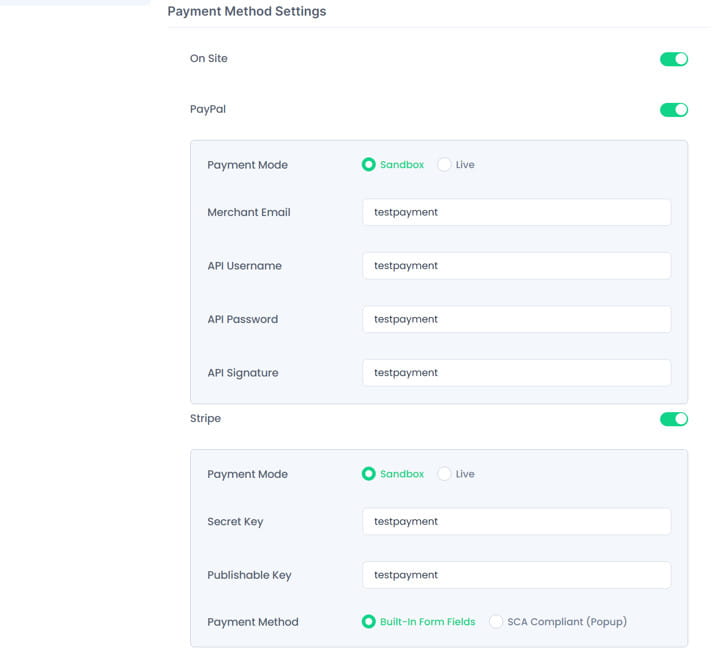
The plugin provides a sandbox mode to test and ensure everything is working well before going public, as well as a test mode for troubleshooting and debugging.
The Reports section in BookingPress is quite comprehensive, and you can use it to track various aspects of business performance. The reports are categorized into sub-sections.
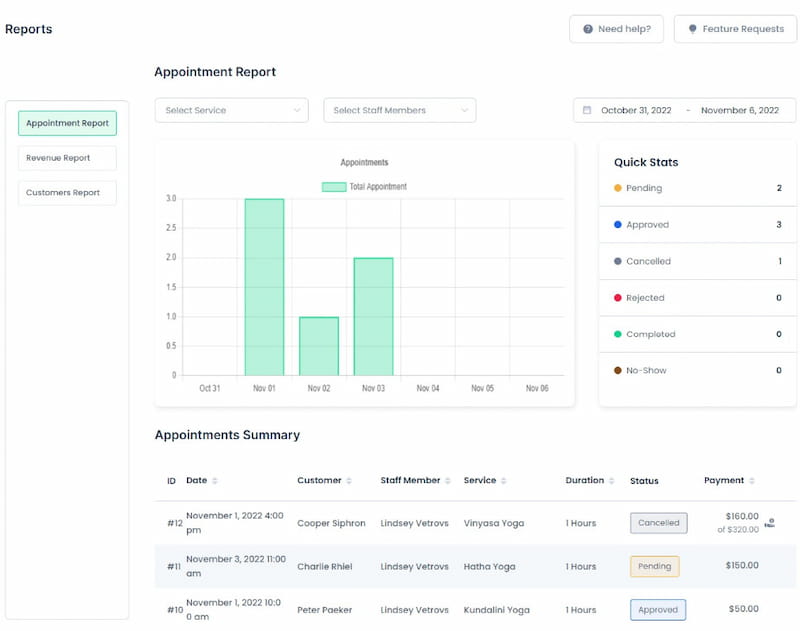
Furthermore, there are various filters available that you can use to narrow down your search and get specific reports.
You can send customized email notifications to customers once they book an appointment. The Notifications section allows you to customize email templates and even add custom notifications. You can set up notification emails for customers and staff to ensure everyone knows about the appointment.
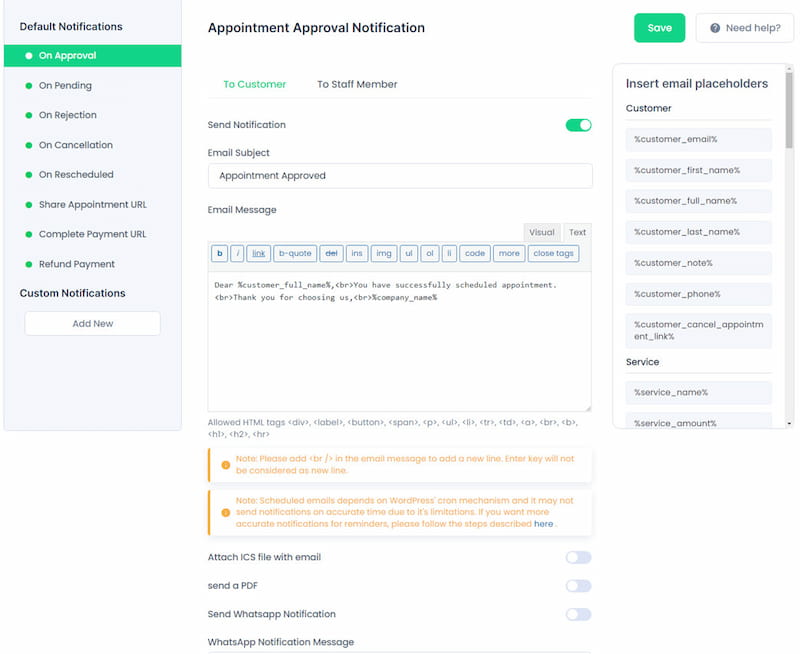
The plugin supports multiple email placeholders that you can use to mention specific data like the customer’s name or email. This makes it easier to personalize the emails.
Additionally, you can integrate MailChimp or AWeber with your appointment booking form to automate lead generation. Whenever someone uses your appointment booking form, their email address will be added to your email list, allowing you to run marketing campaigns and newsletters.
As an admin, you can easily create, modify, or delete staff accounts as needed.
Staff members can log in to their accounts to view their upcoming appointments and manage their schedules. This helps avoid scheduling conflicts and ensures everyone is on the same page.
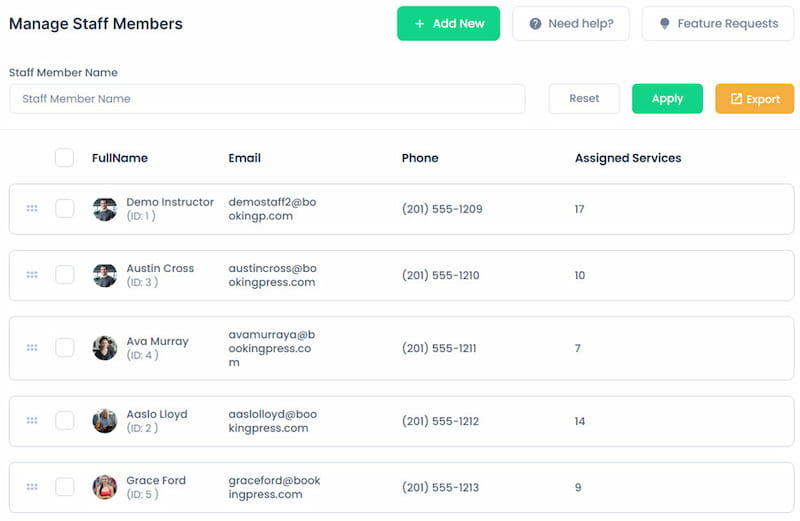
You can set different roles for each staff member, which allows limiting access to certain features and ensuring that everyone has the appropriate level of access.
BookingPress offers integrations with various third-party apps and services, which will help you make the best of your business.
Extend the functionality of BookingPress at no extra cost using 34+ add-ons:
BookingPress integrates with various top page builders in the market, such as Gutenberg, Elementor, WPBakery, and more. You can use any of these tools without worrying about compatibility issues.
Once you have created a booking widget, you can easily embed it anywhere on your website using your preferred page builder. Add the block and save your changes to see it in action on your website.
Translating the BookingPress plugin to other languages is easy with the use of popular WordPress translation plugins such as WPML, Polylang, and Weglot. This allows users to cater to a broader audience by providing services in multiple languages.
Customers will find BookingPress easy to use when making reservations. The booking process is straightforward, from start to finish. Customers can select the service they want to book, choose a date and time, and indicate if they have a preferred staff member.
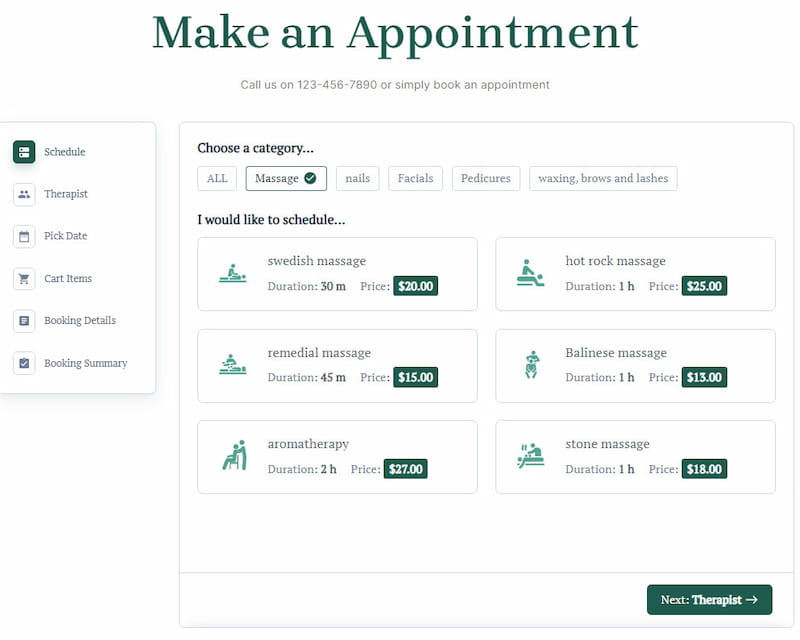
Customers can pay for their reservation after providing their name and email address. The steps are simple and easy to follow.
BookingPress has a customer panel feature that allows customers to log in and manage their appointments and profile.
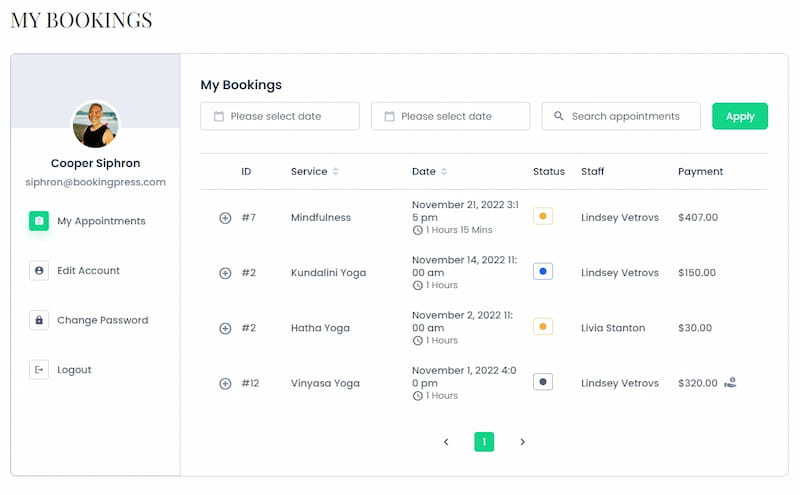
Here, customers can view and manage their appointments, filter them by date, name, etc., and even reschedule or cancel appointments if the administrator allows them.
There is a free version of BookingPress available in the WordPress plugins repository. Though the free version caters to the basic requirements, it does have its limitations. So, you can try out the free version and see if it makes good sense to get a premium version.
The pro version brings many valuable features to the table, and pricing plans are affordable. There are three pricing plans, and each comes with the same features (except the Location add-on). The only difference is in the number of sites on which you can use the plugin. Plans start from $99/year.
Check the full comparison between the free and pro version.
BookingPress offers several demo WordPress sites to showcase the plugin’s capabilities in different scenarios. This is a good way to see how your website’s front end and back end will look after installing and configuring the BookingPress plugin.
The plugin features an easy-to-use dashboard, user-friendly setup, and customizable appointment booking forms. Comprehensive tutorials and setup guides are available in the documentation section, and support is readily available in case of any issues.
The plugin is affordable and offers an all-in-one solution for managing your business’s bookings so if you want a reliable booking plugin that simplifies the booking process, BookingPress is an excellent option to consider.
If you think that BookingPress is not right fit for your needs, then you can check alternatives such as MotoPress Hotel Booking, Pinpoint Booking, or my list of good paid and free WordPress and WooCommerce booking plugins.
Here are some of the most asked questions regarding BookingPress.
| 1. What types of businesses can use BookingPress?
BookingPress can be used by a wide variety of businesses, including spas, salons, gyms, healthcare providers, and more. |
| 2. Can I customize the booking form?
Yes, you can easily customize the booking form to fit your specific needs using the customization options provided in the plugin. |
| 3. Is BookingPress mobile responsive?
Yes, BookingPress is fully mobile responsive, meaning it will work seamlessly on any device, including smartphones and tablets. |
| 4. Can I accept payments through BookingPress?
Yes, the plugin supports a variety of payment gateways, including PayPal, Stripe, and Authorize.net. |
| 5. How many services can I offer?
There is no limit to the number of services you can offer. |
| 6. Can I limit the number of bookings per day or week?
Yes, you can limit the number of bookings per day or week to ensure that you are not overbooked. |
| 7. Can I add a calendar to my website?
Yes, BookingPress includes a calendar widget that you can add to your website to show your available appointment times. |
| 8. Can I set up automatic email notifications for customers?
You can set up automatic email notifications to remind customers of their appointments and confirm their bookings. |
| 9. Can I create discount codes with BookingPress?
You can create discount codes to offer customers special promotions or discounts. |
DISCLOSURE: Posts may contain affiliate links. If you buy something through one of those links, I might get a small commission, without any extra cost to you. Read more about it here.

10Web AI Website Builder is a website-building tool that leverages the capabilities of artificial intelligence (AI) and machine learning to help users create professional-looking websites. Users can recreate an existing website or build a new one from scratch using pre-designed templates and a drag-and-drop interface.
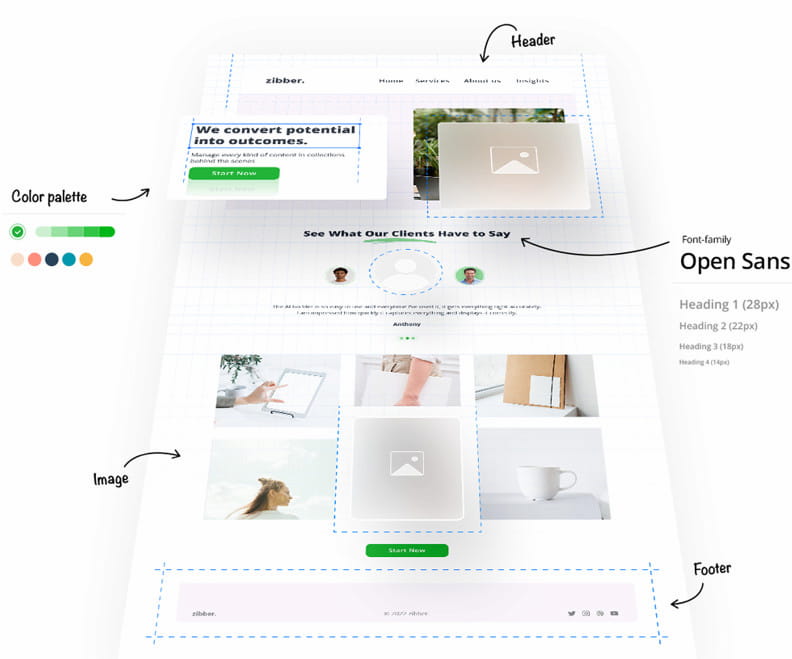
The 10Web AI Website Builder analyzes the content of an existing website and automatically generates a copy of its design elements, including fonts, color palettes, images, headers, and footers. Users can then use these pre-generated design elements as a starting point to build their own customized website.
In addition to its AI capabilities, the 10Web AI Website Builder also offers a range of other features and tools, such as premade pages, e-commerce functionality, and SEO optimization, to help users create a comprehensive and professional website.
The tool is designed to be user-friendly, so even those without technical knowledge or coding experience can easily create a website.
In this 10Web AI Builder review, I will show what the tool offers, if it can really build a site automatically for you, and what are its pros and cons.
| 10WEB DISCOUNT:
Use coupon kasatenweb for a 20% discount. |
10Web AI Website Builder is an incredibly powerful tool that makes the process of building a website much easier. With this technology, you can recreate a website quickly and efficiently without spending countless hours on coding and development.
One of the things I love about the AI Website Builder is its versatility. It can be used to build any kind of website; all you need to do is provide the URL of the webpage you want to replicate.
After you provide the URL, the AI Builder analyzes the page and generates a copy of its structure, design elements, and content blocks. This includes everything from fonts and color palettes to images, headers and footers, content sections, and even forms.
Using these pre-generated elements, you can build and customize a new website to meet your specific needs and preferences. It’s a straightforward and efficient process.
AI Builder tool also comes equipped with premade pages that you can effortlessly add to your website. By doing so, these pages will automatically adopt the design elements of your existing website, making the website creation process more streamlined and efficient.
Once you’ve set up the initial version of your website, you can continue customizing it according to your preferences. By incorporating your text, colors, and visuals, you’ll be able to create a website that truly stands out and meets your unique needs.
Features:
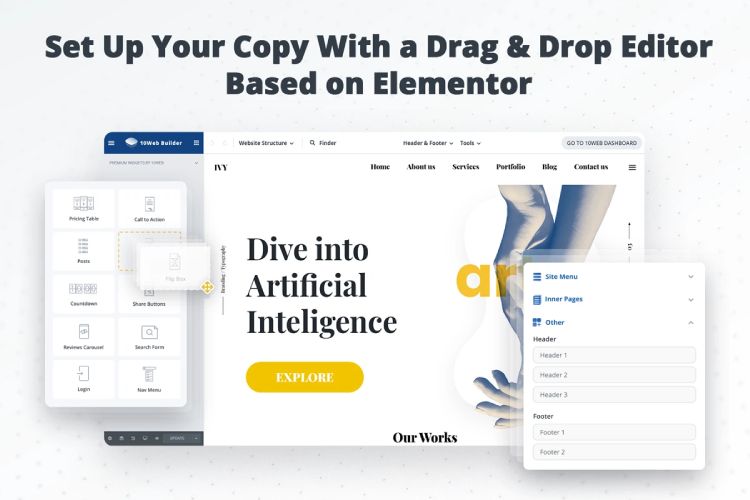
10Web AI Builder can recreate pages by entering a URL, or it can create a website from scratch. It uses Elementor for creating and recreating sites and site pages.
The AI Builder analyzes the structure and design elements of the website and creates a replica of it using the Elementor widgets and elements.
Once the replica is created, the user can then customize and modify it using the Elementor editor. The user can add their content, images, and design elements to the website, and the AI Builder will automatically adjust the design elements to match the new changes.
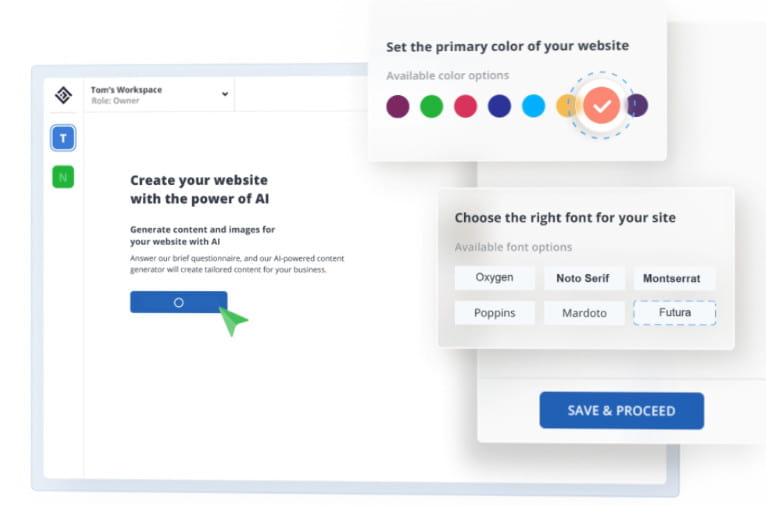
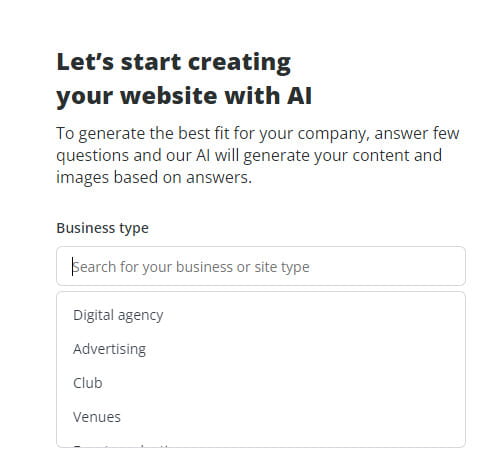
You can also create a website from scratch. Simply answer a few basic questions about your company, including its name, type, description, and services offered, and 10Web AI Website Builder will do the rest.
It will use your responses to automatically generate content and images for your website, saving you time and effort. After the initial creation, you can use the drag-and-drop editor, based on Elementor, to make further adjustments and customizations to your website as needed.
To start building a website with 10Web AI Builder, the first step is to select your business type from a dropdown menu. If you’re creating a website for personal use, you can select “Blog” as the company type and click “Next.”
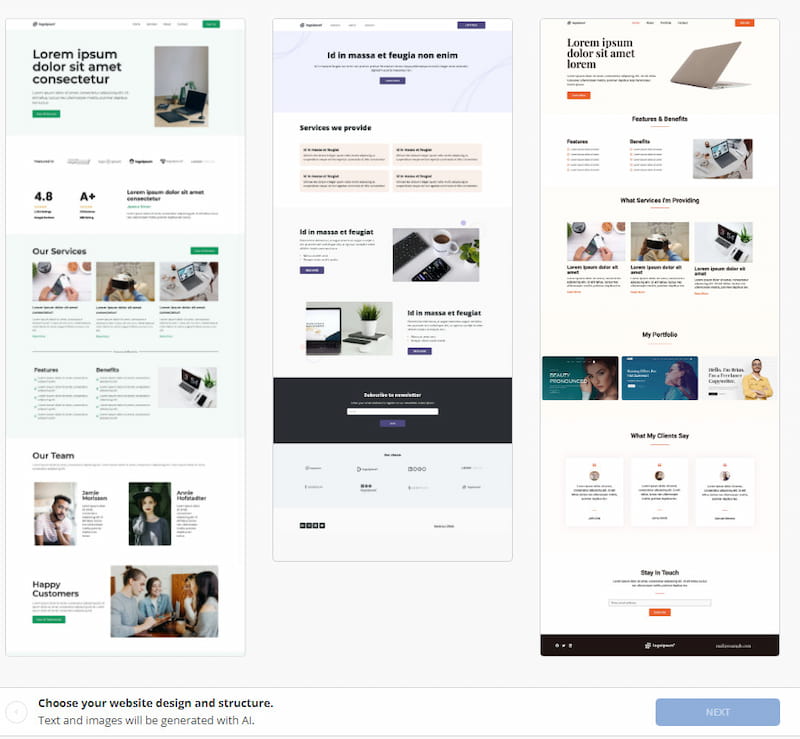
After that you will be presented with three choices for template layout.
Then, you’ll need to provide your company’s name and describe it in detail. To ensure optimal results, it’s recommended that you mention your target audience, industry, and what makes your business unique.
Moving on to step 2 of 4, you can choose up to three services or features you want your website to highlight. If you’re building a website for your business, these could be your various service levels or offerings.
The AI Builder will create support pages highlighting these services and features, with initial content already filled in. You can always make adjustments to this content later on.
In step 3 of 4, you can add an email address, phone number, and physical address if they’re relevant to your business. However, if you primarily operate online, you can skip these fields.
Finally, in the last step, you can choose the tone of your site. Depending on your target audience, you can choose between an informal or formal tone. With these simple steps, you can quickly and easily create a professional-looking website.
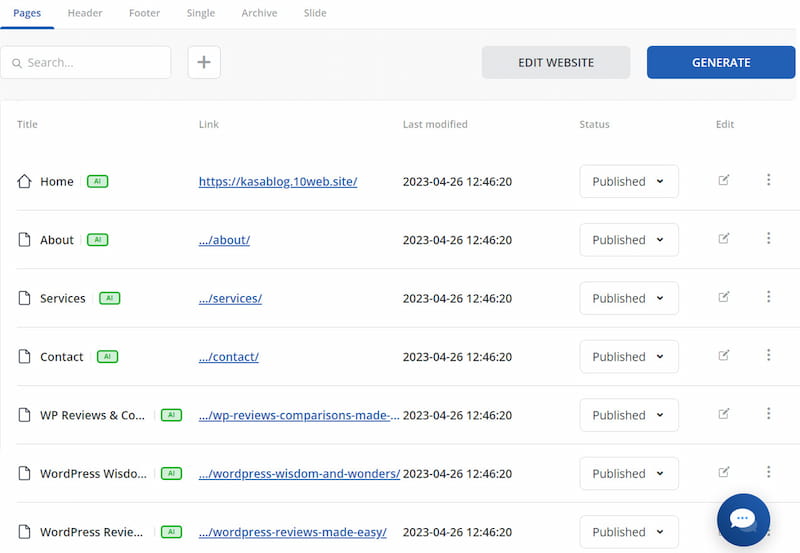
After the content has been generated, the 10Web AI Builder will populate several pages based on your selected theme. These pages include the home page, about page, contact page, and other pages, depending on the services and features you provide. Your next step would be to edit the content according to your specific requirements.
Once your initial content has been generated, 10Web AI Website Builder offers three options to add additional pages to your website: AI Recreation, Premade pages, or Blank page.
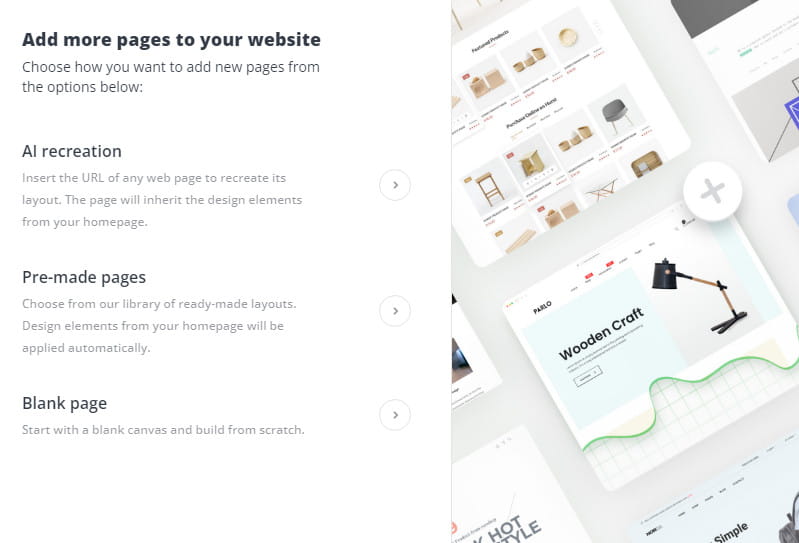
You can choose from various premade pages to add to your site or start from scratch with a blank page. The AI Recreation feature allows you to input an existing website URL, and 10Web will recreate the website on WordPress for you.
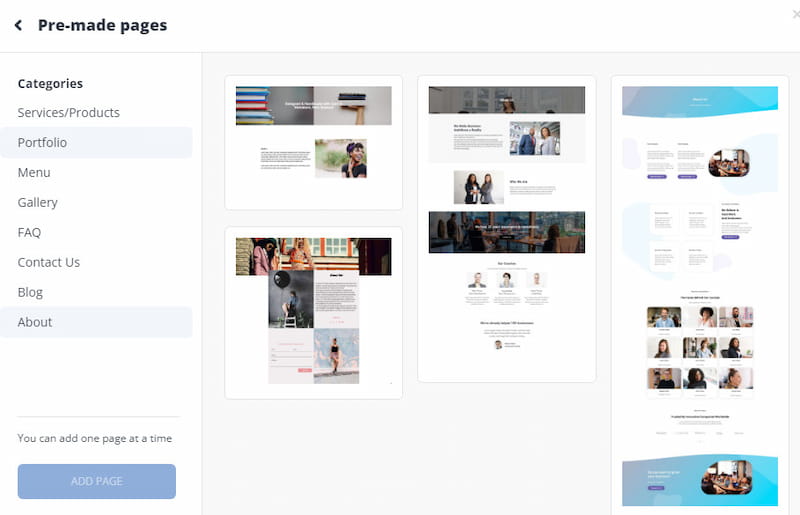
Additionally, 10Web AI Builder includes a header and footer that can be customized to fit the design of your website. The Builder also provides several templates that can be used to save time when adding content to your website.
AI Builder can’t be purchased separately like 10Web Speed Booster or AI Assistant. So, if you want to use it, you will need to purchase one of Platform plans which you can get on monthly or annual basis.
In Personal plan, you can only generate up to 5 pages, in Premium plan 10 and with Agency plan 20 pages for a site. This should be enough for most users.
10Web AI Site Builder utilizes Elementor for creating and recreating sites. But there is a significant difference between Elementor and other page builders available – 10Web creates sites automatically.
Also, 10Web site builder offers a range of unique features that distinguish it from other page builders on the market. For example, 10Web site builder is an all-in-one solution that provides hosting, a range of valuable tools, speed booster, etc. For more info, check my 10Web review.
With 10Web AI Website Builder, designing, building, and publishing your website has never been easier. This AI-powered DIY website builder leverages cutting-edge technology to streamline the website creation process, eliminating the need for manual coding and automation.
The tool uses AI technology to automate many tasks that usually take hours to complete manually.
AI Website Builder is a remarkably convenient and efficient solution for building websites. It can save you significant time and effort during the website creation process, making it a must-try tool for anyone looking to build a website quickly and with minimal hassle.
Here are some of the most frequently asked questions about 10Web site builder and answers to those questions.
| 1. Is 10Web site builder easy to use?
Yes, 10Web site builder is designed to be user-friendly, even for those without technical knowledge or coding experience. |
| 2. Can I build an e-commerce website using the 10Web site builder?
Yes, 10Web site builder offers e-commerce functionality to enable users to create online stores. |
| 3. Can I create a mobile-friendly website?
Yes, websites created will be optimized for mobile devices. |
| 4. How does 10Web site builder use AI technology?
It uses AI to analyze the content of an existing website and generate a copy of its design elements, including fonts, color palettes, images, headers, and footers. |
| 5. Can I customize the design of the website created?
Yes, 10Web Builder allows users to customize the design of a created website using pre-designed templates and a drag-and-drop interface. |
| 6. How long does it take to build a website using the 10Web site builder?
The time it takes to build a website using 10Web site builder depends on the complexity of the website and the level of customization required. However, many users report being able to create a website in just a few hours. |
| 7. Is a free trial available?
Yes, there is a 14-day free trial for new users. |
| 8. Does 10Web site builder offer a feature to optimize website speed?
Yes, it offers a speed optimization feature to help users improve the website’s loading speed. |
| 9. Is there a limit to the number of pages I can create using the 10Web site builder?
You can generate content and images for a template once within your free trial. After upgrading, the limits will depend on your plan. |
| 10. Is a hosting service also provided?
Yes, the Builder provides hosting services for your AI website. |
| 11. Does it only work with WordPress?
Yes, 10Web Builder only works with WordPress, meaning it can only create WordPress sites. |
| 12. Can I use 10Web Builder to recreate Wix, Squarespace, etc., sites in WordPress?
Yes, you simply insert the URL, and 10Web AI Builder will compy layout, design, and content using Elementor. |
DISCLOSURE: Posts may contain affiliate links. If you buy something through one of those links, I might get a small commission, without any extra cost to you. Read more about it here.

SpinnerChief is a highly effective tool for spinning articles, which enables you to create unique and easy-to-read content in a short amount of time. By utilizing advanced artificial intelligence and natural language processing technologies, the tool can comprehend and rephrase text to retain the initial meaning while making it unique.
It is suitable for anyone who needs to produce content. The tool provides various features, such as the ability to rewrite complete articles, paragraphs, and sentences and spin words individually. It also offers customization options to adjust the level of spinning and variation, allowing users to generate content that meets their specific needs.
In this SpinnerChief review, I will show all features it provides, test how well it performs when rewriting the content, and mention its pros and cons.
| SPINNERCHIEF DISCOUNT:
Use coupon SCamazingme40 for a 40% discount. |
SpinnerChief has a user-friendly interface, making it accessible and easy to use right from the start. The tool also provides a grammar checker feature that guarantees unique content and grammatically correct ones.
With SpinnerChief, you can restructure sentences, enhance the length of your content, break down lengthy sentences into shorter ones, shorten the content, improve its quality, and expand it.
SpinnerChief can generate hundreds of distinct variations and high-quality articles in just a few minutes using advanced algorithms and natural language processing technology. It even corrects spelling or grammar errors, making spun articles even better than the original.
Features:
SpinnerChief paraphraser is the main feature that you will use. It allows you to generate unique variations of the provided content. It uses advanced natural language processing (NLP) algorithms to analyze the text and then rewrites it in a way that maintains the original meaning while changing the structure and phrasing of the content.
SpinnerChief’s paraphraser feature includes various customization options, allowing users to adjust the spinning level, the degree of variation, and other factors to create content that meets their needs.

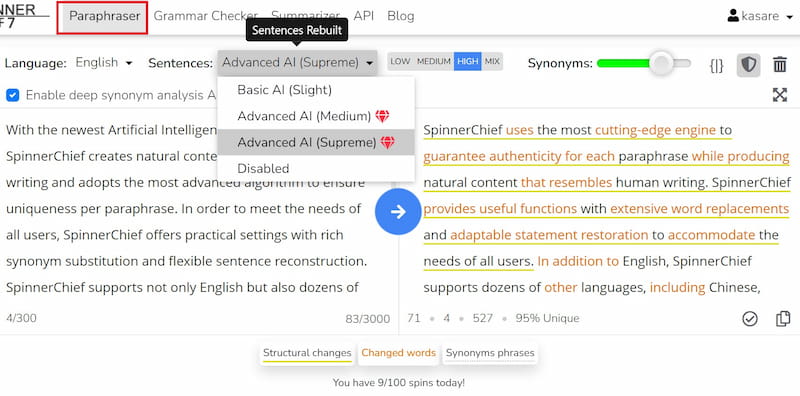
One of the valuable features here is Sentences Rebuilt, which has 3 levels. Basic AI option is used to restructure up to 5 sentences, the Advanced AI Medium option for up to 10 sentences, and Advanced AI Supreme to process all sentences. You can also disable this feature.
For the degree of sentence rewriting, you will have a low, medium, and high level. Select mix for randomly selecting the degree of sentence rewriting. You will also notice the synonyms setting slider with 5 levels (change a few words, replace some words, replace more words, and balance the quality, higher replacement rate, and maximum replacement rate.
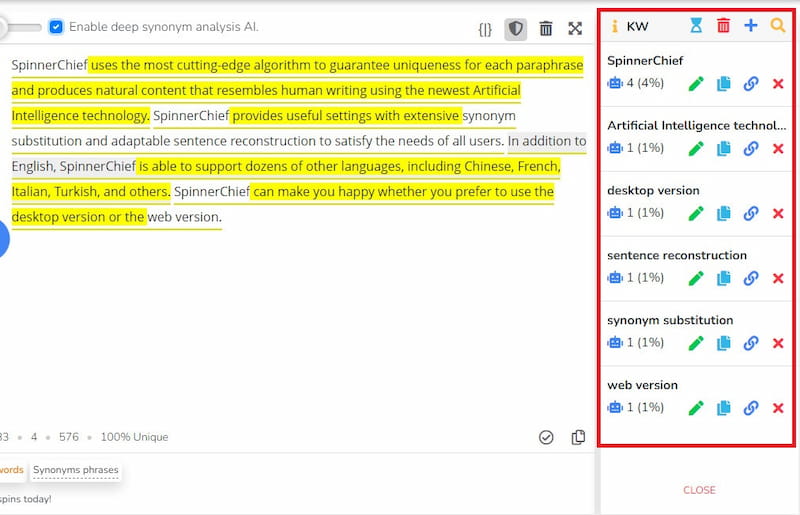
The “Enable Deep Synonym Analysis AI” feature in SpinnerChief allows the software to analyze the context of the rewritten content and then suggest synonyms that fit the meaning and context of the original text.
This feature improves the accuracy of the rewritten content by selecting synonyms that are not only interchangeable with the original words but also convey the same meaning and context.
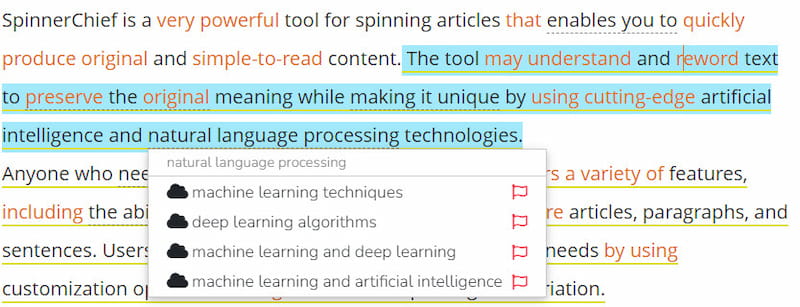
You can also manually select synonyms and adjust per your needs.
SpinnerChief’s grammar checker feature analyzes the grammar and syntax of the rewritten text. It can identify and correct common grammar and punctuation mistakes, such as tense verb errors, subject-verb agreement, and misused homophones.
The grammar checker uses advanced algorithms to analyze the text and suggest corrections, which the user can accept or reject. This feature helps to improve the readability and professionalism of the rewritten content.
This feature is intended for basic checking of grammar and spelling, so don’t expect it also to detect complex writing mistakes and improvements that tools like Grammarly, Trinka AI, Ginger, WhiteSmoke, ProWritingAid, etc. can detect.
The SpinnerChief Summarizer feature allows users to input a lengthy article or text and create a shorter, summarized version of the original. This feature utilizes advanced algorithms to extract the most important sentences and concepts from the original text and condense them into a shorter, more digestible format.
The summarization process considers the context and meaning of the original text to ensure that the summary accurately represents the key points and ideas. This feature can be useful for those who need to quickly understand the main points of a lengthy article or for creating summaries for online content.
The issue that I often encountered when using this feature is Processing failed error, which I am not sure why it happens.
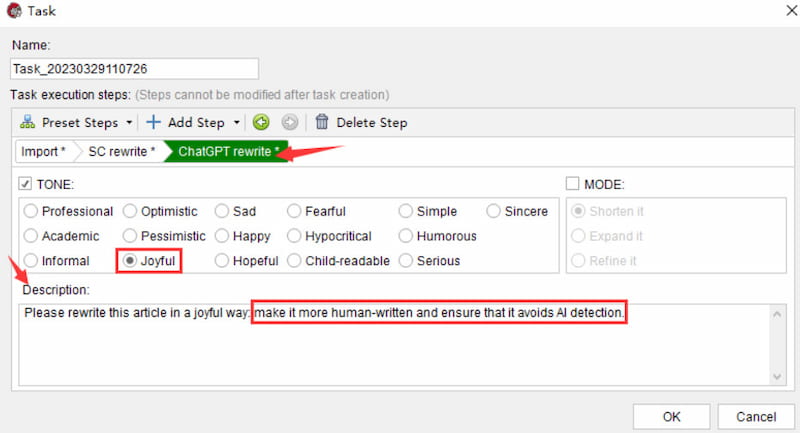
Experience the ultimate article generation tool with ChatGPTSpin, a combination of the advanced technologies of SpinnerChief and ChatGPT.
With ChatGPTSpin, you can produce articles that are not only unique and optimized for specific keywords.
ChatGPTSpin offers a hassle-free article generation process that requires you to provide detailed descriptions of the article you want, and the tool takes care of the rest. You can even exclude specific keywords from the article to ensure the final output meets your requirements.
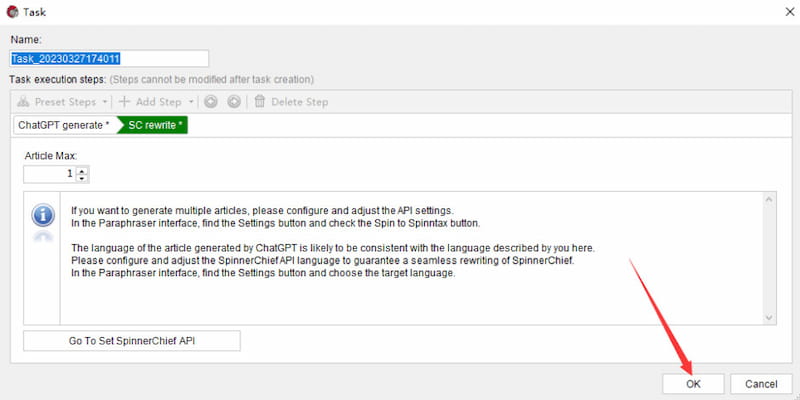
One of the significant advantages of ChatGPTSpin is its flexibility, which allows you to repeat the SpinnerChief and ChatGPT rewriting steps as many times as needed, and in any order you choose, to achieve the desired level of uniqueness and readability.
Also, ChatGPTSpin enables you to avoid AI detection and produce articles that pass even the most stringent plagiarism checks.
Here are some of the features of ChatgptSpin:
ChatGPT and SpinnerChief are tools designed to help users create unique content. However, they differ in their purpose, functionality, and approach to content creation.
ChatGPT is a conversational AI language model that uses deep learning algorithms to understand and generate human-like responses to various queries and topics. It is designed to simulate human-like conversations and provide users with helpful, informative, and engaging answers.
On the other hand, SpinnerChief is an article-spinning tool that uses advanced algorithms and natural language processing technology to generate unique variations of existing content while retaining the same meaning.
But ChatGPT can also be used to rewrite content. So why use SpinnerChief when you can get rewritten content for free with ChatGPT?
Most will be happy with how ChatGPT rewrites the content, but the difference is that SpinnerChief is better at rewriting content and making it unique, considering it is optimized for that purpose. So if you want your content to be more unique and fine-tune it, SpinnerChief will be a good option.
The SpinnerChief API offers a convenient way to integrate SpinnerChief into other compatible desktop software products, online services, WordPress plugins, etc.
By submitting texts to SpinnerChief’s servers, the API takes care of the laborious work of article spinning. You can use SpinnerChief’s API to automate the article-spinning process and streamline workflow.

You can send up to 500 Paraphraser API requests per day. If you only need API requests, you can just purchase API service.
SpinnerChief can be purchased as the Ultimate version or Team Ultimate. Ultimate version plans can be purchased at a monthly price tag, annual or one-time payment. A one-time fee plan is definitely the best option to save money. Every plan comes with the same available features.
Team Ultimate version plans differ by the number of team users – 3, 5, and 10 users. Each plan can be purchased as an annual or one-time payment.
SpinnerChief pricing is not the lowest on the market, but it is still competitive with other tools that serve the same purpose. The software offers multiple pricing plans to fit different budgets and needs.
The monthly subscription fee ranges from $57, and the yearly subscription fee from $107, depending on your chosen plan. The lifetime license fee is a one-time payment of $307, which can be more cost-effective for long-term use.
Some of the popular SpinnerChief alternatives include Spin Rewriter and WordAI.
WordAi is a powerful tool that automatically rewrites entire sentences and paragraphs to create unique content in the English language.
WordAi goes beyond basic synonym replacement and instead utilizes advanced technology to understand each word’s context in the original content. This ensures that each synonym chosen by WordAi makes sense and fits seamlessly within the rewritten content.
The tool’s advanced natural language processing capabilities enable it to comprehend the meaning of each word and how each word interacts with the others in the sentence. By analyzing the content, WordAi can suggest ways to rewrite sentences that have no resemblance to the original sentence.
WordAi can create sophisticated paragraph and document-level spins that make your content look natural and coherent.
Now that you know more about WordAI, you can see below a comparison SpinnerChief vs. WordAI based on the features each tool provides.
PRODUCT
You access via your browser
You need to download and install
At no extra charge
LIFETIME OPTION AVAILABLE
INTEGRATION WITH OTHER TOOLS
Compare your original and spun articles so you can immediately see the difference.
Add relevant public domain images to your article
Add nested spintax to your articles.This multiplies the number of variations you can get from a single article
SENTENCE SPINNING
PARAGRAPH SPINNING
If you want HTML, ability to get fully marked-up content
Does the tool have extensive documentation or video tutorials on how to get most out of spin rewriter
Detects unordered lists and puts the elements in a completely new order, increasing the uniqueness of your article.
Connect your CopyScape account to get an assessment of whether your article is unique
GRAMMAR AND SPELL CHECK
Which languages spun rewriter support and can provide spun content for
Allows you to add your own synonyms for certain keywords and then force spin rewriter to use your synonyms when it comes upon a word from your list
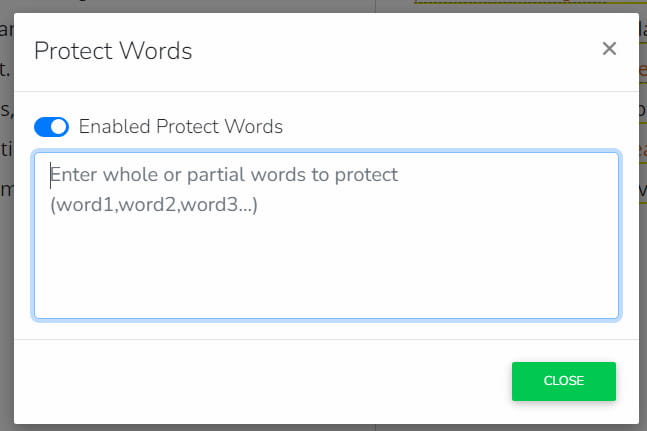
Add keywords that you don’t want the software to touch at all
Save all your work and edit later if needed
MANUAL SPINNING
Spin more than one article at the same time
Option to download saved files
Submit article(s) to your blogs and many article directories directly from tool
Scrapes videos from ( for example) Youtube according to your keywords and you can insert these videos into your article
Check the density of your project keywords
Highlight a selected words in article, and make them all anchor text for any URL
Choose selected sources and scrape articles based on your keywords, then import them to start spinning
Does the tool have only paid version or free version also
Do you have option to try product before paying
Time in which you can ask for refund if not happy with product
PRICE
WordAi
English
Three day trial
30 days
$57/month and yearly $324
SpinnerChief
100 spins per day with pro version
Only couple YT videos
English gives best results but for rest of languages I am not sure if they provide good results.
You can use free version to test
There is option for refund request but there is nowhere mentioned what are the terms
Per month, per year and lifetime pricing plan. Starts from $57/month to $307 one time plan
SpinnerChief comes in desktop and web versions, while WordAi is entirely web-based. I personally prefer web versions, so it is good that both tools offer it. But it is important to note that the SpinnerChief web version doesn’t have all the desktop version’s features and vice versa, so you would need to use both to utilize everything the tool offers.
WordAI and SpinnerChief offer an easy-to-use web interface with just enough features for article spinning to make it simple and not overload users with a bunch of features most of them will not use.
WINNER: Both tools offer easy-to-use interfaces when it comes to the web version.
Both tools offer similar options regarding rewriting features, so there is not much difference in that field.
Both tools offer grammar checker feature out of the box. I have not extensively tested it, but from a few tests conducted, it can be seen that the grammar checker feature does an okay job in both tools.
Both tools offer protected words option and bulk spinning. But SpinnerChief has a feature that WordAI doesn’t. It is Keyword Analyst, and it is available only in English.
It is not feature of significant value, but some may consider it as useful.
WINNER: When it comes to the features they provide, I would say that SpinnerChief slightly wins in this field.
SpinnerChief has certain limitations when it comes to rewriting content. In the paid version, you are limited to 100 spins per day for max 3000 words and max 300 sentences per spin. That would mean that you can rewrite about 9 million words per month.
Grammar Checker and Summarizer are also limited to 100 spins per day, while API usage needs to be purchased separately based on what you need (it can be purchased based on only grammar checker or also summarizer and paraphraser) and based on how many requests per day you need.
WordAI’s standard plan includes 3,000,000 rewritten words per month that can be used between the main interface, bulk rewriter, and API.
If you need more than 3,000,000 words in any month, you can purchase them at a rate of $2 per 10,000 words. This would mean SpinnerChief offers more words to rewrite per month. In the WordAI interface, you can rewrite up to 5,000 words at a time.
WINNER: SpinnerChief has more available words per month for rewriting purposes than WordAI.
SpinnerChief is a cheaper option when it comes to an annual plan and also offers a lifetime plan with a one-time payment, which can save money in the long run. WordAi doesn’t have a lifetime plan.
While WordAI doesn’t offer a free version, SpinnerChief can be tested in its free, limited version, which is good.
WINNER: SpinnerChief offers cheaper plans compared to WordAI.
WordAI supports only the English language, while SpinnerChief supports a vast amount of languages when it comes to rewriting. It is hard to build tool that will be good for rewriting in one language, so it is strange that SpinnerChief supports so many. It is natural to question the quality of provided content in many languages.
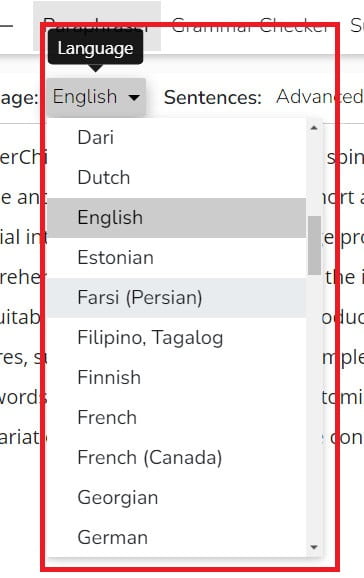
As Croatian is my native language, I have tested SpinnerChief when it comes to providing rewritten, unique content in Croatian. The results were not perfect, but I was surprised at how good they actually were.
I expected terrible rewritten content. Of course, just like with English, the more synonyms you set and the higher the other settings, the results will be less human readable. I can’t test the quality for other language options because I don’t know any other language.
WINNER: SpinnerChief is the winner here, as WordAi supports only rewriting in the English language.
Now I will test SpinnerChief vs. WordAI regarding the quality of generated article output.
But be noted, considering both tools have options to adjust rewriting levels, it is hard to compare results as results highly depend on those settings.
EXAMPLE 1
Here is WordAi rewritten content for particular text using its Regular setting. This is the first output without me changing anything. WordAi generated content looks good, but it excluded in rewrite output many parts of the content.
Here is SpinnerChief generated output for that same content. This is the first output without me changing anything. I have used all medium settings to be approximately the same as WordAi’s regular setting.
WINNER: From what I can see, SpinnerChief did a better job, and if I would choose which content to use on the live site, I would choose the output SpinnerChief generated (after a few content adjustments).
EXAMPLE 2
This time I will use a little more complex article with technical terminology, which is not exactly written best, to see how each tool performs in those cases.
Here is SpinnerChief generated output for that content. This is the first output without me changing anything. This time, I have used Advanced sentence rebuilding, max sentence rewriting, and almost max usage of synonyms to be on par with the max level setting of WordAI that I will use.
Here is WordAi rewritten content for that same text using a More Adventurous setting. This is the first output without me changing anything. You can see that the content generated is good but not very different from the original. Some sentences are mixed and worded differently but not as unique.
WINNER: In my opinion, SpinnerChief was better. The content I used for testing tools was not well written, so the results were lower quality, but SpinnerChief still did a solid job.
Here are some of the advantages and disadvantages of using SpinnerChief.
PROS
CONS
SpinnerChief can be considered a writing assistant that helps you to enhance your content, and it is a valuable tool for those who want to add a new dimension to their writing skills.
SpinnerChief functionality revolves around replacing certain words or phrases within your text while preserving the original message. It can accomplish this by generating fresh ideas, recycling previously written content, enhancing readability, saving valuable time, and improving search engine optimization.
In my opinion, SpinnerChief is a useful tool offering a wide range of features to help content creators efficiently produce high-quality and unique content.
With its advanced algorithms and thesaurus, it is capable of generating content that is not only readable but also optimized for SEO. The ability to customize the rewriting process and exclude specific keywords allows users to have complete control over the output.
SpinnerChief API offers seamless integration with other software products, making it even more versatile.
The quality of content generated by SpinnerChief can vary depending on the input and settings used. However, SpinnerChief utilizes advanced algorithms and techniques to ensure that the output content is unique, readable, and coherent.
Additionally, its built-in thesaurus and synonyms database helps to improve the flow and overall quality of the content. Reviewing and editing the generated content to ensure it meets your standards and expectations is still recommended.
I believe that SpinnerChief can be a valuable tool for content generation, especially for those who need to generate a large amount of content quickly.
Here are some of the most frequently asked questions about SpinnerChief.
| 1. What is SpinnerChief, and what does it do?
SpinnerChief is a tool designed for article spinning, which is the process of creating unique versions of an existing article while retaining the same meaning. |
| 2. How does SpinnerChief work?
SpinnerChief uses advanced algorithms and NLP technology to analyze the original content and generate unique variations that retain the same meaning. |
| 3. What are the benefits of using SpinnerChief?
It can save time and effort while producing high-quality, unique content. It provides various customization options to adjust the level of spinning and variation, allowing users to generate content that meets their specific needs. The tool also offers a grammar checker to ensure that content is grammatically correct. |
| 4. Is SpinnerChief easy to use?
Yes, SpinnerChief is designed with a user-friendly interface. |
| 5. Can it spin entire articles?
Yes, SpinnerChief can spin entire articles or individual paragraphs and sentences. |
| 6. Can SpinnerChief spin words on a word-by-word basis?
Yes, it offers the option to spin words on a word-by-word basis, allowing users to create highly unique content. |
| 7. What are the differences between the free and paid versions of SpinnerChief?
The paid version of SpinnerChief provides additional features and customization options, such as more advanced spinning algorithms, the ability to spin content in multiple languages, and more. |
| 8. How does SpinnerChief compare to other article-spinning tools?
SpinnerChief is considered one of the advanced article-spinning tools available, offering a wide range of features and customization options that might not be available in many other tools. |
| 9. Does it offer a grammar checker?
Yes, it offers a grammar checker that ensures grammatically correct and error-free content. |
| 10. Can SpinnerChief be used to rewrite content in multiple languages?
Yes, SpinnerChief offers the ability to spin content in multiple languages. |
| 11. Can it be integrated with other software tools?
Thanks to its API, it can be integrated with various other software tools, allowing users to seamlessly use article-spinning functionality in their existing workflow. |
DISCLOSURE: Posts may contain affiliate links. If you buy something through one of those links, I might get a small commission, without any extra cost to you. Read more about it here.

If you’re looking for a more efficient way to insert affiliate links, search for products based on keywords, automatically update prices, and add products from multiple affiliate networks, then you need a reliable affiliate plugin like Affi AI.
With Affi AI, you’ll have access to a wide range of features that will make your life easier and your affiliate marketing efforts more profitable.
Whether a beginner or an experienced affiliate marketer, you can easily tailor Affi AI to fit your needs. And adding products from multiple affiliate networks allows you to expand your options and maximize earnings.
In this Affi AI review, I will go into the features this WordPress affiliate plugin offers, how it works, and its pros and cons.
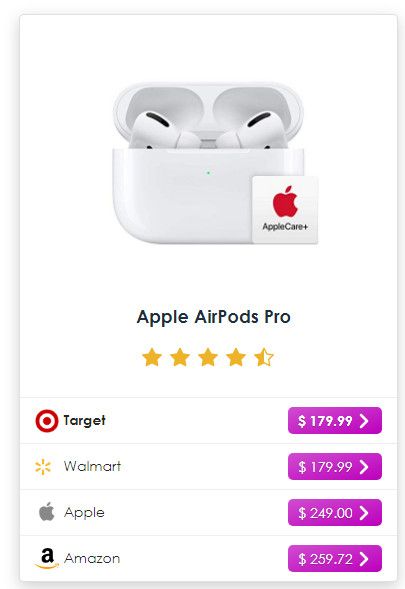
With Affi.ai, integrating products and services on your site has never been easier. You can display products or services with price comparisons and with offers from different merchants to create an attractive and informative website that will generate more revenue.
One of the standout features of Affi.ai is its smart contextual advertising. You can highlight products, services, and merchants with just one click to make them more visible to your website visitors.
With the automatic display of products from Amazon, eBay, Aliexpress, and Kelkoo, you can expand your offerings and maximize your potential earnings.
Another advantage of Affi.ai is its time-saving and user-friendly design. With daily and automatic updates of products, prices, information, and stock levels, you’ll always have the latest information on your site.
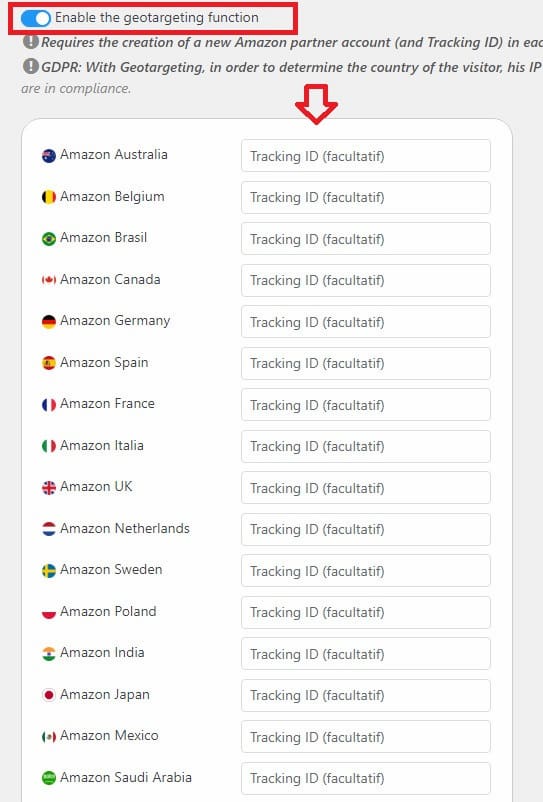
Plus, Affi.ai supports multiple merchants and platforms, custom merchants, giving you unlimited possibilities for affiliate earning. Plus, Affi.ai offers store localization, which is especially useful for affiliates promoting local store products from Amazon, eBay, and other marketplaces.
One thing I appreciate about Affi.ai is that it doesn’t require an Amazon API to display products, making it an excellent option for affiliates who don’t have access to API keys. And, with the ability to generate your product boxes directly from your WordPress post editor, you can quickly and easily add products to your site.
Affi.ai is SEO, mobile-friendly, and AMP compatible, ensuring your website is easily accessible and viewable on all devices.
Plugin also has useful custom disclaimer option and displays information about the price last update to comply with affiliate programs policy (like Amazon).
Affi.ai offers seamless integration with four affiliate programs. Those are Amazon, eBay, AliExpress, and Kelkoo, allowing you to automatically retrieve all the necessary data, such as product images, descriptions, and prices, without any additional effort.
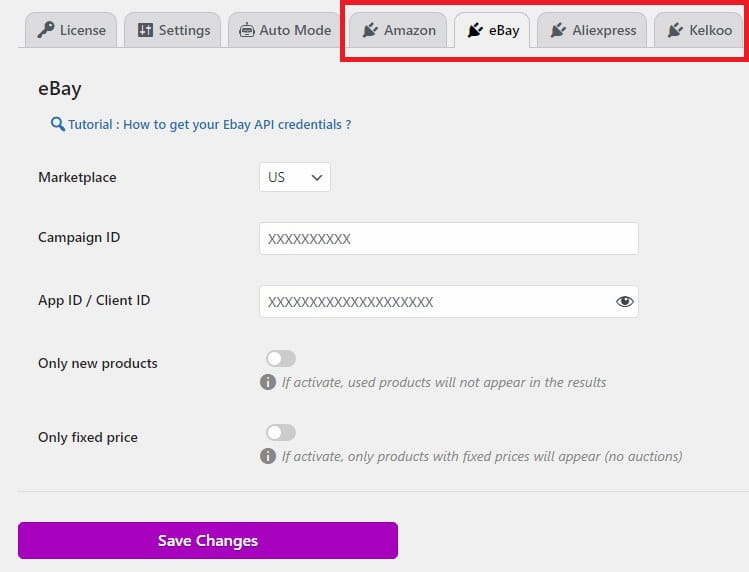
All you need to do is enter your API keys and tracking IDs for the affiliate programs you’re registered with, and the plugin will do the rest. The icon next to your chosen platforms should turn green, indicating that the selected merchants are active and ready to go.
One of the benefits of using Affi.ai is that the data is updated daily, ensuring that your website visitors always have access to the latest information on products, prices, and promotions. And with the ability to activate multiple merchants and platforms, you can quickly expand your offerings and target a wider audience.
If you want to use affiliate programs other than the ones that Affi.ai integrates with out of the boy, you can take advantage of the Custom Merchants feature.
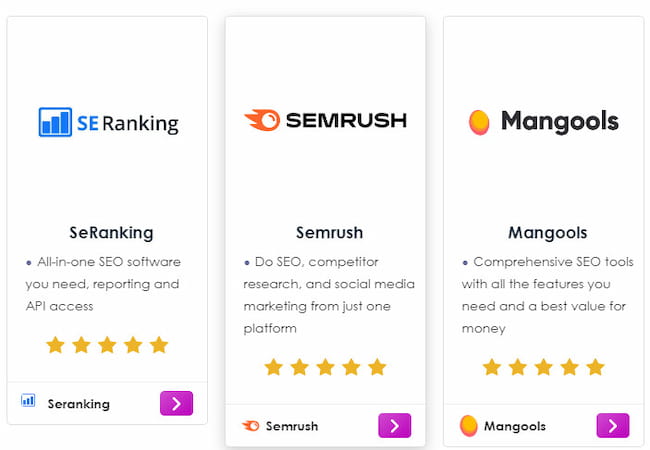
This feature allows you to use other programs directly or via any affiliate platforms, including Awin, CJ, ClickBank, Effinity, FlexOffers, Rakuten, ShareASale, Skimlinks, Tradedoubler, Walmart, and more.
Suppose you occasionally want to add a custom merchant to a comparison or custom box. In that case, you can do so directly via the interface in the “Advanced Settings” -> “Product” -> “Add Merchants” section. Here, you can simply input a regular or tracked link to include the desired merchant.
However, if you frequently work with specific merchants and want to convert your deep links into tracked links automatically, the Custom Merchants option is the best choice.
By adding a favorite merchant to the Custom Merchants area within Affi.ai, you will no longer need to manually create your tracked links on the platforms each time you create a shortcode.
Once the merchant is entered into Affi.ai’s Custom Merchants space, the tool will automatically create the tracked deep links when you click “Convert to Tracked URL” in the creation interface. This feature saves you time and streamlines working with your favorite merchants.
With the Custom Merchants feature, you can integrate customized merchants in price comparison boxes and create custom boxes. It’s worth noting that with custom merchants, the data products and the price of custom merchants will not be updated automatically, like with Amazon, eBay, AliExpress, and Kelkoo.
There are several formats you can use:
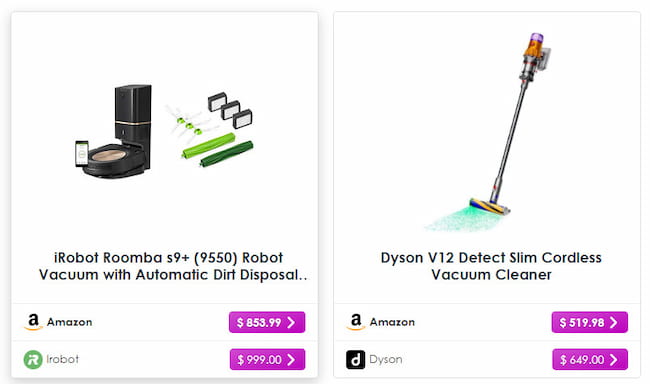
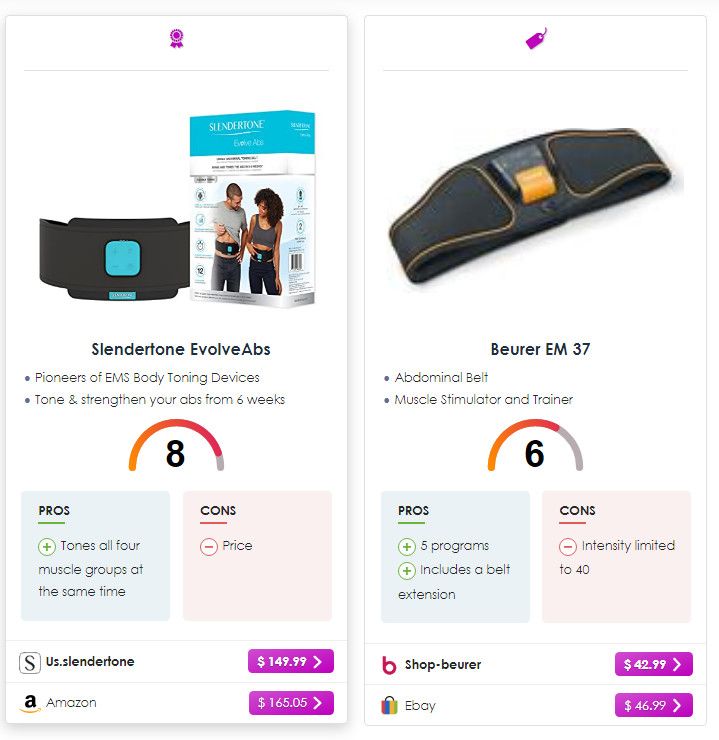
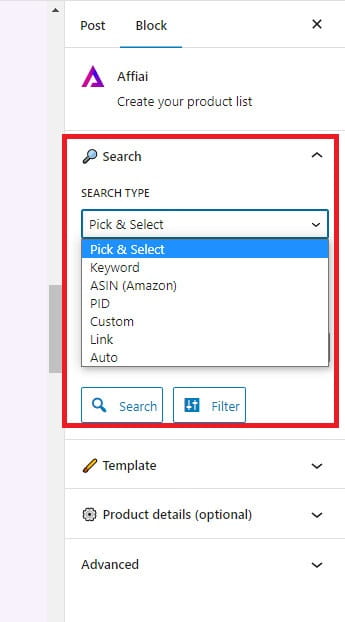
Affi AI gives you complete control over the products you want to display on your website.
You can select the products using keywords, ASIN codes, pick and select, etc,, and Affi AI will automatically retrieve all relevant information, such as photos, titles, descriptions, merchants, and updated prices.
All the product boxes generated by Affi ai come with tracked links that contain your affiliate IDs for Amazon, eBay, AliExpress, and Kelkoo. You can generate revenue from all purchases made through these links.
The plugin also ensures that all the information displayed on your site is up-to-date, as it automatically updates the prices and other details daily without any action from you.
Plugin is compatible with Divi, Elementor, Gutenberg, Classic Editor, and many page builders and can be easily integrated using shortcodes and widgets.
You can choose between quick and custom modes to suit your preferences. Quick mode lets you display products on your website using auto mode or typing in a keyword within seconds.
On the other hand, custom mode allows you to customize the format, number of products/services, custom merchants, titles, descriptions, colors, icons, notes, pros, cons, etc.
The plugin comes with a nice feature called “Auto” mode, which automatically displays relevant products before or after an article or page. This feature matches the title of the article or page to find products that are relevant to the content.
Choose the language that will be used to search for products matching your content. Additionally, you can display products automatically at the beginning, middle, after the 1st, 2nd, or 3rd paragraph, and/or after all my posts and/or pages.
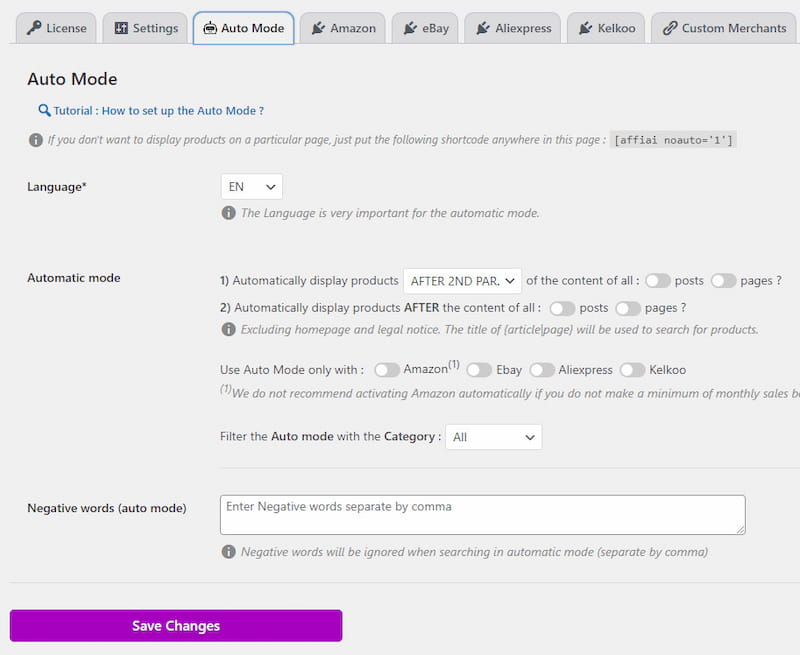
You also can exclude specific keywords that could cause issues during product searches. A field called “Negative words” allows you to enter these keywords.
It’s recommended not to use Amazon in auto mode because Amazon may limit your API quota if you don’t make a minimum monthly sales with them.
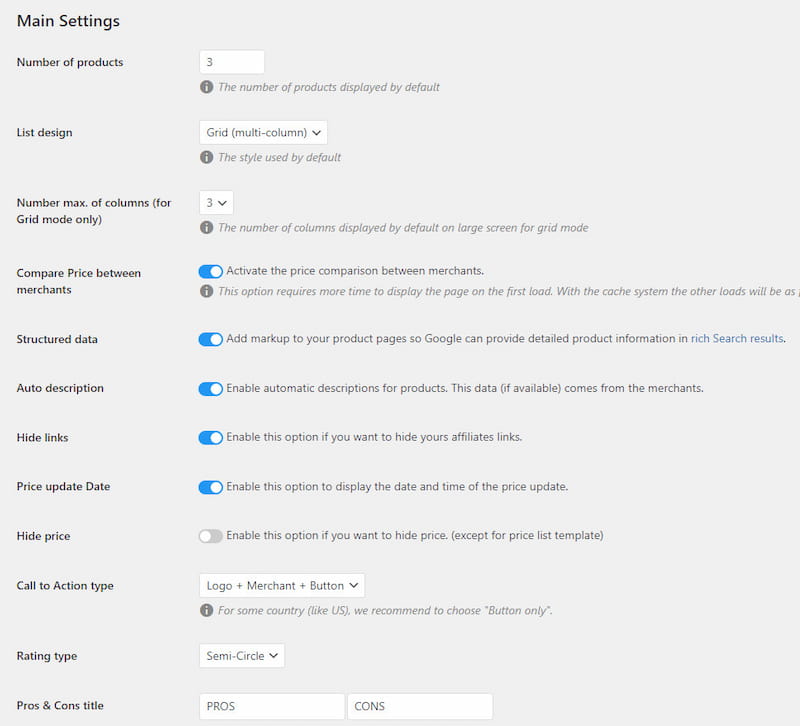
If you have a niche site, you can filter on a product category to ensure that only relevant products are displayed. You also can customize the design of the product boxes in general settings.
In addition to auto mode, you can embed a custom shortcode in a specific article or page to place more suitable products in the location of your choice. This removes the “random” products from the auto mode and replaces them with those you’ve chosen for that particular article or page.
Lastly, you can check the “custom fields” to see which keyword was found and change it if necessary to match the keyword of your choice. These options provide greater flexibility and control over the products displayed on your website.
To fully utilize Affi.ai’s features, an active Amazon API key is required. The API lets users fetch important product details such as specifications, images, and other content directly from Amazon product pages.
However, gaining access to Amazon’s API is not immediate. Amazon associates must have at least three referred sales and verified website information before being granted API access.
Fortunately, if you don’t yet have access to Amazon’s API, Affi.ai offers a non-API feature allowing you to display Amazon products automatically until your API key is activated. This means you can start using Affi.ai’s features without needing an Amazon API key.
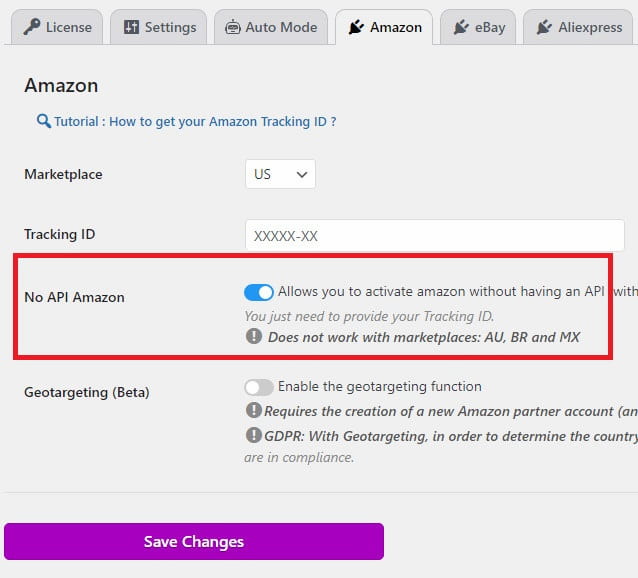
If you encounter an error message such as “Too many requests” with your Amazon API key, Affi.ai will automatically switch to the “Amazon without API” option. This ensures you can display Amazon products regardless of API access issues.
To test your Amazon API key, click the “Test your Amazon key” button in the Affi.ai plugin under the “Amazon” tab.
While the Amazon no API option is available, it does have certain limitations. For example, not all Amazon products may be available, and some product references may be missing.
Price filters, descriptions, and promotional information may not be displayed. If a product is on sale, the promotional price will be displayed, but the percentage discount will not be shown. You will need to enter UPC codes if you wish to have price comparisons using the Amazon option without API.
Furthermore, the price comparison with other merchants is not available with the ASIN search but is available when using EAN codes. Despite these limitations, the Amazon no API option is still a helpful feature that can be used when the API is unavailable or experiencing issues.
To make it easier for you to find and select the products you want, Affi AI provides a Pick & Select search mode. This feature allows you to type in a keyword, and the plugin will visually display available products with information such as photos, price, sale, and merchant.
You can select the product(s) you want, and Affi AI will automatically retrieve all relevant information from the chosen products.
Affi AI also generates price comparisons automatically for available products and merchants whenever possible. If you wish to add additional merchants, you can do so.
Additionally, you can use the Pick & Select mode in conjunction to refine your search further if needed.
You can also customize the product image (by choosing a new photo from your media library or entering the image URL).
The Affi AI dashboard tab provides an overview of all the shortcodes you have created, including the name of the post, the type of search, the products displayed, and the date of the price update.
This information helps keep track of the shortcodes and make any necessary modifications. Additionally, the summary allows you to clear the product cache, which can help improve the performance of your website.
Plugin comes in 4 pricing plans charged every year. Pricing starts at $49/ year for a single site. Each plan comes with the same features, and the only difference is in the number of sites on which you can use the plugin.
There is a 15-day money-back guarantee which is enough time to test the plugin and see if it fits your needs. There is no free version or trial mode.
Affi AI is a powerful tool that can save you time by automatically adding affiliate products to your site. With its easy setup and user-friendly interface, you can quickly create high-quality, monetizable content to engage your audience and increase revenue.
You can diversify your affiliate programs and offer visitors more relevant and practical recommendations. You can create visually appealing and SEO-friendly content with just a few clicks.
If you’re an affiliate marketer looking to enhance your website and streamline your affiliate marketing activities, then Affi.ai is the tool for you. Its range of features, user-friendly design, and customization options make it an excellent choice for affiliates in all niches.
As alternative options to Affi AI, you can check Content Egg, Lasso, Datafeedr, or Affiliate Egg.
DISCLOSURE: Posts may contain affiliate links. If you buy something through one of those links, I might get a small commission, without any extra cost to you. Read more about it here.
The trend of customized products has been on the rise and having a visual product configurator option in your store opens up various opportunities.
Allowing customers to personalize products is a great way to build customer loyalty and attract new customers. People are often looking for unique products that reflect their personalities and interests. You can appeal to a broader range of customers by offering customizable, personalized products.
Product configurators like Kickflip allows your clients to customize products themself and see what the finished product will look like, eliminating any guesswork, confusion, disappointment, or hesitation. This process is more precise, adds elements of creativity, and fun for everyone involved.
Additionally, you can charge higher prices for customized products and generate more revenue. Most customers are willing to pay extra for unique and personalized items.
When choosing a tool to offer this option to visitors, it’s essential to select one that is easy to use but still offers many features. Kickflip is an excellent choice for this purpose. This Kickflip review will go into detail about the options it provides, pricing, as well as its pros and cons.
Kickflip is the ultimate solution for businesses looking to boost sales and engagement. It’s a versatile product customizer enables you to sell any kind of custom product, from shirts, bikes, gloves to shoes, watches, and furniture.
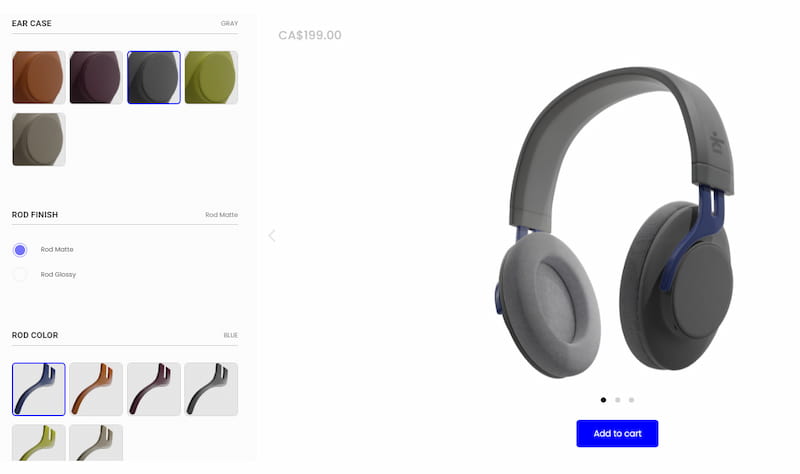
With Kickflip, you don’t need coding skills to configure products, thanks to its user-friendly interface. Kickflip includes features to build a product configurator, manage custom orders, and designs data with a Rest API. The multi-user option allows you to add users to your Kickflip account, making it easy for your team to collaborate.
The platform has many features that make creating customizable products a breeze. You can add colors, images, logos or modify pricing. You can also seamlessly integrate with popular ecommerce platforms like Shopify, WooCommerce, and PrestaShop.
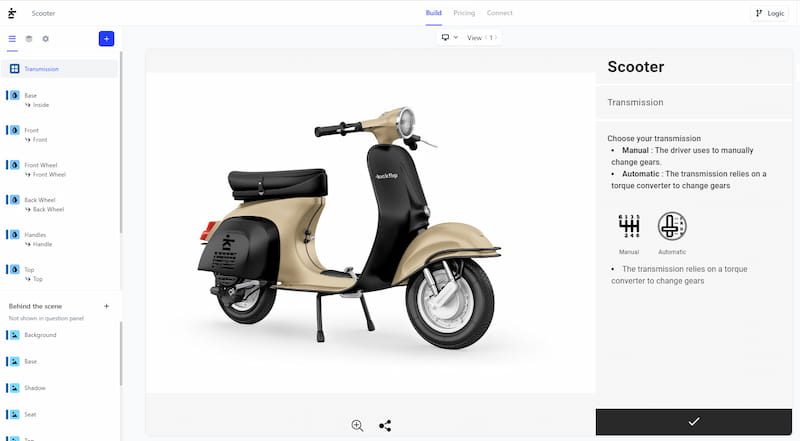
Customers can start customizing your products from a design they like thanks to design starter points feature. They can also upload product images and, apply text, select a font, size, and position. With advanced color application technologies, customers can see a real-time preview of how their choices will look on the product.
Kickflip allows you to charge more for options or addons, and the total price will be adjusted on the fly. You can also create rules to display options based on other options selected by the customer.
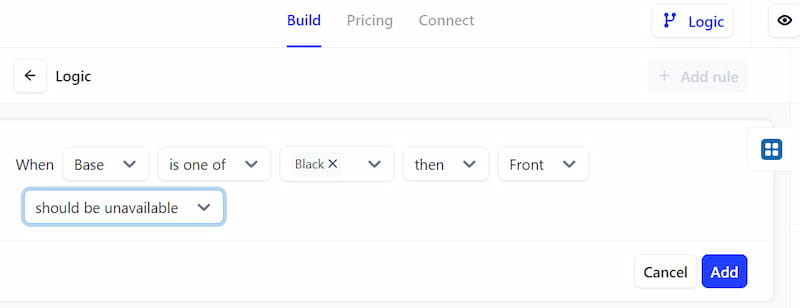
The platform can generate high-resolution, print-ready files for quick and efficient production. Customers can drag, rotate and resize texts and images within print areas and share their designs with friends on Facebook, Twitter, or Pinterest.
Kickflip is a fully hosted, cloud-based solution that uses Amazon Web Services to ensure maximum performance and stability. With a CDN of 32 data centers worldwide, it provides the fastest loading times anywhere in the world. Hosting is included, and bandwidth is unlimited at no additional cost.
In addition, you can explore a range of themes to find the perfect look and feel for your customizer. All of the themes are fully responsive and mobile-compatible.
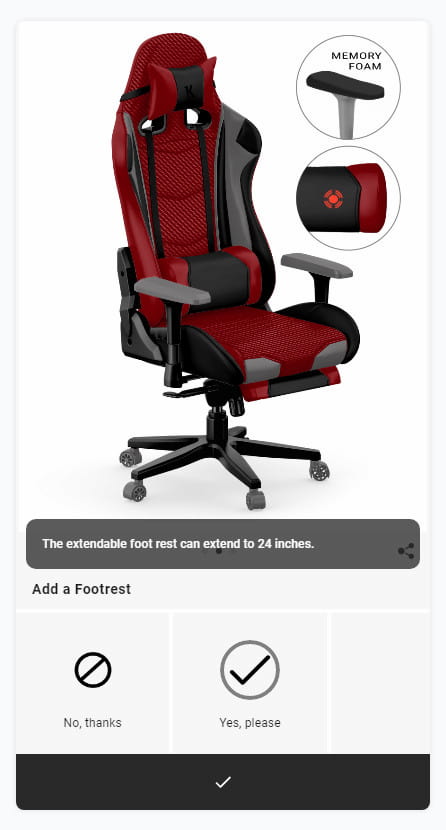
The solution is available in multiple languages and currencies to cater to a global audience and offers a white-label option for Pro, Business, and Enterprise plans, so you can use your own branding.
With Kickflip, you can easily integrate a customizable product experience into your online store. The tool offers a plugin for Shopify, WooCommerce, or PrestaShop that injects an IFrame allowing customers to begin their customization process. After completing the customization, they are redirected to your regular shopping cart to complete the transaction.
If you have a custom ecommerce website, you can also integrate Kickflip using API, which is available with the Enterprise plan.
Kickflip platform allows you to connect multiple online stores with your Kickflip account, as long as they are all on the same ecommerce platform.
When you create a new product in Kickflip, it will automatically be added to your online store.
To connect your store, simply open your Kickflip dashboard and in the Online stores section, click on + Add online store. From there, you can follow the instructions for your specific ecommerce platform.
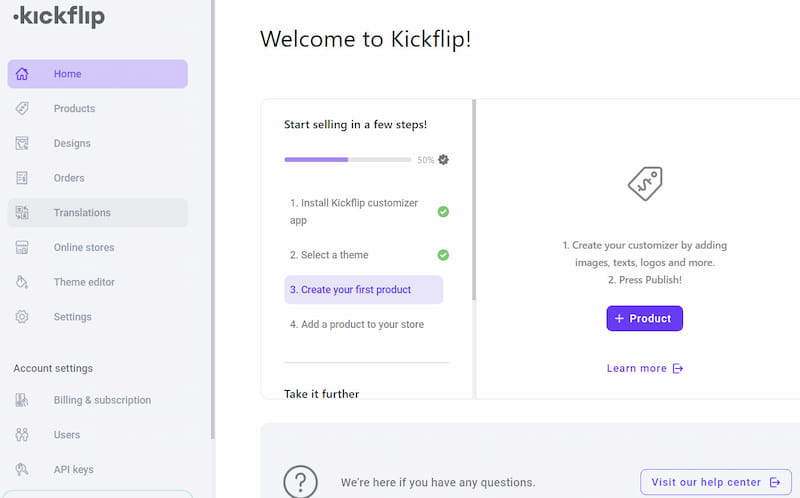
If you are on Shopify, you will be redirected to the app page on the Shopify App Store. If you are on PrestaShop, you will be redirected to the app page on the Prestashop Addons Marketplace, and if you are on WooCommerce, you will be redirected to the plugin page on the WordPress repository.
For custom ecommerce, you will be prompted to enter your online store name, URL, currency and then click on Add.
You will have to create new accounts if you wish to connect Kickflip to several stores on different platforms. They are also working on a Wix integration, which will be available soon.
When you create a new product, it is automatically added to your online store. You can use Kickflip to create any type of product which would be available for customer to customize.
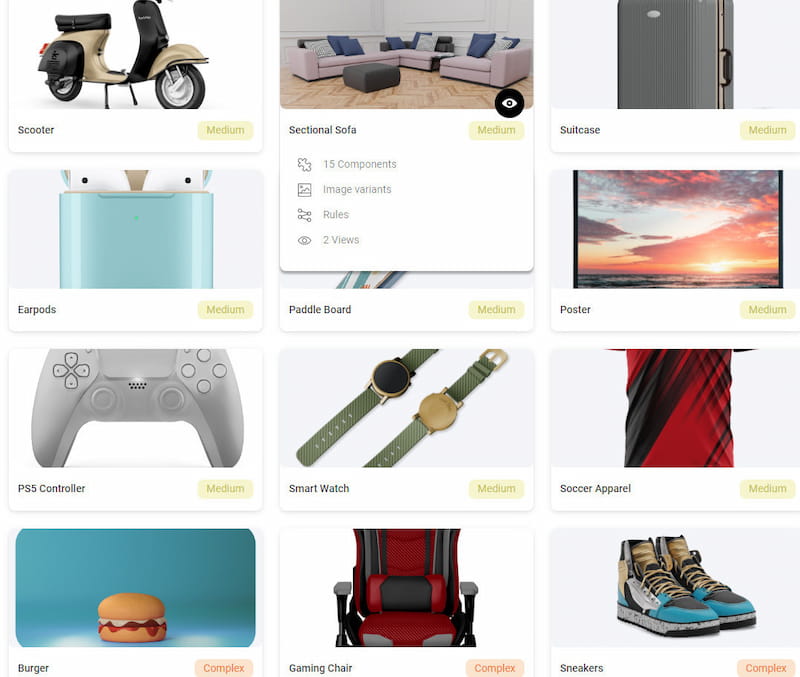
Go to the Products page in your Kickflip dashboard and click on the + Product button. This will bring you to the product builder, where you can start adding questions to your customizer. These questions will appear in the question panel and be the basis of your customer’s customization experience.
To add a new question, click on the + button in the left panel. From there, you can select the input type, which is how your customers will interact with the question, and the display type, which is the element you want to display.
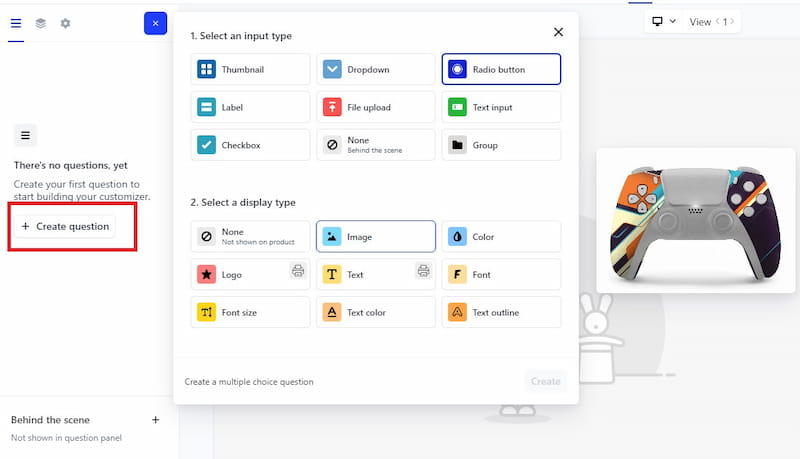
Your customers will answer these questions by selecting answers as they customize product.
Once you are satisfied with the customizer, hit the Publish button in the top right corner of the product builder. This will make your changes visible on your online store if your product is already live. If your product is not yet on your online store, hitting Publish will save your draft but not add it.
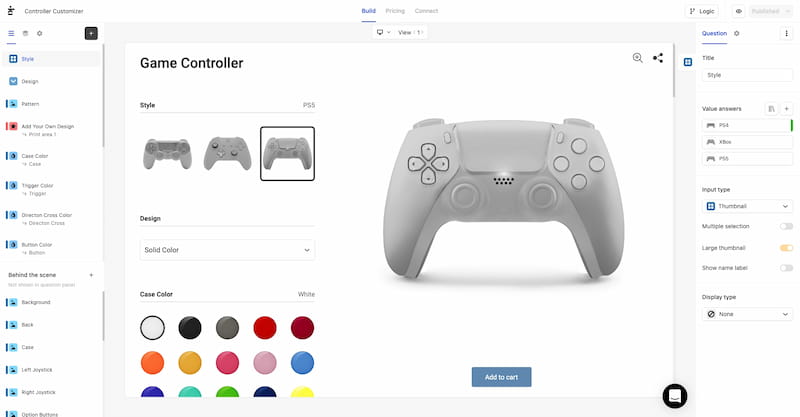
It’s important to note that for Woocommerce, Shopify, and Prestashop plugins, the customizer needs to be embedded in a product page for it to function properly. However, with a custom integration, you have the flexibility to embed the customizer anywhere on your website.
Setting the base price for your products in Kickflip is a straightforward process. The base price is the foundation cost of your product and does not include any additional fees. To set the base price, open the product you wish to set the base price for. Click on the Pricing tab, and under Base price, enter a desired base price.
In addition to setting the base price, Kickflip allows you to set extra prices. To display tax-inclusive prices on your customizer, activate the Display taxes toggle and set the tax rate.
Keep in mind that Kickflip will pass along the price without taxes to your cart, so you will need to activate taxes within your ecommerce platform for the taxes to be added correctly.
Starting Points in Kickflip are a powerful tool to help guide your customers in their customization journey. These pre-designed examples of the product serve as a base for your customers to choose from, allowing them to visualize the possibilities and make their own design choices. With the ability to add as many starting points as you wish, the possibilities are endless.
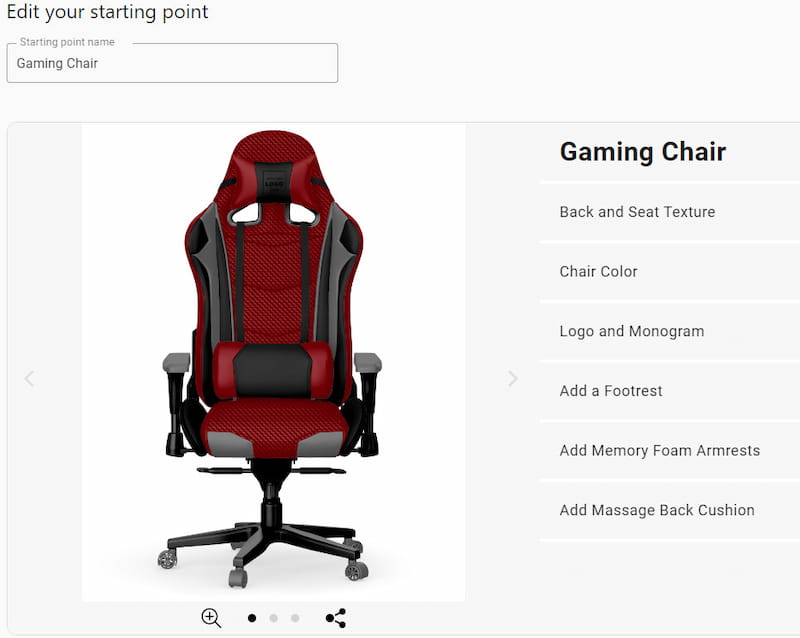
A default starting point is automatically created when you publish your product for the first time. This default starting point serves as a foundation for your customers to build upon, and it can be updated whenever you modify your product and republish it.
It’s important to note that deleting a starting point will also remove it from your online stores, and this action cannot be undone. With the ability to create multiple starting points, you can offer a wide variety of options for your customers to choose from, allowing them to truly make the product their own.
Customizing the look and feel of your customizer to align with your brand image is important, and Kickflip makes it easy to do so.
Go to the Theme Editor section in your Kickflip dashboard to access the Theme Editor. From there, you can click on Change Theme to select from two fully customizable options. If you ever change your mind, you can switch to a different theme later.
The Barebones theme is a great option for products with few questions. It has a clean and simple design that allows users to easily customize the product by scrolling through the choices.
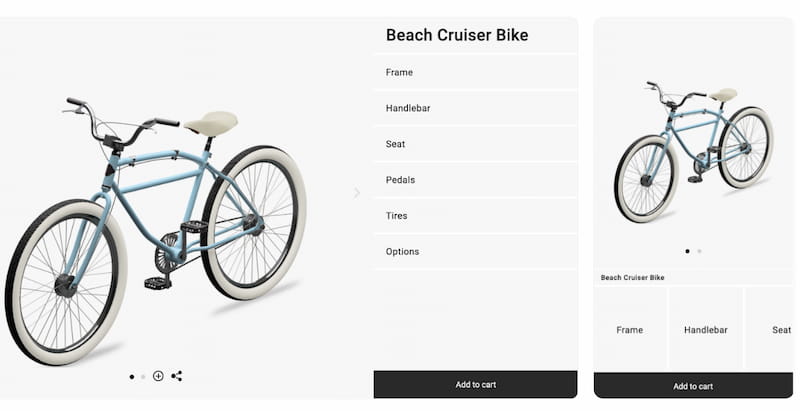
The Booklike theme is perfect for more complex products. It displays all the questions on a single page, making it easy for users to see all the options and make changes to their choices.
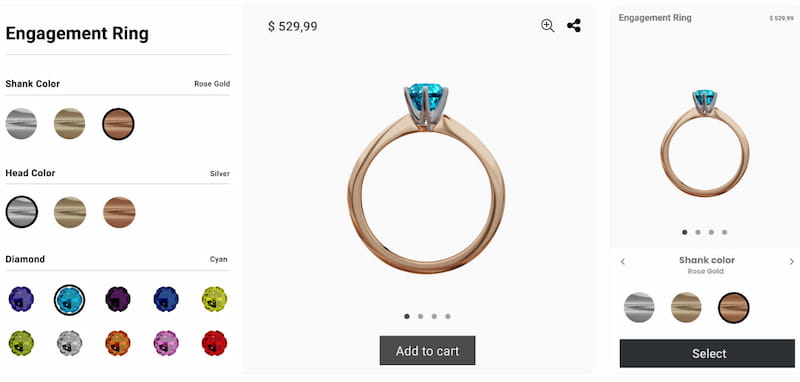
Both themes are highly customizable, allowing you to modify elements such as fonts, colors, padding, sizes and even move the Question panel to the left or right side of the screen.
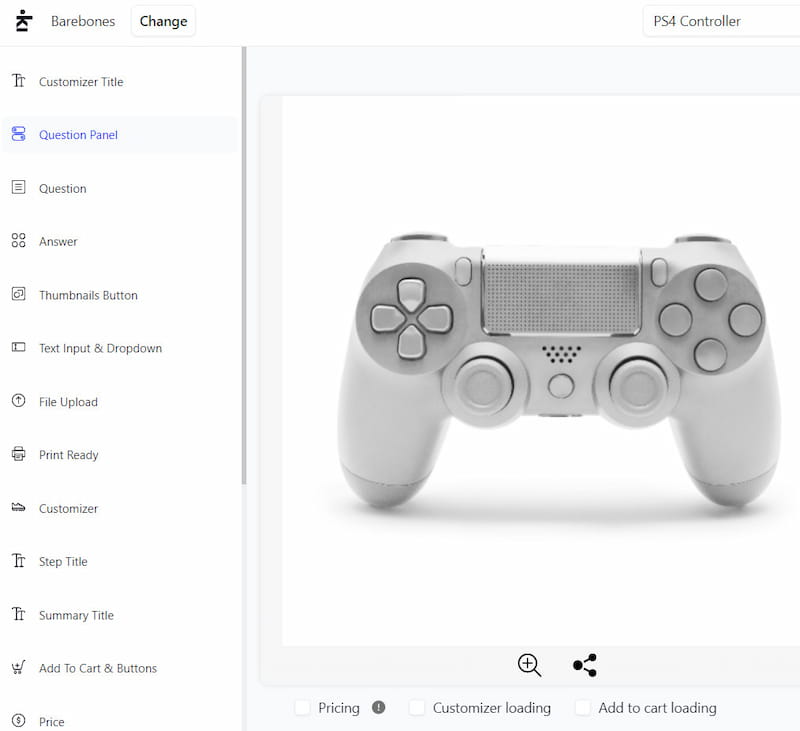
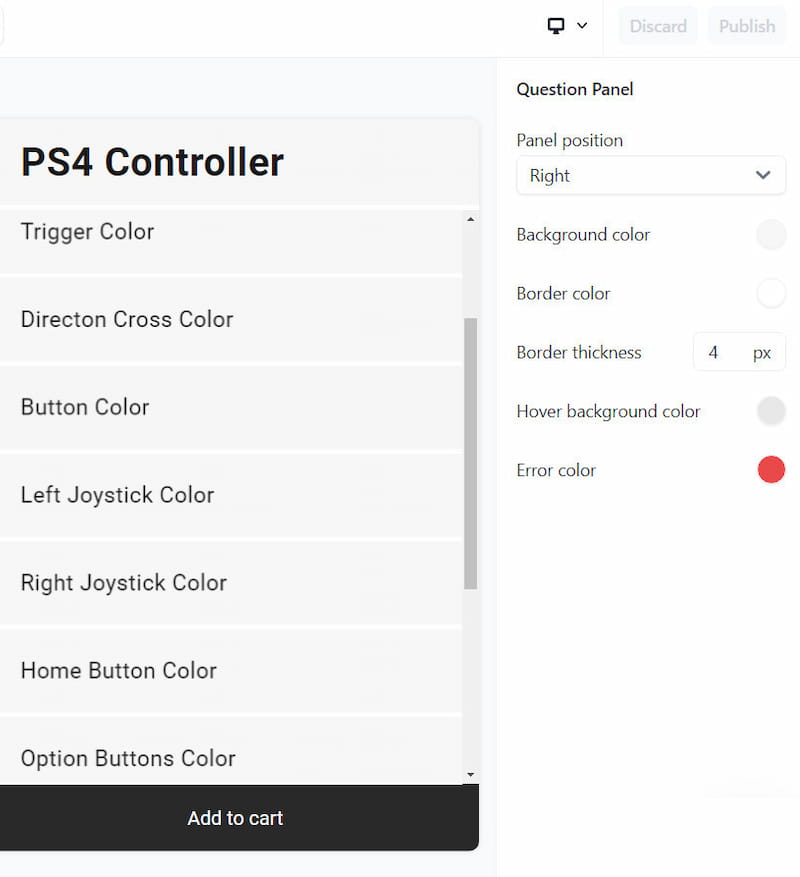
With the flexibility to customize the look and feel of your customizer, you can ensure that it aligns with your brand’s image and provides the best possible experience for your customers.
When customers complete their purchases on your customizer, the corresponding order details will be available in the Orders section of your Kickflip dashboard. This section allows you to easily view and manage all of your orders in one place.
When you click on an individual order, an order sheet displays detailed information about the purchase. This includes all of the choices made by the customer, such as materials, colors, texts, etc.
The order sheet also shows the order time and time zone, a picture of the customized product, the number of units purchased, and the total amount paid.
This information is crucial for fulfilling the order and ensuring that your customers receive the exact product they designed. The order sheet also allows you to keep track of your sales and revenue, making it easy to manage your business.
Kickflip comes in 4 pricing plans. The Essential plan is free but comes with a 2.9% transaction fee, and you can only use it for 1 product. Most people will need one of the other three plans. With Startup, Pro, and Business plan transaction fee will be 1.9%.
The Startup plan can be used for 3 products, Pro with 10 products, and the Business with an unlimited number of products. Pro and Business come with a white label feature. All plans come with unlimited transfer and storage, and payment is monthly.
There is also an Enterprise plan if you need custom integration and dedicated priority support.
With Kickflip, you can easily offer your customer’s option for creating customizable products in WooCommerce.
I can say that Kickflip is a top-notch product customizer tool that seamlessly integrates with popular ecommerce platforms such as Shopify, WooCommerce, and PrestaShop. The user interface is straightforward and requires no coding skills, making it accessible for businesses of all sizes.
With Kickflip, you can customize a wide range of products. The tool utilizes advanced and robust technologies to provide a feature-packed tool. Hosting and unlimited bandwidth are included in the package at no additional cost.
What sets Kickflip apart from the competition is the user-friendly customization interface that also works seamlessly on mobile devices. Many popular brands are already using Kickflip, and it is rapidly becoming a leader in the product customization market.
The Kickflip can be expensive as most users will want to go with Business plan, maybe Pro if you sell up to 10 products. But I doubt many store owners sell less than 10 products on their store. Also, the transaction fee is not something you usually see in this kind of products and will deter some users from using Kickflip.
Overall, Kickflip offers most features you will need to provide your customers with product customization options. There is high competition when it comes to product customizer/configurator tools, but Kickflip has nice features to distinguish itself from the competition.
As alternative options for WooCommerce, you can use WooCommerce visual product configurator plugins like Staggs product configurator, WP Configurator, etc.

DISCLOSURE: Posts may contain affiliate links. If you buy something through one of those links, I might get a small commission, without any extra cost to you. Read more about it here.

The Amazing Selling Machine (ASM) is a course that teaches how to make money online by selling on Amazon using Fulfillment by Amazon (FBA). The training focuses on building a private-label brand and selling products on Amazon.
ASM aims to be a thorough, detailed training program that will assist you in developing Amazon’s FBA business. It covers a wide range of topics, including how to find the ideal product, create effective marketing strategies, scale business, etc.
It is a very popular program, but is Amazing Selling Machine really amazing and worth the price tag and your time? In this Amazing Selling Machine review, I show all pros and cons.
IMPORTANT: You can take advantage of the 40% off Amazing Selling Machine discount even though they do not usually provide a discount code. Simply click on this link to receive a discount.
The Amazing Selling Machine consists of an 8-week online training course, a private mentoring program (including coaching calls), a global seller community, and a private resource vaultThesese features are intended to show new sellers how to build a profitable Amazon FBA business from scratch without prior experience.

By guiding you step-by-step through developing a profitable Amazon FBA business, it eliminates the hassle and uncertainty of opening your own online store.
With 50 hours of training divided into 160 video lessons, the web class is the program’s main component. The Resource Vault within ASM contains many of downloads and other resources, including spreadsheets, PDFs, tools, and stock photos.
Additionally, ASM has a community where users can connect with other sellers (members), post updates, and ask questions. The community has a number of mentors who, according to ASM, are active sellers on Amazon and willing to assist community members by responding to questions in their spare time.
Everything starts on your dashboard, which is simple to use, and it tracks your progress through the video modules.
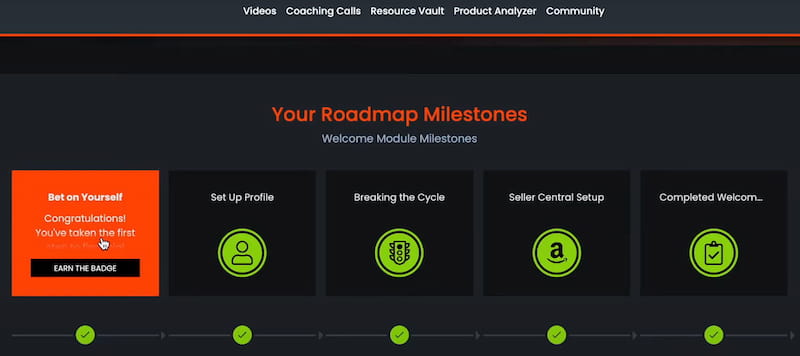
A direct but simple progress tracker called “Your roadmap milestones” is located right in the dashboard’s center. You earn badges as you progress through the course and achieve other attainable goals.
The tracker line below the milestone changes to green once you complete a module or earn a badge. Even though it might seem straightforward, it’s a great way to stay focused, stay on track, and be fully aware of where you stand.
Here is what you get with ASM.

Over 100 video lessons with insider knowledge, from choosing products to collaborating with influencers and increasing sales.
There is a team of highly successful Amazon sellers who help you build your store, answer your questions, and offer guidance on products, marketing, and store optimization.
The assurance that the advice is current and fully supported by evidence is the biggest benefit for you, aside from the wealth of knowledge. Any Amazon FBA-related question can be answered by searching Google, but there is never a guarantee that the results are accurate.
The majority of the obstacles you could face have already been overcome by someone else. You can simply ask someone who has dealt with them before for assistance rather than trying to solve them on your own.
ASM has one of the best private communities. The company refers to this as “the ultimate collection of brain power regarding to Amazon FBA, and they aren’t too far off.
Others might help you keep motivated while badges and community competitions make the typically tedious process of opening a store fun.
This is a valuable collection of tools and resources. The vault contains information for businesses like transportation providers and photographers, supplier templates, product evaluation templates, and even discounts for services that support your business expansion.
The ASM contains 8 modules + a welcome module.
This module covers the ASM dashboard, the community, and the vault in detail. Then, it offers you success guidelines that serve as the cornerstone for dominating the market with your store. After that, it guides you through Amazon Seller Central.
It guides you through locating top-selling products, deciding which product categories to consider and which to avoid, using ASM product selection criteria, and even conducting patent searches. To find the best product, you can also use tool like AMZScout.
How can you tell who a good, trustworthy supplier is? How to differentiate between a high-quality item and a piece of junk?
In addition to contact templates, instructions on calculating profit margins, and sample orders, this module also includes evaluation techniques.
This module includes the following:
This module is packed with professional branding advice, such as how to create a website, brand Facebook page, build and increase subscriber list, get product reviews, etc.
By the end of this module, you will understand exactly how to position your brand for growth.
Here, you’ll discover how to create titles that work wonders for SEO and conversions, create selling bullet points, and properly write a product description. Then it moves on to creating a well-balanced product pricing along with images and emails.
A successful product launch can mean the difference between profit and loss.
This module will guide you through a proper launch step-by-step. Included are the goals of a launch, planning, data analysis, campaign structure, review generation, price optimization, and how to increase sales.
The main topics covered here include customer service, traffic optimization, Amazon ad optimization, split testing, running promotions, etc.
This module reveals some tips that most FBA sellers overlook when expanding their businesses.
Here it is discussed how to reach more people with your brand using influencer marketing, Facebook retargeting, email list building, and positioning yourself in Google and YouTube ad space.
ASM gets updates over time so that content is not outdated. Here is what is new in version 13:
Amazing Selling Machine costs $4997, or $997 per month for six months. You will have complete access to the most recent version of the course.
Remember that before you begin selling, you’ll also need to spend money creating your product or purchasing inventory.
On their sales page, a FAQ video states that ASM students typically spend $1,200 on inventory. The training advises that you start with a $2000 budget for inventory.
The only other expenditure you’ll have to make is for Amazon ads, but according to ASM, these should be immediately profitable.
They offer a 30-day “no questions asked” 100% money-back guarantee.
There is also an additional 6-month refund policy in place under the ASM Success Agreement. They promise to refund you the full cost of the course membership and up to $5,000 of unsold inventory if you meet the requirements.
You can take advantage of the 40% off Amazing Selling Machine discount even though they do not usually provide a discount code. Simply click on this link to receive a discount.
The Amazing Selling Machine course will then be made available to you for just $2497 instead of the usual $4997. This translates into a huge 40% savings for you and a $2000 cost savings!
Here are some of AMS’s advantages and disadvantages to help you decide if Amazing Selling Machine is worth purchasing.
PROS
Here are several things to like about ASM:
CONS
A few things about the Amazing Selling Machine that might make you reconsider:
Is Amazing Selling Machine a scam? The ASM is not a scam in any way, but it is also not a get-rich-quick scheme and requires significant time and money.
But if ASM is not a scam, then why is there so much hate surrounding this course? Undoubtedly, there is a lot of hate online. People complain that it’s too expensive, and many call it a scam.
In my opinion, selling on Amazon has become much more competitive, making it harder for newcomers to succeed and build a successful business, even with the help of the Amazing Selling Machine.
Overall, the Amazon FBA business model has stagnated, and newcomers have little chance of success. Any Amazon seller who has been in business for a while will attest that FBA was less competitive five to seven years ago. Success is still possible, but it’s much harder now than it used to be.
Their approach is centered on choosing the right product in a specific niche and then improving that product in some way with your own brand.
They have undoubtedly contributed to the success of many other people, but if you are working alone without knowledge about business finances or the finer points, you shouldn’t be doing it.
They do say that, with the proper training and attention, “anyone can do this.” Though technically accurate, I believe that claim to be somewhat deceptive given that not everyone is a good candidate. You must be willing to put in the time, work diligently, dedicate yourself, etc.
You need to consider everything else in addition to the cost of the course, including website costs, product costs, subscriptions, high-quality product images, ad spend, Amazon fees, etc.
You must comprehend cash flow, cost of goods sold, and the difference between true profit and simply sales. Additionally, you need to be passionate about your business and have a “don’t quit” attitude when you don’t get results immediately.
During crucial phases of the Amazon business, such as running Amazon PPC ads to obtain product reviews and improve rankings, the Amazing Selling Machine course is lacking in detail and real-world examples. For these paid advertisements, they provided a step-by-step setup guide but no illustrations of actual, successful campaigns.
I have put together a list of the leading causes of ASM failures after reading many of the issues students were posting in the ASM forum.
ASM sales pages frequently give the impression that you can launch an Amazon FBA business for $5000 or less. There isn’t much left over for marketing, only enough to order inventory.
But the first step in winning is launching your product. Then to gather customer reviews, you must spend money on PPC campaigns to generate sales.
Without customer feedback, your product listing will not rank, and without rankings, you are without a business. Running PPC involves a learning curve and requires financial investment before it is optimized.
Due to an increase in suppliers and brands listing their own products, Amazon FBA has grown considerably more competitive, which results in lower profit margins for all third-party sellers.
There is no guarantee that just a few successful products will generate a fantastic income, and there is no assurance that those products will remain profitable over the long term either.
Choosing the right product can be difficult. Especially when you need to ensure that your product’s profit margins and sales volume are appropriate. Picking a product shouldn’t be based on your interests, either. Choose a product that, at the very least, has the appropriate metrics.
Students are instructed to contact various vendors after selecting a product with the appropriate metrics. One of the frequent errors is to skimp on this step and only contact a few suppliers.
The students who get the best deals contact around 10 to 30 suppliers or more. To see how they respond to your inquiries and perhaps customize your product, you should also order samples from them.
Do they respond quickly? Do they accommodate your special requests? Are you pleased with the samples’ quality?
It’s essential to have a great supplier who produces high-quality goods. You can follow every step, but if your product is poor quality and receives bad reviews, there is no coming back from that.
Most sellers will go through a number of learning curve stages, which could take an entire year. There are numerous factors (some of which are sometimes beyond your control) that can cause your Amazon FBA business to fail, so the students who actually persevered for the entire year are the ones who have the best chance of making it work.
The worst thing you can do is to have unreasonably high standards and lose patience when mistakes are made, or a task takes longer than you anticipated. In the world of Amazon FBA, patience is crucial. If you have the money, it makes sense to launch several products at once so that you aren’t dependent on just one.
Here are some alternatives to consider if you are not sure if ASM is the right choice for you:
|
|

DISCLOSURE: Posts may contain affiliate links. If you buy something through one of those links, I might get a small commission, without any extra cost to you. Read more about it here.
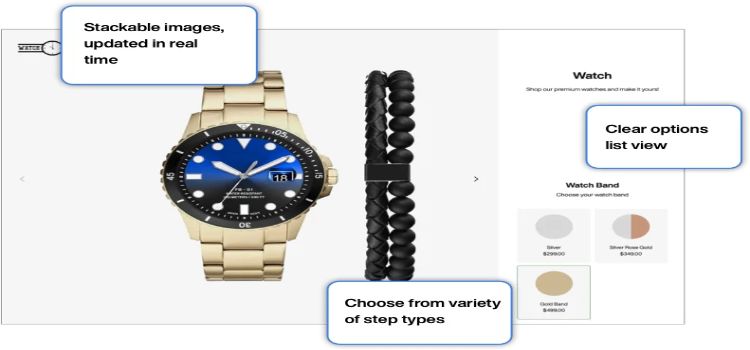
In recent years, there has been an increase in the popularity of customized goods. Consumers often seek distinctive goods that reflect their personalities and interests. This is why having a good WordPress product configurator plugin like Staggs is crucial.
With the help of this plugin, you can turn your standard product pages into product configurators/customizers. It includes a stacking system that lets you carefully plan the steps for the best user experience.
A new component of the product is added with each step until the product is finished. The basic idea behind this configurator is very straightforward – divide your product into parts that can be customized, then let the customer customize it as desired.
The Staggs Product Configurator has an entirely responsive and modern design. This configurator is among the best ones available.

Allow your customers to truly interact with the product configurator by including images and backgrounds. The Staggs Product Configurator is applicable to all products.
Features:
Additional features are available to premium users, including conditional steps, stock management, and support for multiple product image views.
Staggs provides a selection of up to 6 different step types. The idea is to create an image for each possible step variation. In essence, you are cutting the product into different pieces. When all the parts are put together, the finished product is displayed.
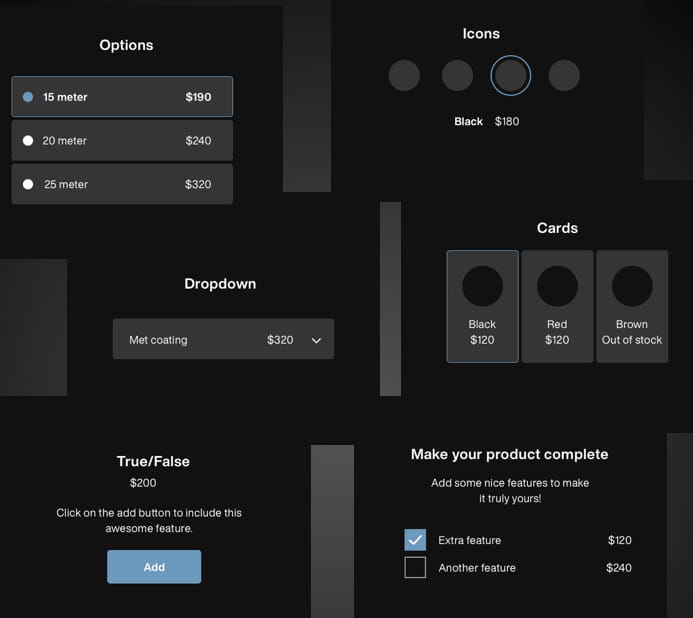
Depending on what you are selling, this can be anything from a color change to adding a new component.
You can upload transparent images of the product parts that change, which is a better option than creating all the product variation images. The configurator will stack the images on top of each other, resulting in a combined image.
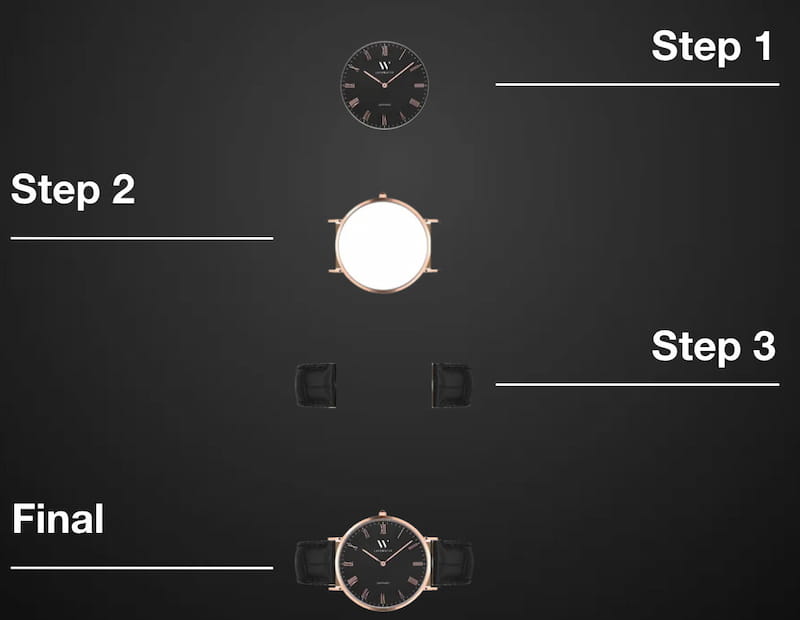
It’s important to keep all of your images for the configurator at the same size. If not, the final product might not be correctly displayed.
The configurator’s product items can be created once all of the images have been created. With all in place, you can then start creating the product groups.
The product import and export tool enables batch import and export of product items and groups for the configurator (included with the premium version).
The only remaining step in the configurator process then is to build the actual configurator and connect the product groups.
Choose “New product item” in the left Staggs menu to create a configurable product. To achieve the desired outcome, a user must first identify configurable product parts and gather/generate images for each product part variation.
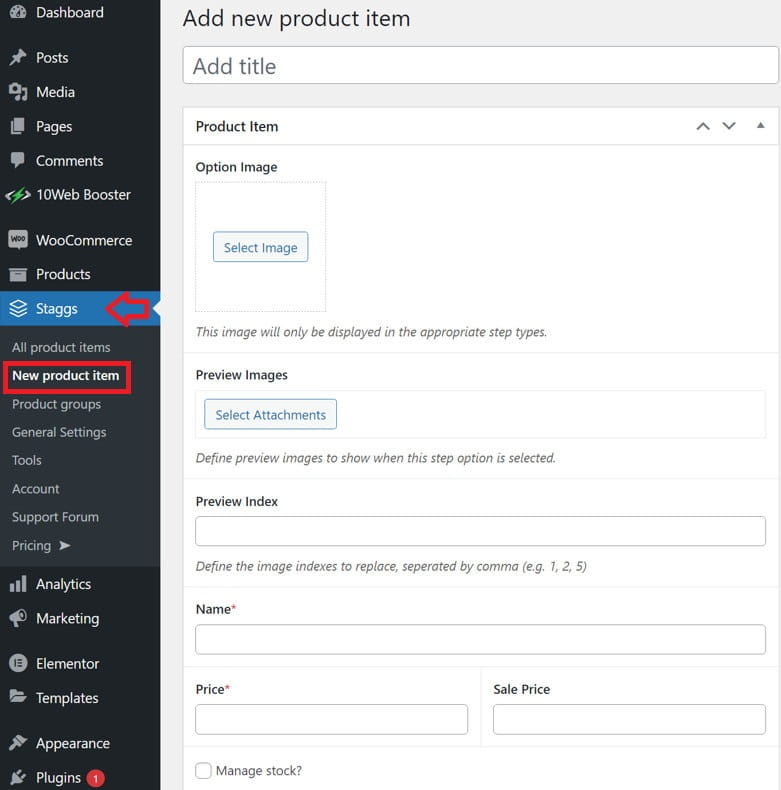
If you choose image stacking, you must ensure the image components are correctly aligned. You need to keep a constant frame for each component position to accomplish that.
There are several fields to fill in for each product item:
Once the product items are in place, you can begin combining them into steps by choosing the “Product groups” option from the right menu.
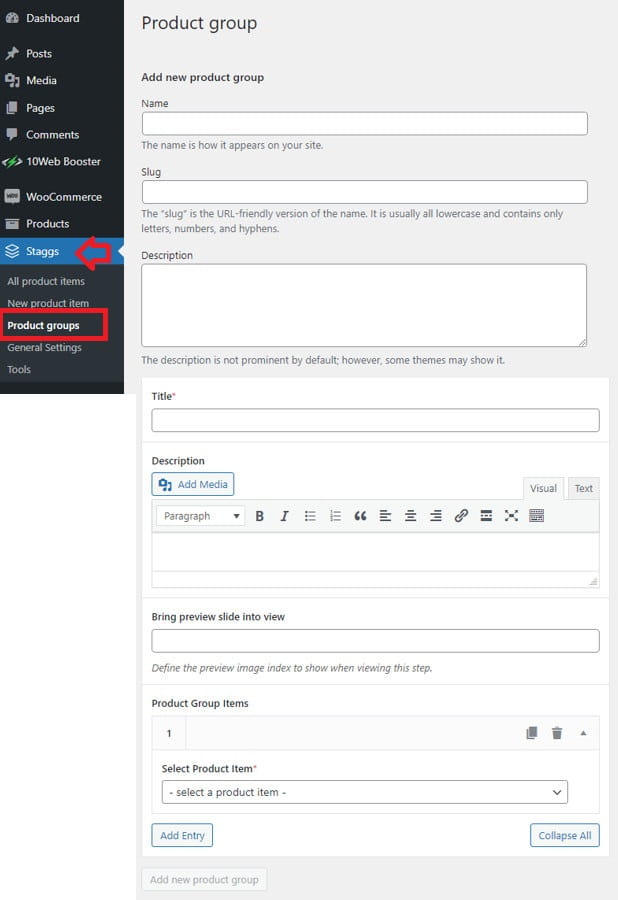
The last step is to build the WooCommerce product and incorporate the created product groups into the configurator steps.
You must select the “Enable configurator” checkbox for that product under WooCommerce products if you want to show the configurator.
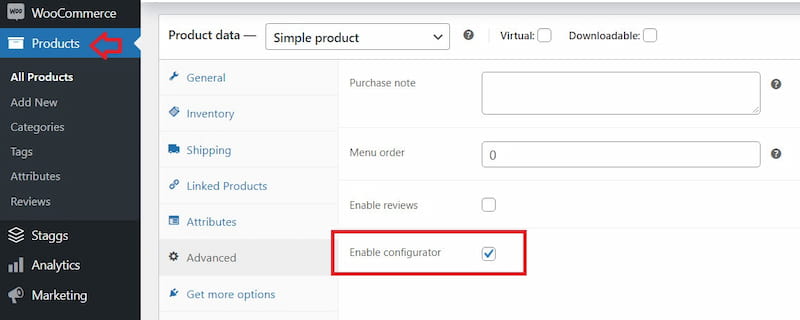
You can customize the configurator once it is enabled. Decide whether you want the preview to appear on the left or right, set the theme (light or dark), set an accent color, and even set the company logo and configurator background image.
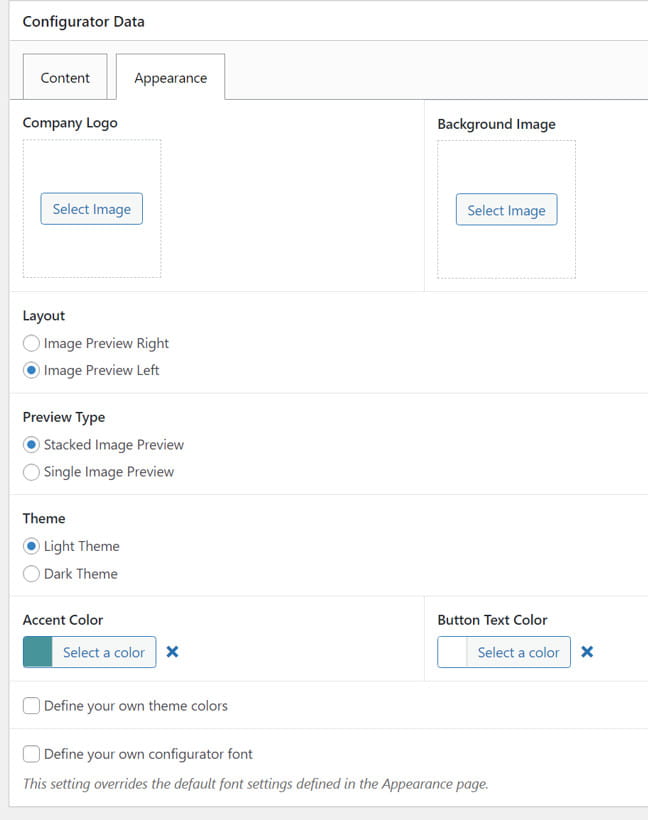
Instead of choosing a light or dark theme, you can also create your own color scheme. However, that is only accessible in the paid version.
Under Content tab, the product groups can be added as steps. The type of entry can be selected when adding a new entry. Options are true/false, dropdowns, tickboxes, cards, and icons (only in the pro version will all be available).
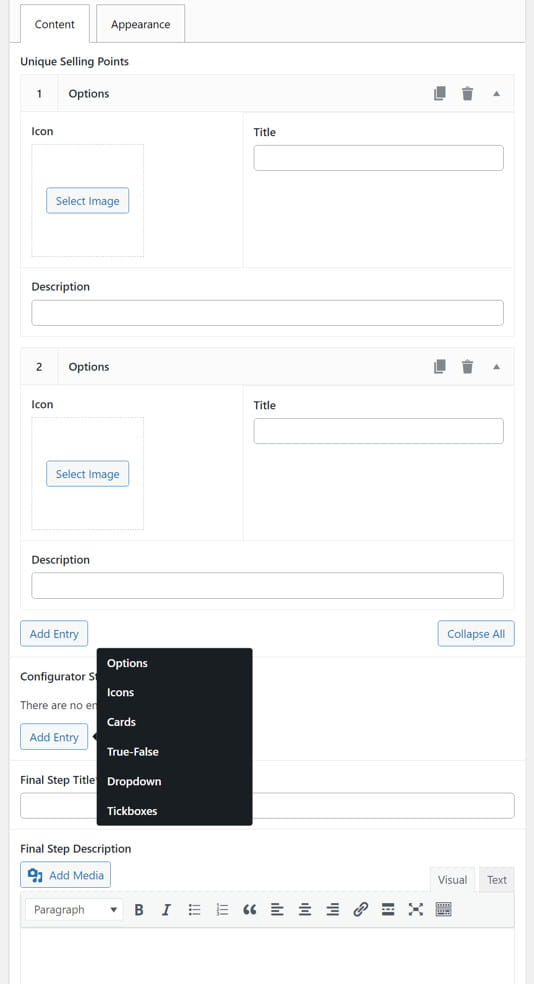
If you have the premium version, you can conditionally display steps based on the outcome of a previous step. This enables you to limit users’ options based on a particular configuration.
For the customer, the process is straightforward. The customer scrolls, then chooses, and finally makes a purchase. The customer can configure everything and choose the options he wants while scrolling. You can check demo to see how it looks.
The product preview image will be updated automatically whenever a customer changes a product option if a preview has been configured. But a preview doesn’t need to be set up. In that case, the image won’t change.
Customers can preview the finished product with all the options they have chosen once the item has been added to the cart. This avoids a great deal of customer confusion and significantly lowers cart abandonment.
The Staggs configurator works excellently on mobile devices, so no matter what devices visitors use, they will be able to use the product configurator without the issue.
The plugin comes in a free and paid version. Paid plans are Essential and Professional. Free version is somewhat limiting. You will need to buy one of the paid plans for any serious options.
Unfortunately, paid plans only come as monthly pricing, which means you will need to pay each month either $29.99 for the Essential plan or $49.99/per month for the Professional plan, which is a little expensive. Also, there is nowhere mentioned if that is for 1 site usage or more.
The difference between the Essential and Professional plan is in the number of available step types, and the Professional plan comes with additional features like multiple image views, scroll images into view, and conditional step display. So if you want to offer serious product configurator options to customers, you will need to buy a Professional plan.
WooCommerce requires the installation of an additional plugin for users to create configurable products. These plugins are referred to as “product configurators” or “product customizers.”
But do not confuse the WooCommerce visual product configurator (which is merely a visual stylization of products) with WooCommerce composite products (which are for assembling multiple product parts into a single unit) or with WooCommerce custom product boxes.
Offering customization separates you from your competitors and helps to increase brand recognition and awareness, which leads to higher sales.
Customers are willing to pay more for personalized items, which boosts sales for your online store. Most customers are willing to pay more for unique, tailored goods that match their personal styles.
You can even use the print on demand WooCommerce plugin to integrate with options like Printify and delegate the responsibility for item creation, packaging, shipping, and other related tasks.
The Staggs product configurator is built up of product items, groups, and step types.
When creating a new product, you can activate the product configurator for that product. When you check the mark, the product single page will transform into a product configurator.
The only thing left to do is connect the product groups to the product configurator. Based on your pricing plan, you will be able to choose 2, 4, or 6 step types. How your step options are displayed in the product configurator depends on the step type.
You can even go a step further and configure conditional logic in steps. But be noted that this feature is only available for users on the Professional plan.
Although it might sound complicated, Staggs is a straightforward product configurator tool with all the features you will need.
You can always install the free version and test it. If you need more features, you can buy one of the available paid plans.

DISCLOSURE: Posts may contain affiliate links. If you buy something through one of those links, I might get a small commission, without any extra cost to you. Read more about it here.

With the exponential rise of online activities, content writing and marketing have surged in popularity. And now hundreds of thousands of people around the globe are involved with this kickass profession. To assist content writers in accomplishing their job, AI content assistants have come to the fore.
AI technology has already revolutionized nearly every industry or sector of businesses, be it automotive, advertising, healthcare, cybersecurity, IT, CRM, or R&D. If AI can transform some of these billion-dollar industries, it can no doubt do wonders in content writing and marketing too.
A host of AI-powered tools are at your disposal. But all of them don’t deliver what they promise. Recently, a WordPress AI assistant called GetGenie was released, creating a buzz. This WordPress AI tool has promised tons of features and benefits that users can receive.
In this GetGenie review write-up, we will closely look at the WordPress-based AI tool GetGenie and dive deep into its features, pros and cons, and price.
Based on my first-hand experience, GetGenie is a majestic WordPress AI content assistant in one word. Whether writing short copies or long-form content, this WordPress AI plugin can execute all types of content. You can even get your content search engine optimized with this breathtaking tool.
GetGenie also boasts 30+ templates that you can utilize to generate different sorts of content for your personal and professional projects. The best part of GetGenie? It produces content in a readable, fathomable, and palatable manner.
GetGenie comes packed with a wealth of features that can streamline your content and copy. It has the ability not just to level up your content but also to make it SEO-friendly. Among the many features, let me introduce you to the most significant ones.
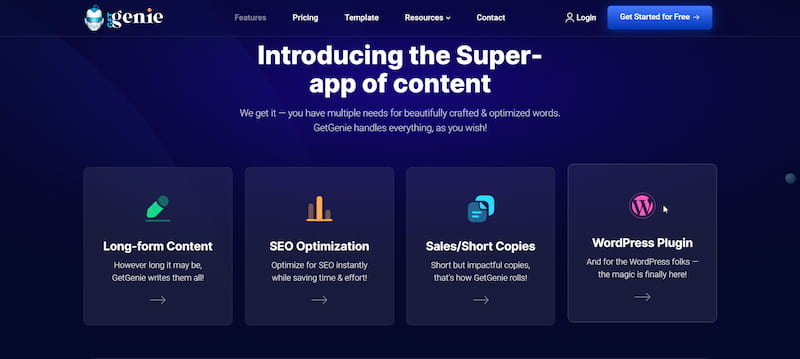
One of the robust features that GetGenie offers is blog post writing with a blog wizard. GetGenie can write an entire blog post in a matter of minutes. All it requires are a couple of inputs, and the job is done.
You just have to provide a focus keyword on your topic. GetGenie will generate the title, intro, and blog outline sequentially. Once these segments of your blog post are generated, it’s a matter of a few minutes for GetGenie to create your blog post.
(Use mouse right click and select “open image in new tab” to see full screen.)
Not just that, you can even rewrite and modify different sections of your WordPress blog post with GetGenie’s rich features.
GetGenie also has the magic to write absorbing product ad copies for your website. Like landing page copies, GetGenie applies copywriting models like AIDA, PAS, etc., for generating product ad copies.
Tagline is a salient text to catch the attention of prospects. Once visitors land on a website, a tagline plays a vital role in keeping them glued to the site. But that happens when the tagline is compelling and thought-provoking.
GetGenie has the magical power to generate arresting taglines for your brand, products, or services.
One of the robust ways of converting the target audience is through social media copy. But for that, you need engaging social media copies. GetGenie can output stellar and palatable copies for all the social media channels based on a brief product description.
The core purpose of a landing page is to make conversions. And for that, you need conversion-friendly copies. GetGenie can write killer as well as conversion-friendly landing page copies for your website.
It applies different prominent copywriting models or frameworks, like AIDA, BAB, PAS, etc., for copy generation.
If social media copywriting is a robust way of converting your target audience, email writing or email copywriting is an effective way for your outreach campaigns. And the good thing is that GetGenie can write imposing emails for your business.
Both sentence and paragraph rewriting are breathtaking features of GetGenie. Utilizing the Sentence Rewriting feature, users can get a rephrased version of a sentence without any tweaks to the meaning.
Likewise, the Paragraph Rewriting feature can bring out an entirely new paragraph, keeping a paragraph’s essence and meaning.
Feature-Benefit is a pretty useful and hook-grabbing feature of GetGenie. This nifty feature works by users inputting product features to GeGenie. In return, they will get the benefits and perks of the product.
Paragraph Compression works by cutting down a long paragraph into a short one without altering the meaning. This makes the paragraph easier and more digestible to the readers.
On the contrary, the Paragraph Answer feature of GetGenie generates a paragraph-long answer to a factual and informative question.
GetGenie comes with a framework and model feature. The AI Content tool is designed in such a way that it can generate framework-based copies. Currently, GetGenie offers several framework features, including AIDA, BAB, and PAS. Each of these frameworks has a particular pattern.
For example, the AIDA (Attention-Interest-Desire-Action) framework initially grabs attention, piques interest, creates desire, and persuades people to take action.
Writing content or copy isn’t the end of content creation or copy creation. Rather, your content needs to be SEO-friendly. GetGenie has a keyword suggestion or keyword analysis feature packed with metrics like search volume, CPC, keyword difficulty, and many more.
GetGenie doesn’t stall at just providing keyword suggestions. Rather also provides you with a Content Score to improve your on-page factors to improve. It will suggest you a list of points, including the number of words, headings, paragraphs, and images.
This saves you time and minimizes your effort and energy in SEO optimization.
Now comes the SERP analysis part of GetGenie. Once the keyword analysis part is done, it will showcase a list of competitors as part of the SERP analysis.
Not just the website names of the competitors but even the website URLs will show up, letting you visit their sites right away.
Another smashing feature that comes with GetGenie is “Questions Asked.” These questions are mainly related to the keyword you provided to GetGenie at the beginning.
GetGenie fetches the related question asked by people on forums like Quora and Reddit.
I have already mentioned above that GetGenie comes with 30+ templates. And these templates, no doubt, were designed to facilitate the process of your content creation.
Let’s take a glance at some of the core GetGenie templates:
|
|
Well, In my opinion, GetGenie has the charm and some stand-out features that set it apart from other WordPress AI content assistants. Wondering how? Let’s take a look-
Based on the above narrative, you have already comprehended that GetGenie serves multiple purposes simultaneously. Right from writing top-hole content, it optimizes content by providing keyword suggestions and a live score.
Besides, it also targets your competitors based on the focus keyword you provide. It then aims to beat the competitors by conducting an in-depth analysis of the backlinks, traffic, and other relevant data.
The core purpose of GetGenie is generating top-grade content, and in my view, it has passed the test. Not only has it passed the test, but it also exceeds other AI content tools with some of its game-changing features.
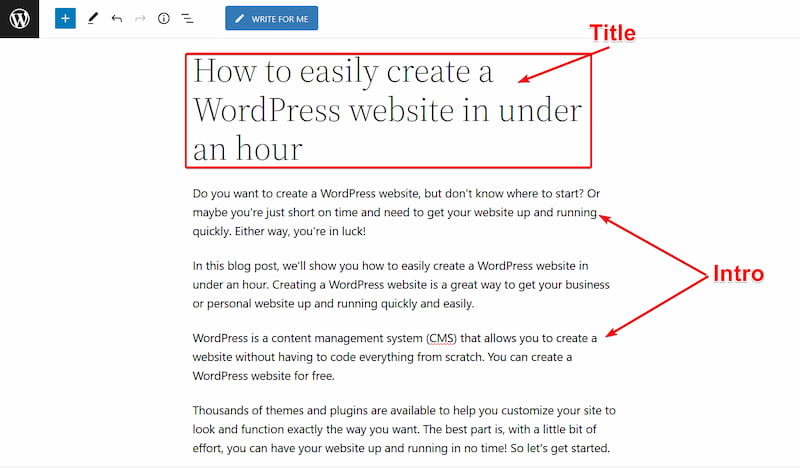
No product is perfect. So here are some advantages and disadvantages of GetGenie:
PROS:
CONS:
Based on our first-hand experience, we have pinpointed GetGenie covering all the minute details. Given the features, benefits, and price, I reckon it can be your marketing campaign’s go-to WordPress AI tool.
Now, it’s up to you to decide whether you should go for GetGenie. In our view, you can opt for WordPress-based GetGenie and let your content rank, attract, and convert visitors into paying customers.
If you choose GetGenie to get your marketing content and copies written, you can start with its free version. Once you are pleased with its performance, go for the pro version. Hopefully, you will have a smooth experience with GetGenie, an all-in-one WordPress AI content assistant.
If GetGenie is not what you are looking for, you can check Jasper, Anyword, SEO Content Machine, Article Forge, and Kontent Machine as alternative options.

DISCLOSURE: Posts may contain affiliate links. If you buy something through one of those links, I might get a small commission, without any extra cost to you. Read more about it here.